Rear Shock Absorber
Suspension
COMPONENTS
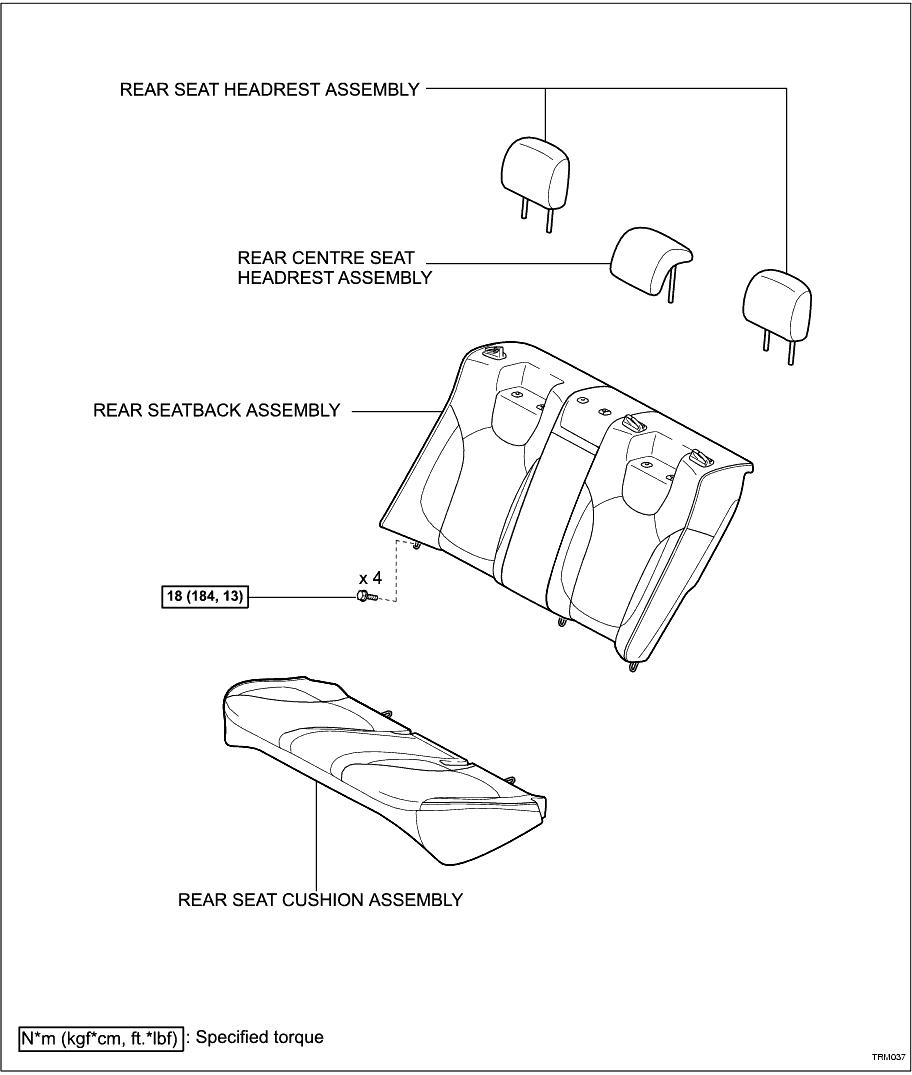
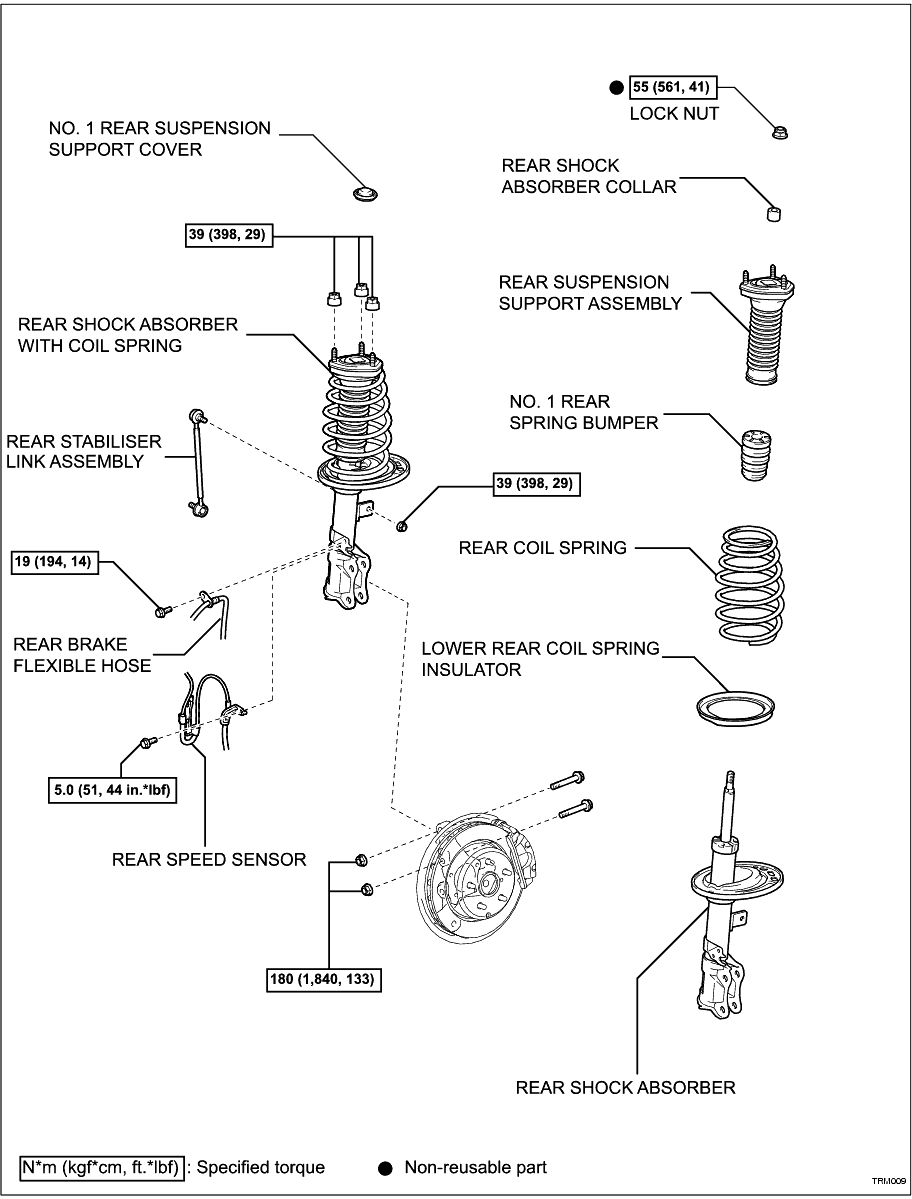
REMOVAL
HINT:
• Use the same procedures for the RH side and the LH side.
• The procedures listed below are for the LH side.
1. REMOVE REAR SEAT CUSHION ASSEMBLY (
Click Here
)
2. REMOVE REAR SEAT HEADREST ASSEMBLY
3. REMOVE REAR CENTRE SEAT HEADREST ASSEMBLY
4. REMOVE REAR SEATBACK ASSEMBLY (
Click Here
)
5. REMOVE REAR WHEEL
6. DISCONNECT REAR STABILISER LINK ASSEMBLY
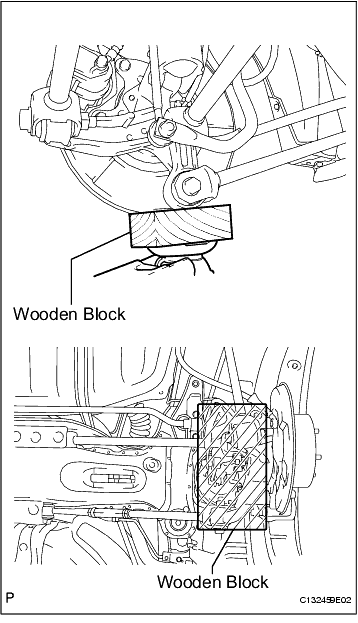
(a) Support the rear axle carrier with a jack.
-
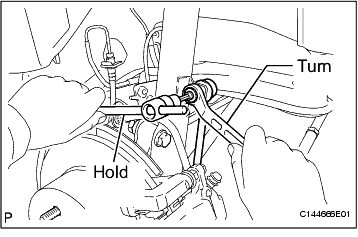
(b) Remove the nut and disconnect the rear stabiliser link assembly from the rear shock absorber.
HINT:
If the ball joint turns together with the nut, use a hexagon wrench (5 mm) to hold the stud.
-
7. DISCONNECT REAR SPEED SENSOR
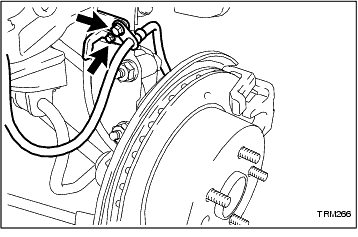
(a) Remove the 2 bolts, and disconnect the rear brake flexible hose and rear speed sensor from the rear shock absorber with coil spring.
NOTICE:
Remove the rear speed sensor from the rear shock absorber with coil spring.
-
8. REMOVE NO. 1 REAR SUSPENSION SUPPORT COVER
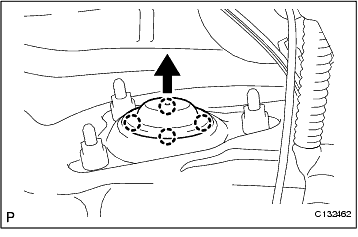
(a) Using a screwdriver, disengage the 4 claws and remove the No. 1 rear suspension support cover.
-
9. REMOVE REAR SHOCK ABSORBER WITH COIL SPRING
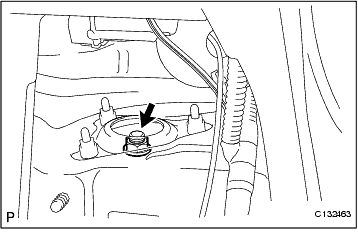
(a) Loosen the lock nut of the rear shock absorber with coil spring.
NOTICE:
• Do not remove the lock nut.
• Only loosen the nut when disassembling the rear shock absorber with coil spring.
-
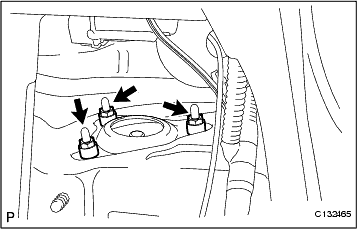
(b) Remove the 3 nuts on the upper side of the rear shock absorber with coil spring.
-
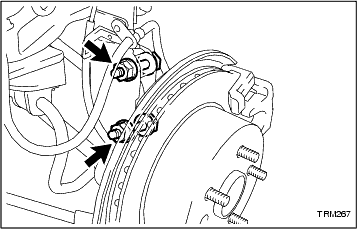
(c) Remove the 2 nuts on the lower side of the rear shock absorber with coil spring.
NOTICE:
• When removing the nuts, keep the bolts from rotating.
• Keep one bolt inserted to secure the hub and disc rotor.
-
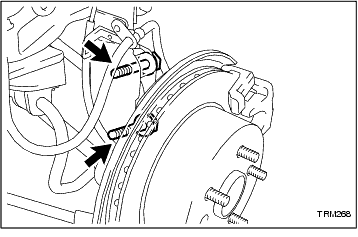
(d) Lower the rear axle carrier, and remove the 2 bolts on the lower side of the rear shock absorber with coil spring.
NOTICE:
Ensure the rear speed sensor is disconnected from the rear shock absorber with coil spring.
-
DISASSEMBLY
1. SECURE REAR SHOCK ABSORBER WITH COIL SPRING
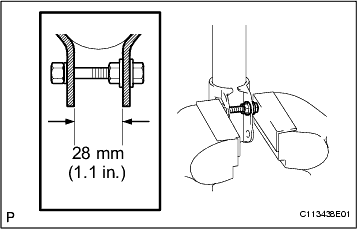
(a) As shown in the illustration, secure the rear shock absorber with coil spring in a vice using aluminum plates by closing the vice onto the double nutted bolt affixed to the bracket at the bottom of the absorber.
-
2. REMOVE REAR SHOCK ABSORBER
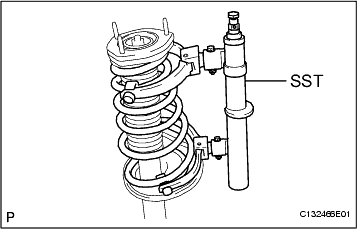
(a) Using SST, compress the rear coil spring.
SST
09727-30021
(09727-00010
09727-00021
09727-00031)
NOTICE:
Do not use an impact wrench.
HINT:
If the front coil spring is compressed at an angle, using 2 SST will make the work easier.
-
(b) Remove the lock nut.
-
(c) Remove the rear shock absorber collar and rear suspension support assembly.
-
(d) Remove the rear coil spring, No. 1 rear spring bumper, and lower rear coil spring insulator.
-
INSPECTION
1. INSPECT REAR SHOCK ABSORBER
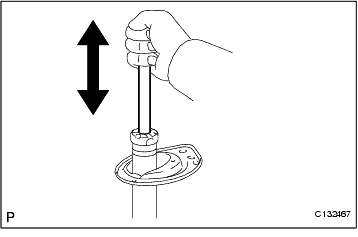
(a) Compress and extend the shock absorber rod 4 or more times.
Standard:
There is no abnormal resistance or sound and operation resistance is normal.
HINT:
If there is any abnormality, replace the rear shock absorber with a new one.
-
REASSEMBLY
1. INSTALL REAR SHOCK ABSORBER
(a) Install the No. 1 rear spring bumper to the piston rod.
-
(b) Install the lower rear coil spring insulator onto the rear shock absorber.
-
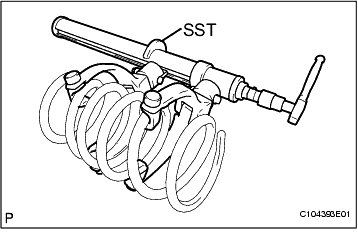
(c) Using SST, compress the rear coil spring.
SST
09727-30021
(09727-00010
09727-00021
09727-00031)
NOTICE:
Do not use an impact wrench.
-
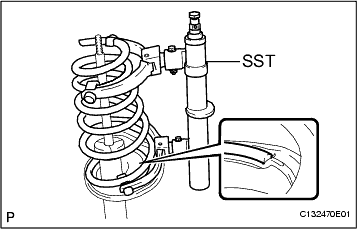
(d) Install the rear coil spring to the rear shock absorber.
NOTICE:
The smaller diameter end must face upward.
HINT:
• Fit the lower end of the rear coil spring into the gap of the lower seat.
• If the front coil spring is compressed at an angle, using 2 SST will make the work easier.
-
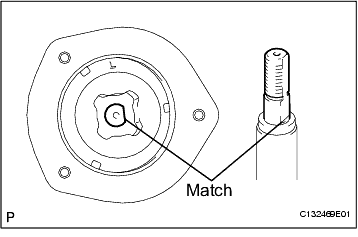
(e) Install the rear suspension support assembly.
NOTICE:
Align the notches of the piston rod and the rear suspension support assembly as shown in the illustration before installing the rear suspension support assembly.
-
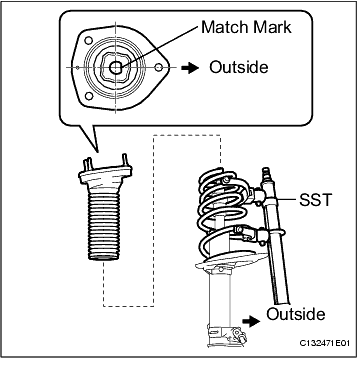
(f) Align the notches of the shock absorber with the notch of the rear suspension support assembly so the notches face the outside of the vehicle.
-
(g) Install the rear shock absorber collar.
-
(h) Loosely tighten a new lock nut to the rear suspension piston rod.
-
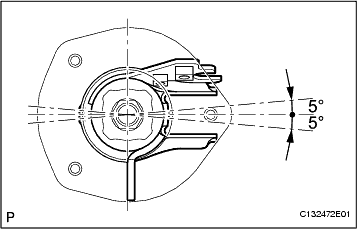
(i) Release the spring while adjusting the rear suspension support assembly to the position shown in the illustration, and remove the SST from the rear coil spring.
NOTICE:
Do not use an impact wrench.
HINT:
When aligning the rear suspension support assembly's stud bolts at the middle point between the two sides of the bracket, the maximum permissible degree of error is +-5?.
-
INSTALLATION
1. INSTALL REAR SHOCK ABSORBER WITH COIL SPRING
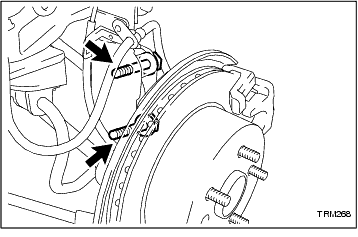
(a) Install the rear shock absorber with coil spring to the rear axle carrier assembly and insert the 2 bolts from the rear of the vehicle.
-
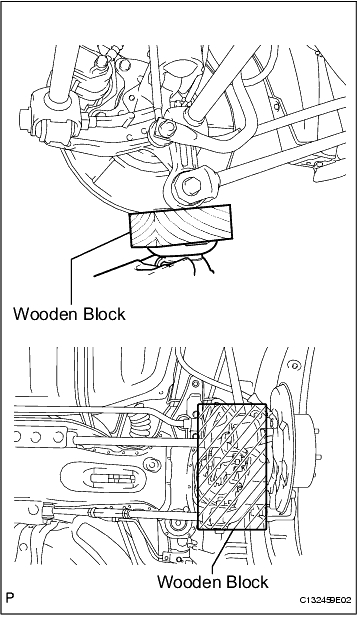
(b) Slowly jack up the vehicle using a wooden block and install the rear shock absorber with coil spring (upper side) to the vehicle.
-
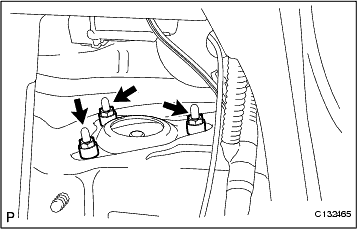
(c) Install the 3 nuts to the upper side of the rear shock absorber with coil spring.
Torque:
39 N*m
(398 kgf*cm,
29 ft.*lbf)
-
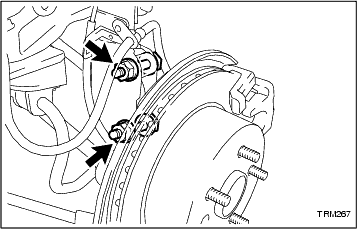
(d) Install the 2 nuts to the lower side of the rear shock absorber with coil spring.
Torque:
180 N*m
(1,840 kgf*cm,
133 ft.*lbf)
NOTICE:
When installing the nuts, keep the bolts from rotating.
-
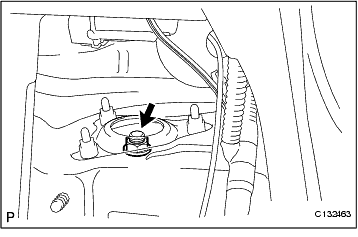
(e) Fully tighten the lock nut.
Torque:
55 N*m
(561 kgf*cm,
41 ft.*lbf)
-
2. CONNECT REAR SPEED SENSOR
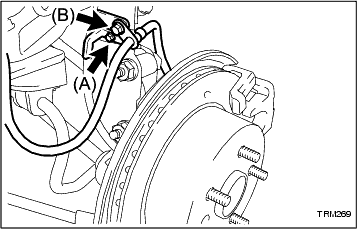
(a) Connect the rear brake flexible hose and rear speed sensor wire harness with the 2 bolts to the rear shock absorber with coil spring.
Torque:
Bolt A
5.0 N*m
(51 kgf*cm,
44 in.*lbf)
Bolt B
19 N*m
(194 kgf*cm,
14 ft.*lbf)
-
3. CONNECT REAR STABILISER LINK ASSEMBLY
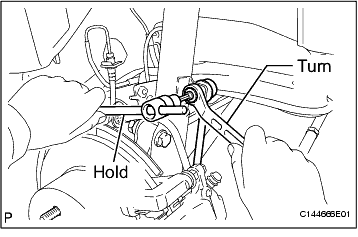
(a) Connect the rear stabiliser link assembly to the rear shock absorber with the nut.
Torque:
39 N*m
(398 kgf*cm,
29 ft.*lbf)
HINT:
If the ball joint turns together with the nut, use a hexagon wrench (5 mm) to hold the stud.
-
4. INSTALL NO. 1 REAR SUSPENSION SUPPORT COVER
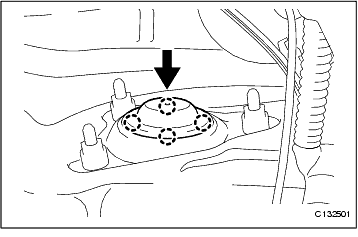
(a) Engage the 4 claws and install the No. 1 rear suspension support cover.
-
5. INSTALL REAR WHEEL
6. INSTALL REAR SEATBACK ASSEMBLY (
Click Here
)
7. INSTALL REAR SEAT CUSHION ASSEMBLY (
Click Here
)
8. INSTALL REAR CENTRE SEAT HEADREST ASSEMBLY
9. INSTALL REAR SEAT HEADREST ASSEMBLY
10. CHECK VSC SPEED SENSOR SIGNAL (
Click Here
)
11. INSPECT AND ADJUST REAR WHEEL ALIGNMENT (
Click Here
)
DISPOSAL
1. DISPOSE OF REAR SHOCK ABSORBER
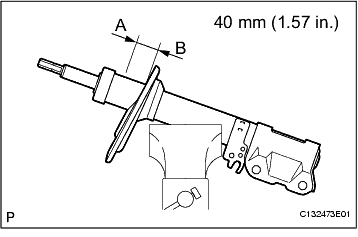
(a) Fully extend the shock absorber piston rod.
-
(b) Using a drill, make a hole in the cylinder between A and B as shown in the illustration to discharge the gas inside.
CAUTION:
• Take care when drilling. Always use the proper safety equipment.
• The gas is colourless, odourless and non-poisonous.
-