2AR-FE FUEL FUEL TANK INSTALLATION
PROCEDURE

 77011
1.INSTALL LOWER FUEL TANK FILLER PIPE SUB-ASSEMBLY
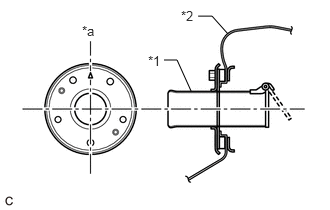
| *1 | Lower Fuel Tank Filler Pipe Sub-assembly |
| *2 | Fuel Tank Assembly |
| *a | Up |
Install the lower fuel tank filler pipe sub-assembly and a new gasket to the fuel tank assembly with the 5 bolts.
- Torque:
- 3.5 N*m (36 kgf*cm, 31 in.*lbf)
- NOTICE:
-
Install the lower fuel tank filler pipe sub-assembly in the correct direction.
77289C
2.INSTALL NO. 4 FUEL TUBE CLAMP
Install the 3 No. 4 fuel tube clamps to the fuel tank assembly.
77246C
3.INSTALL FUEL MAIN TUBE SUPPORT
Install the fuel main tube support to the fuel tank assembly with the bolt.
- Torque:
- 5.4 N*m (55 kgf*cm, 48 in.*lbf)
77209B
4.INSTALL FUEL PUMP TUBE SUB-ASSEMBLY
Engage the 2 clamps to install the fuel pump tube sub-assembly to the fuel tank assembly.
77340A
5.INSTALL FUEL CUT OFF WITH TUBE VALVE ASSEMBLY
Install 2 new fuel tank breather tube gaskets to the fuel tank assembly.
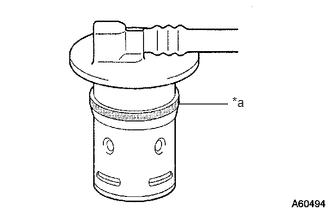
| *a | Apply gasoline around the valve |
Apply a light coat of gasoline or spindle oil around the 2 fuel cut off valves of a new fuel cut off with tube valve assembly as shown in the illustration, and carefully insert them into the fuel tank assembly.
- NOTICE:
-
Be careful not to drop the fuel tank breather tube gaskets into the fuel tank assembly.
Check that the fuel cut off valves are fully inserted.
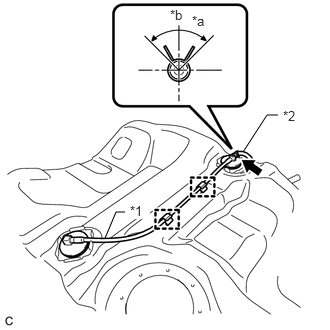
| *1 | Fuel Cut Off with Tube Valve Assembly |
| *2 | Fuel Emission Hose |
| *a | 90° |
| *b | Up |
Engage the 2 clamps to connect the fuel cut off with tube valve assembly to the fuel tank assembly.
Connect the fuel emission hose to the fuel cut off with tube valve assembly and slide the clip to secure it.
- HINT:
-
Engage the clip within the area shown in the illustration.
77643A
6.INSTALL NO. 3 FUEL TANK PROTECTOR
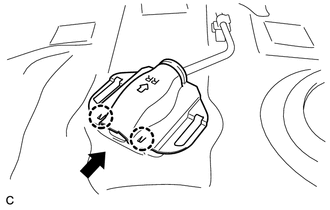
Slide the No. 3 fuel tank protector and engage the 2 claws to install it.
77642A
7.INSTALL NO. 2 FUEL TANK PROTECTOR
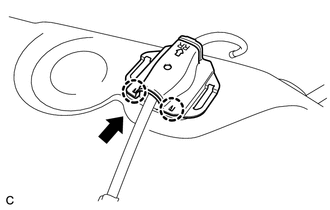
Slide the No. 2 fuel tank protector and engage the 2 claws to install it.
77652A
8.INSTALL NO. 2 FUEL TANK CUSHION
Install 7 new No. 2 fuel tank cushions to the fuel tank assembly.
77651A
9.INSTALL NO. 1 FUEL TANK CUSHION
Install a new No. 1 fuel tank cushion to the fuel tank assembly.
77100
10.INSTALL FUEL TANK ASSEMBLY
Install the 4 clip nuts to the fuel tank assembly.
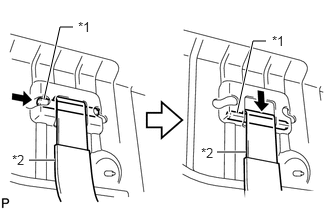
| *1 | Pin |
| *2 | Fuel Tank Band |
Install the 2 fuel tank bands with the 2 pins as shown in the illustration.
Set the fuel tank assembly on an engine lifter with attachments.
- HINT:
-
Using height adjustment attachments and plate lift attachments, keep the fuel tank assembly horizontal.
Raise the engine lifter so that the breather tube fuel hose can be connected as shown in the illustration.
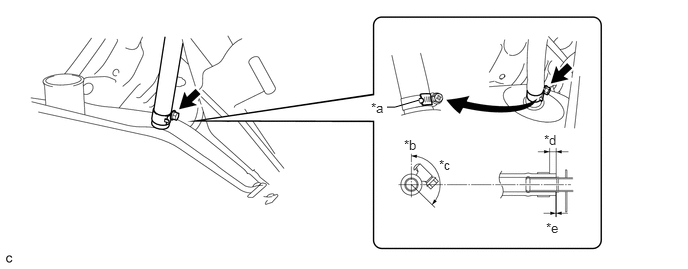
| *a | Claw | *b | Up |
| *c | 135° | *d | 2 to 7 mm (0.0787 to 0.276 in.) |
| *e | 0 to 3 mm (0 to 0.118 in.) | - | - |
- NOTICE:
-
Slowly raise the engine lifter so as not to drop the fuel tank assembly.
- HINT:
-
Make sure the bolt of the clamp is positioned within the area shown in the illustration.
Connect the fuel tank to filler pipe hose to the fuel tank assembly and tighten the clamp to secure it.
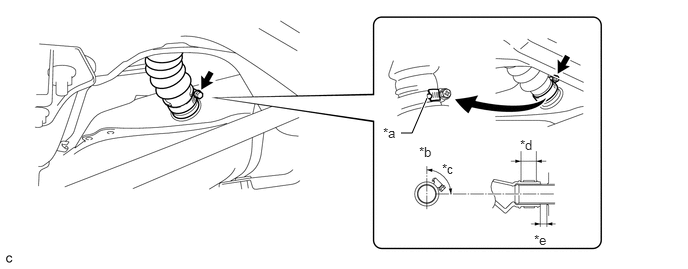
| *a | Claw | *b | Up |
| *c | 90° | *d | Clamp Area |
| *e | 3 to 10 mm (0.118 to 0.394 in.) | - | - |
- HINT:
-
Make sure the bolt of the clamp is positioned within the area shown in the illustration.
Slightly raise the engine lifter, then install the fuel tank assembly to the vehicle body.
Tighten the 2 bolts of the fuel tank bands.
- Torque:
- 39 N*m (400 kgf*cm, 29 ft.*lbf)
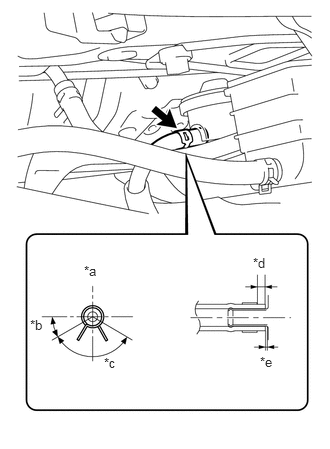
| *a | Up |
| *b | 30° |
| *c | 120° (Clip Area) |
| *d | 2 to 7 mm (0.0787 to 0.276 in.) |
| *e | 0 to 3 mm (0 to 0.118 in.) |
Connect the fuel emission hose to the charcoal canister assembly and slide the clip to secure it.
- HINT:
-
Engage the clip within the area shown in the illustration.
77209B
11.CONNECT FUEL PUMP TUBE SUB-ASSEMBLY
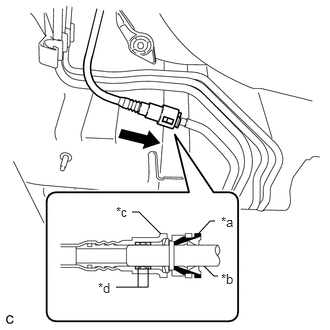
| *a | Retainer |
| *b | Fuel Pipe |
| *c | Fuel Tube Connector |
| *d | O-ring |

|
Push |
Connect the fuel pump tube sub-assembly.
- NOTICE:
-
Check that there is no damage or foreign matter on the connecting parts of the fuel lines.
Align the fuel tube connector with the fuel pipe, and push them together until the fuel tube connector makes a "click" sound. If it is difficult to push the fuel pipe into the fuel tube connector, apply a small amount of clean engine oil to the tip of the fuel pipe and reinsert it.
After connecting the fuel lines, check that the fuel pipe and fuel tube connector are securely connected by pulling on them.
77631A
12.INSTALL LOWER CENTER FUEL TANK PROTECTOR
Install the lower center fuel tank protector with the 4 bolts.
- Torque:
- 5.4 N*m (55 kgf*cm, 48 in.*lbf)
48832A
13.INSTALL REAR NO. 1 STABILIZER BAR BRACKET
Install the 2 rear No. 1 stabilizer bar brackets with the 4 bolts.
- Torque:
- 31 N*m (316 kgf*cm, 23 ft.*lbf)
46430
14.INSTALL NO. 3 PARKING BRAKE CABLE ASSEMBLY
Install the No. 3 parking brake cable assembly with the bolt and nut.
- Torque:
- 6.0 N*m (61 kgf*cm, 53 in.*lbf)
46420
15.INSTALL NO. 2 PARKING BRAKE CABLE ASSEMBLY
Install the No. 2 parking brake cable assembly with the bolt and nut.
- Torque:
- 6.0 N*m (61 kgf*cm, 53 in.*lbf)
57536A
16.INSTALL FRONT FLOOR BRACE LH (for Sport Package)
Install the front floor brace LH with the bolt and 2 nuts.
- Torque:
- 56 N*m (571 kgf*cm, 41 ft.*lbf)
57535A
17.INSTALL FRONT FLOOR BRACE RH (for Sport Package)
Install the front floor brace RH with the bolt and 2 nuts.
- Torque:
- 56 N*m (571 kgf*cm, 41 ft.*lbf)
17420
18.INSTALL CENTER EXHAUST PIPE ASSEMBLY
77020A
19.INSTALL FUEL SUCTION TUBE WITH PUMP AND GAUGE ASSEMBLY
20.ADD FUEL
21.INSPECT FOR EXHAUST GAS LEAK