EB62 MANUAL TRANSMISSION / TRANSAXLE MANUAL TRANSAXLE ASSEMBLY REMOVAL
CAUTION / NOTICE / HINT
- CAUTION:
-
The engine assembly with transaxle is very heavy. Be sure to follow the procedure described in the repair manual, or the engine lifter may suddenly drop.
- NOTICE:
-
When the transaxle is removed, be sure to use a new clutch release with bearing cylinder and new installation bolts. Removal of the transaxle allows the compressed clutch release with bearing cylinder to return to its original position, and dust from the moving section could damage the seal of the clutch release with bearing cylinder, possibly causing clutch fluid leaks.
PROCEDURE

 1.REMOVE ENGINE ASSEMBLY WITH TRANSAXLE
2.DISCONNECT WIRE HARNESS
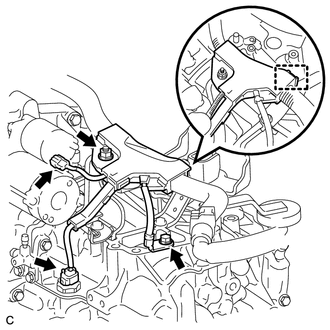
Remove the nut and 2 clamps.
Remove the bolt and disconnect the 2 connectors and wire harnesses from the manual transaxle assembly.
43420
3.REMOVE FRONT DRIVE SHAFT ASSEMBLY LH
43420G
4.REMOVE FRONT DRIVE SHAFT HOLE SNAP RING LH
43410
5.REMOVE FRONT DRIVE SHAFT ASSEMBLY RH
51100G
6.REMOVE FRONT FRAME ASSEMBLY
12361A
7.REMOVE FRONT ENGINE MOUNTING INSULATOR
12372A
8.REMOVE ENGINE MOUNTING INSULATOR LH
30300
9.REMOVE MANUAL TRANSAXLE ASSEMBLY
Using the height adjustment attachment and plate lift attachment, set the manual transaxle assembly on a transmission jack.
- NOTICE:
- ·
Secure the manual transaxle assembly to the transmission jack using a suitable adapter, such as a rope or attachment.
·To prevent the oil pan from deforming, do not place any attachments onto the oil pan of the manual transaxle assembly.
·Hold the engine assembly with a suitable adapter, such as a rope, during the operation.
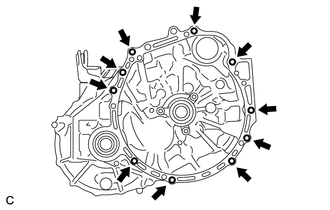
Remove the 10 bolts and manual transaxle assembly.
- NOTICE:
-
To prevent damage to the knock pins, do not pry between the manual transaxle assembly and engine.
12311A
10.REMOVE FRONT ENGINE MOUNTING BRACKET
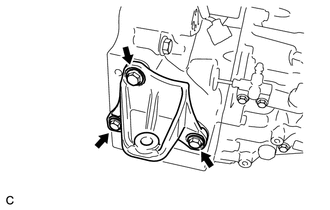
Remove the 3 bolts and front engine mounting bracket.
11.DISCONNECT CLUTCH LINE
31490
12.REMOVE CLUTCH ACCUMULATOR ASSEMBLY
31484
13.REMOVE CLUTCH FLEXIBLE HOSE BRACKET
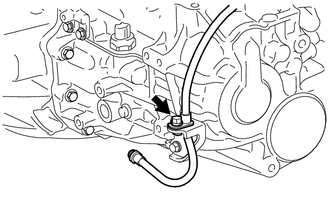
Remove the bolt and clutch line.
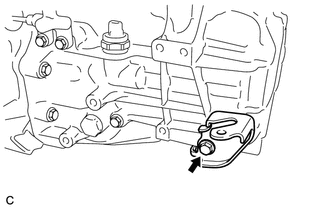
Remove the bolt and clutch flexible hose bracket.
31407B
14.REMOVE CLUTCH RELEASE BLEEDER SUB-ASSEMBLY
Click hereDrivetrain>CLUTCH>CLUTCH UNIT>REMOVAL
15.REMOVE CLUTCH RELEASE WITH BEARING CYLINDER ASSEMBLY
Click hereDrivetrain>CLUTCH>CLUTCH UNIT>REMOVAL
31483
16.REMOVE CLUTCH RELEASE CYLINDER TO BLEEDER TUBE
Click hereDrivetrain>CLUTCH>CLUTCH UNIT>REMOVAL
17.REMOVE WIRE HARNESS CLAMP BRACKET
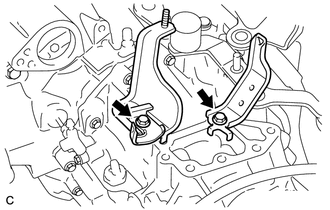
Remove the 2 bolts and 2 wire harness clamp brackets.
33403K
18.REMOVE SPEEDOMETER DRIVEN HOLE COVER SUB-ASSEMBLY
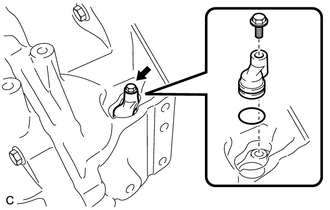
Remove the bolt and speedometer driven hole cover sub-assembly from the front transaxle case.
Remove the O-ring from the speedometer driven hole cover sub-assembly.