FRONT SUSPENSION FRONT LOWER SUSPENSION ARM(for Manual Transaxle) INSTALLATION
PROCEDURE

 48069
1.INSTALL FRONT LOWER NO. 1 SUSPENSION ARM SUB-ASSEMBLY LH (for LH Side)
Install the front lower arm bushing stopper to the front lower No. 1 suspension arm sub-assembly LH.
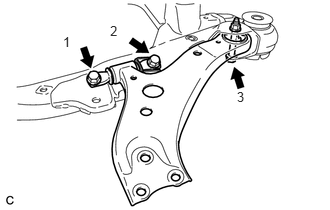
Install the front lower No. 1 suspension arm sub-assembly LH to the front frame assembly with the 3 bolts and nut in the order shown in the illustration.
- Torque:
- Bolt 1, 2 : 200 N*m (2039 kgf*cm, 148 ft.*lbf)
- Bolt 3 : 135 N*m (1377 kgf*cm, 100 ft.*lbf)
- NOTICE:
-
While keeping the nut from rotating, tighten the bolt.
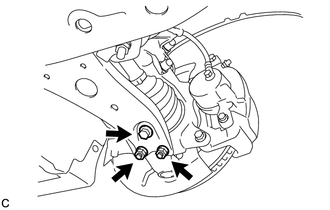
Install the front lower No. 1 suspension arm sub-assembly LH to the front lower ball joint assembly with the bolt and 2 nuts.
- Torque:
- 75 N*m (765 kgf*cm, 55 ft.*lbf)
12372A
2.INSTALL ENGINE MOUNTING INSULATOR LH (for LH Side)
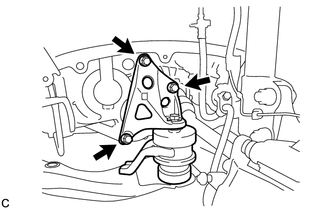
Temporarily tighten the engine mounting insulator LH with the 3 bolts.
Slowly lower the engine assembly with transaxle using a jack and a wooden block.
- NOTICE:
- ·
Do not position the wooden block on the oil pan.
·Do not damage the components surrounding the engine assembly with transaxle.
·Ensure that the jack and wooden block are stable.
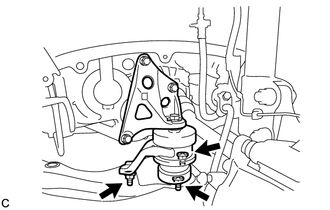
Tighten the engine mounting insulator LH with the 3 nuts.
- Torque:
- 87 N*m (887 kgf*cm, 64 ft.*lbf)
Fully tighten the engine mounting insulator LH with the 3 bolts.
- Torque:
- 64 N*m (653 kgf*cm, 47 ft.*lbf)
Install the 2 hole plugs.
48068
3.INSTALL FRONT LOWER NO. 1 SUSPENSION ARM SUB-ASSEMBLY RH (for RH Side)
Install the front lower arm bushing stopper to the front lower No. 1 suspension arm sub-assembly RH.
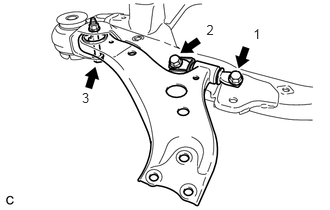
Install the front lower No. 1 suspension arm sub-assembly RH to the front frame assembly with the 3 bolts and nut in the order shown in the illustration.
- Torque:
- Bolt 1, 2 : 200 N*m (2039 kgf*cm, 148 ft.*lbf)
- Bolt 3 : 135 N*m (1377 kgf*cm, 100 ft.*lbf)
- NOTICE:
-
While keeping the nut from rotating, tighten the bolt.
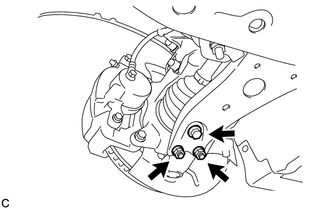
Install the front lower No. 1 suspension arm sub-assembly RH to the front lower ball joint assembly with the bolt and 2 nuts.
- Torque:
- 75 N*m (765 kgf*cm, 55 ft.*lbf)
12362A
4.INSTALL ENGINE MOUNTING INSULATOR RH (for RH Side)
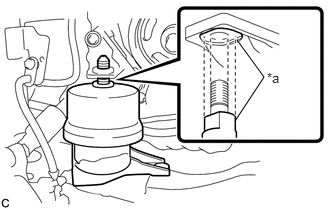
| *a | Cutout |
Set the engine mounting insulator RH on the front frame assembly.
Slowly lower the engine assembly with transaxle using a jack and a wooden block.
- NOTICE:
- ·
Match the position of the cutout (stopper).
·Do not position the wooden block on the oil pan.
·Do not damage the components surrounding the engine assembly with transaxle.
·Ensure that the jack and wooden block are stable.
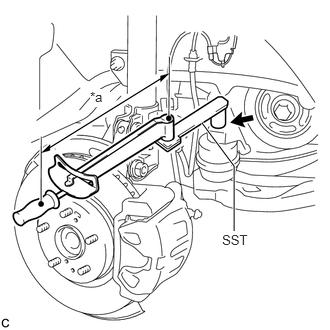
| *a | Fulcrum Length |
Using SST, install the nut to the engine mounting insulator RH.
- SST
- 09961-00950
- Torque:
- without SST : 95 N*m (969 kgf*cm, 70 ft.*lbf)
- with SST : 68 N*m (695 kgf*cm, 50 ft.*lbf)
- NOTICE:
- ·
Use a torque wrench with a fulcrum length of 380 mm (1.25 ft.).
·This torque value is effective when SST is parallel to the torque wrench.
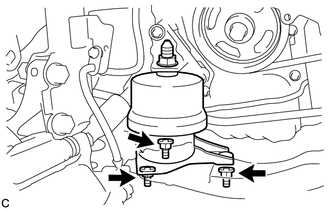
Install the engine mounting insulator RH with the 3 nuts.
- Torque:
- 87 N*m (887 kgf*cm, 64 ft.*lbf)
Install the 2 hole plugs.
12309
5.INSTALL ENGINE MOVING CONTROL ROD SUB-ASSEMBLY (for RH Side)
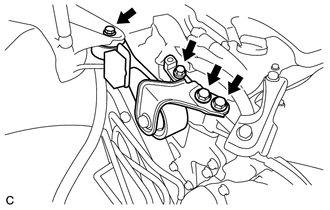
Temporarily install the engine moving control rod sub-assembly with the 4 bolts.
Fully tighten the engine moving control rod sub-assembly with the 4 bolts.
- Torque:
- 38 N*m (387 kgf*cm, 28 ft.*lbf)
12327A
6.INSTALL NO. 2 ENGINE MOUNTING STAY RH (for RH Side)
82284
7.INSTALL EARTH WIRE (for RH Side)
12364A
8.REMOVE ENGINE LATERAL CONTROL ROD
Install the engine lateral control rod to the front frame assembly with the 2 nuts.
- Torque:
- 52 N*m (530 kgf*cm, 38 ft.*lbf)
Install the 2 hole plugs.
12361A
9.INSTALL FRONT ENGINE MOUNTING INSULATOR
Install the front engine mounting insulator to the front frame assembly with the 3 nuts.
- Torque:
- 52 N*m (530 kgf*cm, 38 ft.*lbf)
53737B
10.INSTALL FRONT FENDER APRON SEAL LH (for LH Side)
53736
11.INSTALL FRONT FENDER APRON SEAL RH (for RH Side)
51442C
12.INSTALL ENGINE UNDER COVER LH
51441C
13.INSTALL ENGINE UNDER COVER RH
14.INSTALL AIR CLEANER CASE SUB-ASSEMBLY
17801
15.INSTALL AIR CLEANER FILTER ELEMENT SUB-ASSEMBLY
16.INSTALL AIR CLEANER CAP SUB-ASSEMBLY
55702A
17.INSTALL FRONT OUTER COWL TOP PANEL SUB-ASSEMBLY
18.INSTALL WINDSHIELD WIPER MOTOR AND LINK ASSEMBLY
19.INSTALL FRONT WHEELS
- Torque:
- 103 N*m (1049 kgf*cm, 76 ft.*lbf)
20.CONNECT CABLE TO NEGATIVE BATTERY TERMINAL
- NOTICE:
-
When disconnecting the cable, some systems need to be initialized after the cable is reconnected.
-
Click hereGeneral>INTRODUCTION>REPAIR INSTRUCTION>INITIALIZATION
21.INSPECT AND ADJUST FRONT WHEEL ALIGNMENT