POWER DISTRIBUTION MAIN BODY ECU REMOVAL
PROCEDURE

 1. PRECAUTION
- NOTICE:
-
After turning the ignition switch off, waiting time may be required before disconnecting the cable from the negative (-) battery terminal. Therefore, make sure to read the disconnecting the cable from the negative (-) battery terminal notices before proceeding with work.
-
Click hereGeneral>INTRODUCTION>REPAIR INSTRUCTION>PRECAUTION
2.DISCONNECT CABLE FROM NEGATIVE BATTERY TERMINAL
- NOTICE:
-
When disconnecting the cable, some systems need to be initialized after the cable is reconnected.
-
Click hereGeneral>INTRODUCTION>REPAIR INSTRUCTION>INITIALIZATION
53922B
3.REMOVE FRONT PANEL GARNISH LH
67914
4.REMOVE FRONT DOOR SCUFF PLATE LH
62112A
5.REMOVE COWL SIDE TRIM SUB-ASSEMBLY LH
62312B
6.DISCONNECT FRONT DOOR OPENING TRIM WEATHERSTRIP LH
55318C
7.REMOVE INSTRUMENT SIDE PANEL LH
53601
8.DISCONNECT HOOD LOCK CONTROL LEVER SUB-ASSEMBLY (for LHD)
55432D
9.REMOVE LOWER NO.1 INSTRUMENT PANEL FINISH PANEL ASSEMBLY (for LHD)
55607
10.REMOVE NO. 2 INSTRUMENT PANEL UNDER COVER SUB-ASSEMBLY (for RHD)
- HINT:
-
Use the same procedure as for LHD.
-
Click hereVehicle Interior>INTERIOR PANELS / TRIM>INSTRUMENT PANEL SAFETY PAD>REMOVAL
55303B
11.REMOVE LOWER INSTRUMENT PANEL SUB-ASSEMBLY (for RHD)
- HINT:
-
Use the same procedure as for LHD.
-
Click hereVehicle Interior>INTERIOR PANELS / TRIM>INSTRUMENT PANEL SAFETY PAD>REMOVAL
82730
12.REMOVE INSTRUMENT PANEL JUNCTION BLOCK ASSEMBLY (for LHD)
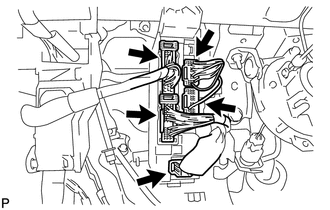
Disconnect the 5 connectors.
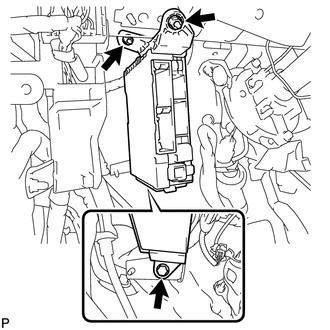
Remove the bolt, 2 nuts and disconnect the instrument panel junction block assembly.
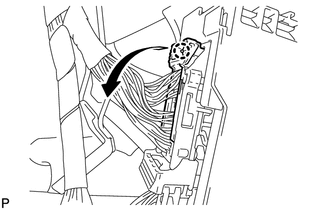
Disengage the claw and disconnect the connector as shown in the illustration.
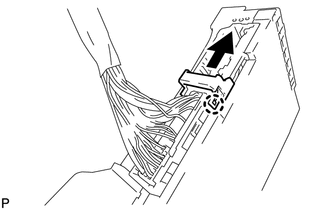
Disengage the claw and release the connector lock as shown in the illustration.
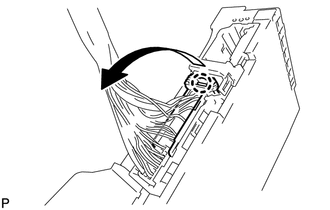
Disengage the claw and disconnect the connector as shown in the illustration.
Remove the instrument panel junction block assembly.
82730
13.REMOVE INSTRUMENT PANEL JUNCTION BLOCK ASSEMBLY (for RHD)
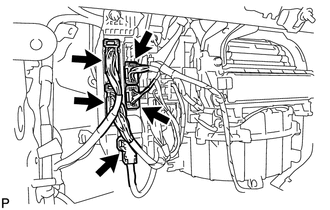
Disconnect the 5 connectors.
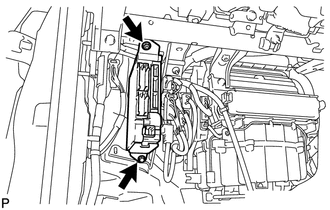
Remove the bolt, nut and disconnect the instrument panel junction block assembly.
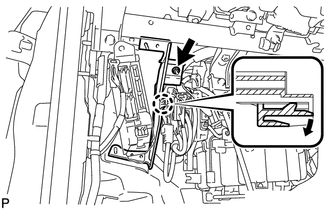
Remove the nut.
Disengage the claw as shown in the illustration and remove the wiring harness clamp bracket.
Disengage the claw and disconnect the connector as shown in the illustration.
Disengage the claw and release the connector lock as shown in the illustration.
Disengage the claw and disconnect the connector as shown in the illustration.
Remove the instrument panel junction block assembly.
89221
14.REMOVE MAIN BODY ECU (MULTIPLEX NETWORK BODY ECU)
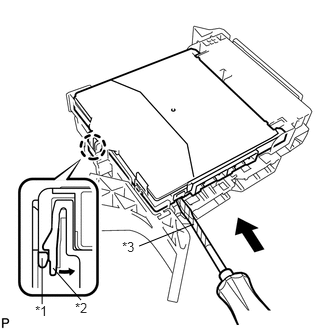
| *1 | Main Body ECU (Multiplex Network Body ECU) |
| *2 | Claw of Driver Side Junction Block |
| *3 | Protective Tape |
Press the claw of the junction block as shown in the illustration to release the lock.
With the junction block lock released, insert a screwdriver with its tip wrapped with protective tape horizontally between the main body ECU (multiplex network body ECU) and junction block.
- NOTICE:
-
Use a screwdriver with a diameter of between 5.0 mm (0.197 in.) and 6.3 mm (0.248 in.) and a length of approximately 90 mm (3.54 in.).
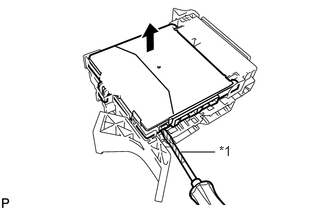
| *1 | Protective Tape |
Using the screwdriver, carefully raise the main body ECU (multiplex network body ECU) up to the position where the connector becomes disengaged.
- NOTICE:
-
Do not insert the screwdriver opening between the junction block and the connector of the main body ECU (multiplex network body ECU).
-
Do not twist the screwdriver to raise the main body ECU (multiplex network body ECU).
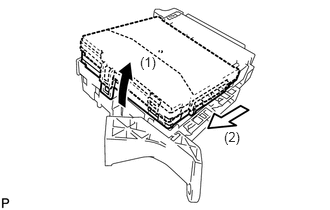
Raise the main body ECU (multiplex network body ECU) as shown by the arrow (1), and then pull it out as shown by the arrow (2) in the illustration.
- NOTICE:
-
Do not touch the ECU connector.