 |
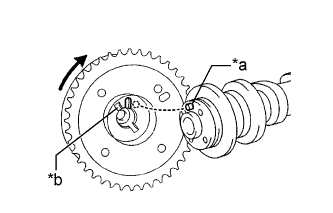
Put the camshaft timing gear assembly and camshaft together with the straight pin and key groove misaligned as shown in the illustration.
| *a | Straight Pin |
| *b | Key Groove |
CAMSHAFT > INSTALLATION |
| 1. INSTALL CAMSHAFT TIMING GEAR ASSEMBLY |
|
Put the camshaft timing gear assembly and camshaft together with the straight pin and key groove misaligned as shown in the illustration.
| *a | Straight Pin |
| *b | Key Groove |
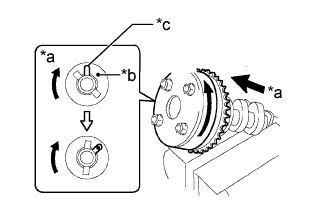 |
Turn the camshaft timing gear assembly as shown in the illustration while pushing it gently against the camshaft. Push further at the position where the pin fits into the groove.
| *a | View A |
| *b | Straight Pin |
| *c | Key Groove |
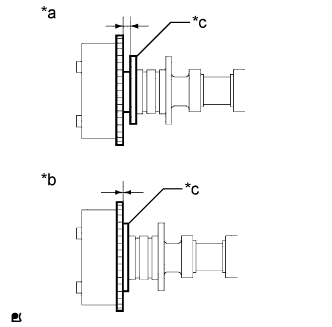 |
Check that there is no clearance between the camshaft timing gear assembly and camshaft flange.
| *a | INCORRECT |
| *b | CORRECT |
| *c | Flange |
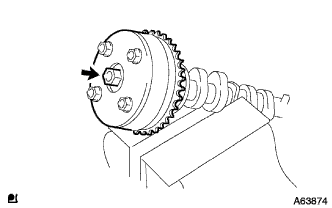 |
Tighten the bolt with the camshaft timing gear assembly secured in place.
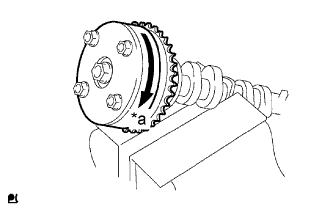 |
Check that the camshaft timing gear assembly can move to the retard direction (clockwise) and is locked in the most retarded position.
| *a | Lock |
| 2. INSTALL CAMSHAFT |
Apply a light coat of engine oil to the camshaft journals, camshaft housings and bearing caps.
Install the No. 1 camshaft bearing and No. 2 camshaft bearing.
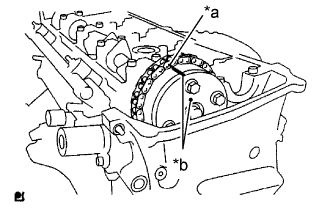 |
Install the chain sub-assembly onto the camshaft timing gear assembly with the paint mark aligned with the timing mark on the camshaft timing gear assembly as shown in the illustration.
| *a | Paint Mark |
| *b | Timing Mark |
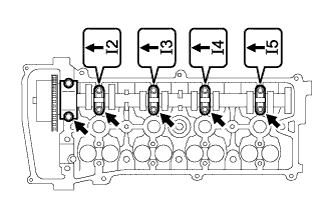 |
Examine the front marks and numbers, and check that the order is as shown in the illustration. Then temporarily install the 5 camshaft bearing caps with the 10 bolts.
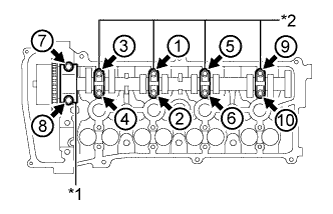 |
Using several steps, uniformly tighten the 10 bolts in the order shown in the illustration.
| *1 | No. 1 Camshaft Bearing Cap |
| *2 | No. 3 Camshaft Bearing Cap |
| 3. INSTALL NO. 2 CAMSHAFT |
Apply a light coat of engine oil to the camshaft journals, camshaft housings and bearing caps.
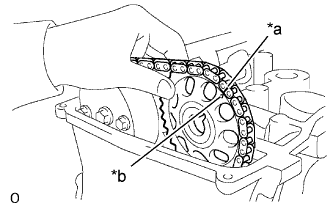 |
Put the camshaft timing sprocket on the cylinder head sub-assembly with the paint mark on the chain aligned with the timing mark on the camshaft timing sprocket.
| *a | Paint Mark |
| *b | Timing Mark |
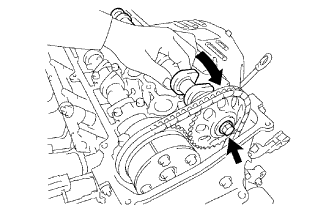 |
While holding the No. 2 camshaft by hand, temporarily install the No. 2 camshaft to the camshaft timing sprocket using the bolt.
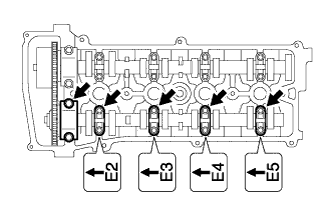 |
Examine the front marks and numbers, and check that the order is as shown in the illustration. Then temporarily install the 5 camshaft bearing caps with the 10 bolts.
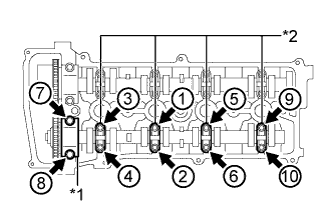 |
Using several steps, uniformly tighten the 10 bolts in the order shown in the illustration.
| *1 | No. 2 Camshaft Bearing Cap |
| *2 | No. 3 Camshaft Bearing Cap |
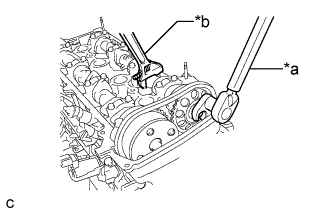 |
Using a union nut wrench, while holding the No. 2 camshaft with a wrench, tighten the bolt.
| *a | Tighten |
| *b | Hold |
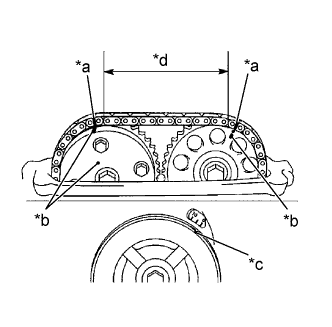 |
Check that the paint marks on the chain sub-assembly are aligned with the timing marks on the camshaft timing gear assembly and camshaft timing sprocket. Also, check that the crankshaft pulley groove is aligned with the timing mark "0" on the timing chain cover sub-assembly.
| *a | Paint Mark |
| *b | Timing Mark |
| *c | Groove |
| *d | 7 Links |
| 4. INSTALL NO. 1 CHAIN TENSIONER ASSEMBLY |
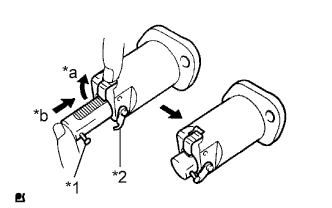 |
Release the ratchet pawl, then fully push in the plunger and set the hook to the pin so that the plunger is in the position shown in the illustration.
| *1 | Pin |
| *2 | Hook |
| *a | Raise |
| *b | Push |
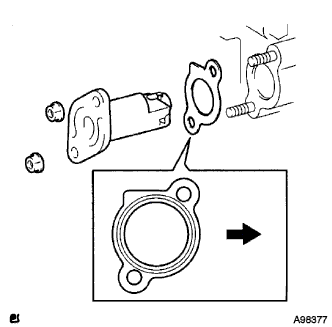 |
Install a new chain tensioner gasket and the No. 1 chain tensioner assembly with the 2 nuts.
 | Engine Front |
| 5. SET NO. 1 CYLINDER TO TDC/COMPRESSION |
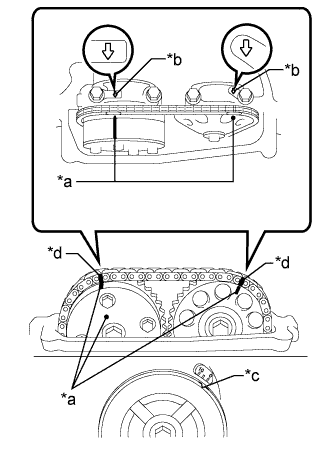 |
Turn the crankshaft pulley until its groove and the timing mark "0" of the timing chain cover sub-assembly are aligned.
| *a | Timing Mark |
| *b | Front Mark |
| *c | Groove |
| *d | Paint Mark |
Check that each timing mark of the camshaft timing gear assembly and camshaft timing sprocket is aligned with each front mark located on the No. 1 and No. 2 bearing caps as shown in the illustration.
If not, turn the crankshaft by 1 revolution (360°) to align the timing marks as above.
Place paint marks on the chain sub-assembly in alignment with the timing marks on the camshaft timing gear assembly and camshaft timing sprocket.
| 6. CHECK VALVE CLEARANCE |
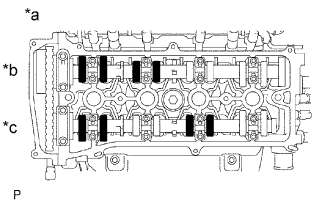 |
Check only the valves indicated.
| *a | No. 1 Cylinder TDC/Compression |
| *b | Intake Side |
| *c | Exhaust Side |
Using a feeler gauge, measure the clearance between the valve lifter and camshaft.
| Item | Specified Condition |
| Intake | 0.19 to 0.29 mm (0.00748 to 0.0114 in.) |
| Exhaust | 0.38 to 0.48 mm (0.0150 to 0.0189 in.) |
Record any out-of-specification valve clearance measurements. They will be used later to determine the required replacement valve lifters.
Turn the crankshaft 1 revolution (360°) and set the No. 4 cylinder to TDC/compression.
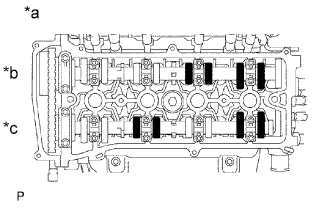 |
Check only the valves indicated.
| *a | No. 4 Cylinder TDC/Compression |
| *b | Intake Side |
| *c | Exhaust Side |
Using a feeler gauge, measure the clearance between the valve lifter and camshaft.
| Item | Specified Condition |
| Intake | 0.19 to 0.29 mm (0.00748 to 0.0114 in.) |
| Exhaust | 0.38 to 0.48 mm (0.0150 to 0.0189 in.) |
Record any out-of-specification valve clearance measurements. They will be used later to determine the required replacement valve lifters.
| 7. ADJUST VALVE CLEARANCE |
Remove the camshaft (Click here).
Remove the valve lifters.
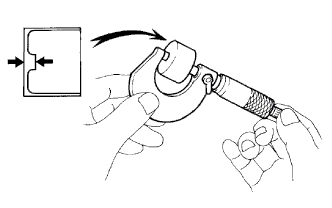 |
Using a micrometer, measure the thickness of the removed valve lifters.
Calculate the thickness of a new lifter so that the valve clearance comes within the specified range.
| Item | Specification |
| Intake | A = B + (C - 0.24 mm (0.00945 in.)) |
| Exhaust | A = B + (C - 0.43 mm (0.0169 in.)) |
| A | New lifter thickness |
| B | Used lifter thickness |
| C | Measured valve clearance |
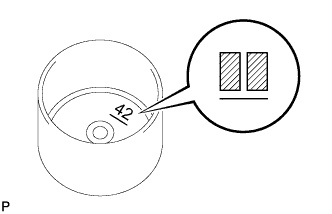 |
Select a new lifter with a thickness as close as possible to the calculated values.
Valve lifter selection chart (intake).
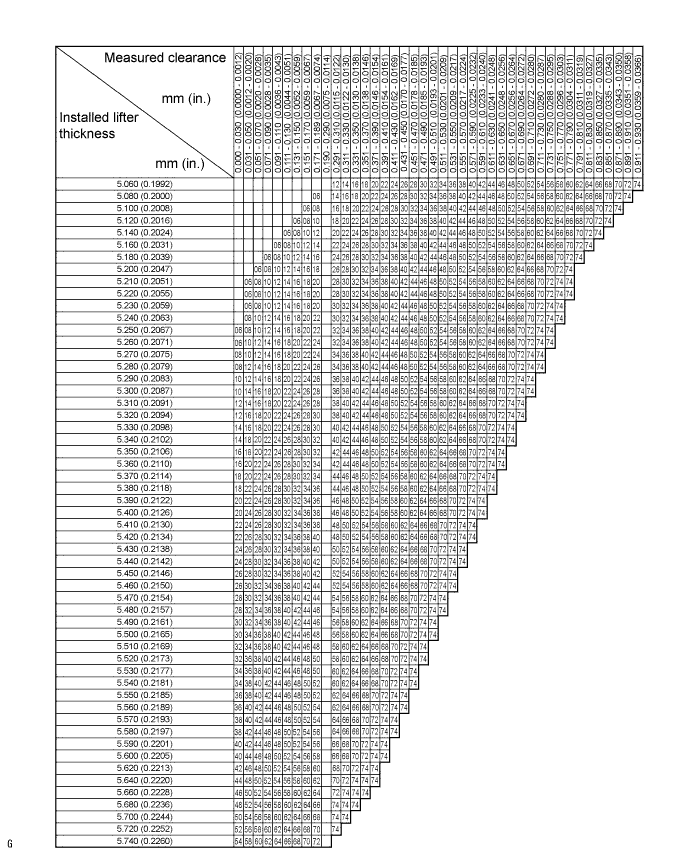
| Lifter No. | Thickness mm (in.) | Lifter No. | Thickness mm (in.) | Lifter No. | Thickness mm (in.) |
| 06 | 5.060 (0.1992) | 30 | 5.300 (0.2087) | 54 | 5.540 (0.2181) |
| 08 | 5.080 (0.2000) | 32 | 5.320 (0.2094) | 56 | 5.560 (0.2189) |
| 10 | 5.100 (0.2008) | 34 | 5.340 (0.2102) | 58 | 5.580 (0.2197) |
| 12 | 5.120 (0.2016) | 36 | 5.360 (0.2110) | 60 | 5.600 (0.2205) |
| 14 | 5.140 (0.2024) | 38 | 5.380 (0.2118) | 62 | 5.620 (0.2213) |
| 16 | 5.160 (0.2031) | 40 | 5.400 (0.2126) | 64 | 5.640 (0.2220) |
| 18 | 5.180 (0.2039) | 42 | 5.420 (0.2134) | 66 | 5.660 (0.2228) |
| 20 | 5.200 (0.2047) | 44 | 5.440 (0.2142) | 68 | 5.680 (0.2236) |
| 22 | 5.220 (0.2055) | 46 | 5.460 (0.2150) | 70 | 5.700 (0.2244) |
| 24 | 5.240 (0.2063) | 48 | 5.480 (0.2157) | 72 | 5.720 (0.2252) |
| 26 | 5.260 (0.2071) | 50 | 5.500 (0.2165) | 74 | 5.740 (0.2260) |
| 28 | 5.280 (0.2079) | 52 | 5.520 (0.2173) | - | - |
Valve lifter selection chart (exhaust).
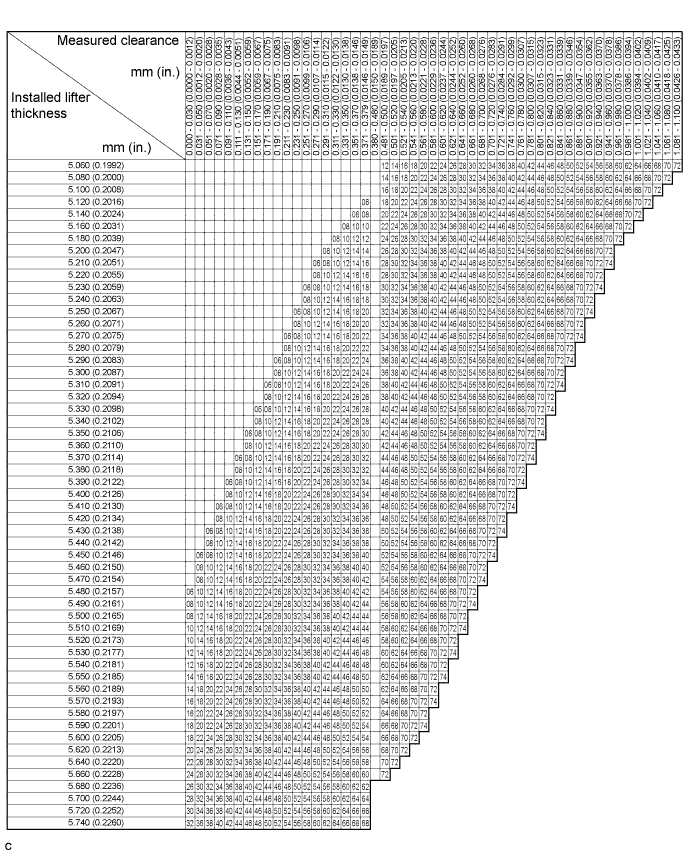
| Lifter No. | Thickness mm (in.) | Lifter No. | Thickness mm (in.) | Lifter No. | Thickness mm (in.) |
| 06 | 5.060 (0.1992) | 30 | 5.300 (0.2087) | 54 | 5.540 (0.2181) |
| 08 | 5.080 (0.2000) | 32 | 5.320 (0.2094) | 56 | 5.560 (0.2189) |
| 10 | 5.100 (0.2008) | 34 | 5.340 (0.2102) | 58 | 5.580 (0.2197) |
| 12 | 5.120 (0.2016) | 36 | 5.360 (0.2110) | 60 | 5.600 (0.2205) |
| 14 | 5.140 (0.2024) | 38 | 5.380 (0.2118) | 62 | 5.620 (0.2213) |
| 16 | 5.160 (0.2031) | 40 | 5.400 (0.2126) | 64 | 5.640 (0.2220) |
| 18 | 5.180 (0.2039) | 42 | 5.420 (0.2134) | 66 | 5.660 (0.2228) |
| 20 | 5.200 (0.2047) | 44 | 5.440 (0.2142) | 68 | 5.680 (0.2236) |
| 22 | 5.220 (0.2055) | 46 | 5.460 (0.2150) | 70 | 5.700 (0.2244) |
| 24 | 5.240 (0.2063) | 48 | 5.480 (0.2157) | 72 | 5.720 (0.2252) |
| 26 | 5.260 (0.2071) | 50 | 5.500 (0.2165) | 74 | 5.740 (0.2260) |
| 28 | 5.280 (0.2079) | 52 | 5.520 (0.2173) | - | - |
Install the selected valve lifter.
Install the camshaft (Click here).
| 8. INSTALL CYLINDER HEAD COVER SUB-ASSEMBLY |
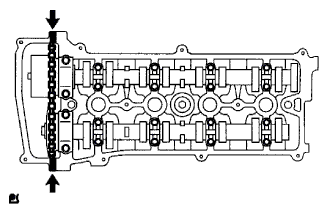 |
Remove any old packing material from the contact surfaces.
Apply seal packing to the 2 locations shown in the illustration.
Install the cylinder head cover gasket to the cylinder head cover sub-assembly.
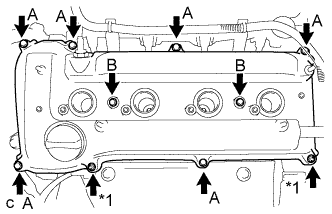 |
Install the cylinder head cover sub-assembly with the 8 bolts and 2 nuts.
| *1 | Nut |
Install the engine wire with the 3 bolts.
Connect the 2 wire harness clamps.
Connect the No. 2 ventilation hose to the cylinder head cover sub-assembly.
| 9. INSTALL IGNITION COIL ASSEMBLY |
Install the 4 ignition coil assemblies with the 4 bolts.
Connect the 4 ignition coil assembly connectors.
| 10. INSPECT FOR OIL LEAK |
| 11. INSPECT IGNITION TIMING |
Warm up and stop the engine.
When using the intelligent tester:
Connect the intelligent tester to the DLC3.
Start the engine and idle it.
Turn the intelligent tester main switch on.
Enter the following menus: Powertrain / Engine / Data List / IGN Advance.
Check that the ignition timing advances immediately when the engine speed is increased.
Enter the following menus: Powertrain / Engine / Active Test / Connect the TC and TE1 / ON.
Monitor IGN Advance of the Data List.
Enter the following menus: Powertrain / Engine / Active Test / Connect the TC and TE1 / OFF.
Turn the ignition switch off.
Disconnect the intelligent tester from the DLC3.
When not using the intelligent tester:
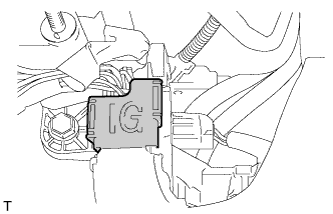 |
Open the wiring harness protector cover located to the right of the No. 4 ignition coil.
Pull the wire harness out from the wiring harness protector cover.
Connect the timing light to the wire harness.
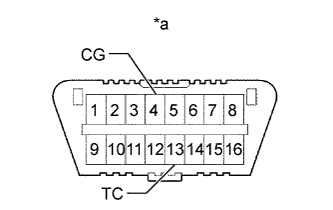 |
Using SST, connect terminals 13 (TC) and 4 (CG) of the DLC3.
| *a | DLC3 |
Using a timing light, check the ignition timing.
Remove SST from the DLC3.
Check the ignition timing.
Check that the ignition timing advances immediately when the engine speed is increased.
Disconnect the timing light from the engine.
Install the No. 1 engine cover sub-assembly.
| 12. INSTALL AIR CLEANER CASE SUB-ASSEMBLY |
Install the air cleaner case sub-assembly with the 3 bolts.
Connect the wire harness clamp.
| 13. INSTALL AIR CLEANER CAP SUB-ASSEMBLY |
Install the air cleaner filter element to the air cleaner case sub-assembly.
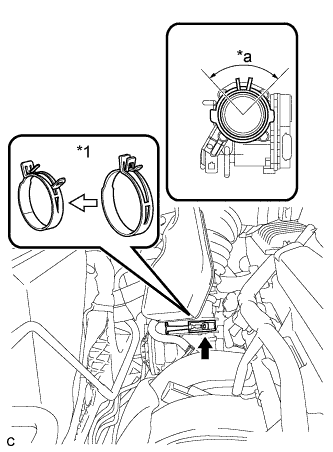 |
Connect the air cleaner cap sub-assembly to the throttle with motor body assembly and release the lock of the air cleaner hose clamp.
| *1 | Air Cleaner Hose Clamp |
Connect the ventilation hose to the cylinder head cover.
Install the air cleaner cap sub-assembly and tighten the 2 bolts.
Connect the wire harness clamp.
Connect the mass air flow meter connector.
Connect the purge line hose to the 2 clamps.
Connect the 2 vacuum switching valve vacuum hoses.
Connect the vacuum switching valve connector.
| 14. INSTALL INLET AIR CLEANER ASSEMBLY |
Install the inlet air cleaner assembly with the 2 bolts.
| 15. INSTALL COOL AIR INTAKE DUCT SEAL |
Install the cool air intake duct seal with the 9 clips.
| 16. INSTALL NO. 1 ENGINE COVER SUB-ASSEMBLY |
Install the No. 1 engine cover sub-assembly with the 2 nuts.
| 17. INSTALL FRONT OUTER COWL TOP PANEL SUB-ASSEMBLY |
Install the front outer cowl top panel sub-assembly with the 10 bolts.
Engage the 2 clamps to install the wire harness to the front outer cowl top panel sub-assembly.
| 18. INSTALL WINDSHIELD WIPER MOTOR AND LINK ASSEMBLY |
| 19. INSTALL FRONT FENDER APRON SEAL RH |
| 20. INSTALL ENGINE UNDER COVER RH |
| 21. INSTALL FRONT WHEEL OPENING EXTENSION PAD RH |
| 22. INSTALL FRONT WHEEL RH |