Home › Vehicle Exterior › WINDOW / GLASS › POWER WINDOW REGULATOR MOTOR (for Front Door)

POWER WINDOW REGULATOR MOTOR (for Front Door) > INSTALLATION

for Preparation Click here


HINT:
  1. Use the same procedure for both the RH and LH sides.
  2. The procedure described below is for the LH side.


1. PRECAUTION

NOTICE:
After turning the ignition switch off, waiting time may be required before disconnecting the cable from the negative (-) battery terminal. Therefore, make sure to read the disconnecting the cable from the negative (-) battery terminal notices before proceeding with work (Click here).


2. INSTALL FRONT POWER WINDOW REGULATOR MOTOR ASSEMBLY

NOTICE:
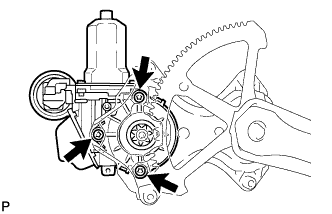
The regulator arm must be below the intermediate position when installing the power window regulator motor.


    B280344
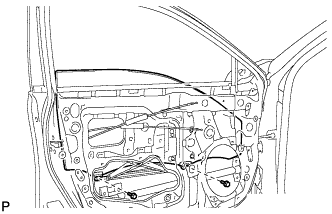
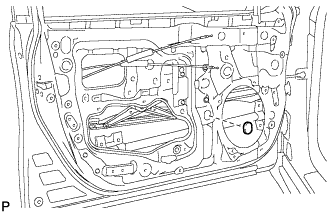
  1. Using a T25 "TORX" socket wrench, install the front power window regulator motor assembly with the 3 screws.

    Torque:
    5.4 N*m{ 55 kgf*cm , 48 in.*lbf }

    HINT:
    A new front window regulator uses self-tapping screws to thread new installation holes when the self-tapping screws are inserted.
3. INSTALL FRONT DOOR WINDOW REGULATOR ASSEMBLY
  1. Apply MP grease to the sliding parts of the front door window regulator assembly.

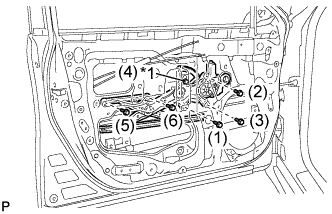
  1. Install the temporary bolt to the front door window regulator assembly.


    B280343E02
  1. Temporarily install the front door window regulator assembly.
    Text in Illustration 
    *1
    Temporary Bolt

  1. Tighten the temporary bolt and 5 bolts to install the front door window regulator assembly.

    HINT:
    Tighten the bolts in the order shown in the illustration.

    Torque:
    8.0 N*m{ 82 kgf*cm , 71 in.*lbf }


4. INSTALL FRONT DOOR GLASS SUB-ASSEMBLY
  1. Connect the cable to the negative (-) battery terminal.

  1. Connect the power window regulator master switch assembly and move the front door glass sub-assembly so that the door glass bolts can be seen.

  1. Disconnect the cable from the negative (-) battery terminal.

    CAUTION:
    Wait at least 90 seconds after disconnecting the cable from the negative (-) battery terminal to disable the SRS system.

    NOTICE:
    When disconnecting the cable, some systems need to be initialized after the cable is reconnected (Click here).

  1. Disconnect the power window regulator master switch assembly.


    B280341E01
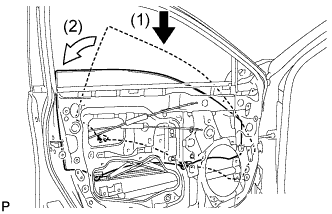
  1. Insert the front door glass sub-assembly into the front door panel along the front door glass run as indicated by the arrows, in the order shown in the illustration.


    B280340
  1. Install the front door glass sub-assembly with the 2 bolts.

    Torque:
    8.0 N*m{ 82 kgf*cm , 71 in.*lbf }


    B277200
  1. Install the grommet.


5. INSTALL FRONT DOOR SERVICE HOLE COVER
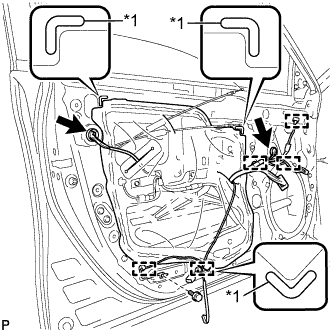
  1. Apply new butyl tape to the front door panel.


    B277199E01
  1. Pass the front door lock remote control cable assembly and front door inside locking cable assembly through a new front door service hole cover.
    Text in Illustration 
    *1
    Reference Point

  1. Attach the front door service hole cover according to the reference points on the front door panel.

    NOTICE:
    Securely install the front door service hole cover preventing wrinkles and air bubbles.

  1. Engage the 5 clamps.

  1. Install the bolt.

    Torque:
    8.0 N*m{ 82 kgf*cm , 71 in.*lbf }

  1. Connect each connector.


6. INSTALL DOOR SIDE AIRBAG SENSOR
  1. Check that the ignition switch is off.

  1. Check that the cable is disconnected from the negative (-) battery terminal.

    CAUTION:
    Wait at least 90 seconds after disconnecting the cable from the negative (-) battery terminal to disable the SRS system.


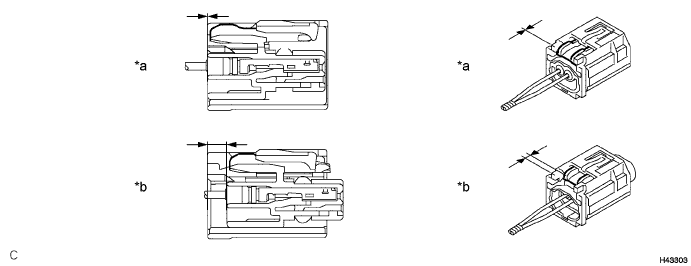
  1. Before connecting the connector, check that the position of the white housing lock is correct as shown in the illustration.


    B296255E01


    Text in Illustration 
    *a
    Incorrect
    *b
    Correct

  1. Insert the pin (stopper) into the door hole and install the door side airbag sensor to the front door panel with the bolt.

    Torque:
    9.0 N*m{ 92 kgf*cm , 80 in.*lbf }

    NOTICE:
    1. If the door side airbag sensor has been dropped, or there are any cracks, dents or other defects in the case or connector, replace it with a new one.
    2. When installing the door side airbag sensor, be careful that the SRS wiring does not interfere with or is not pinched between other parts.
    3. Make sure that the pin (stopper) is securely inserted into the body hole.
    4. Tighten the bolt while holding the door side airbag sensor because the door side airbag sensor pin (stopper) is easily damaged.


  1. Connect the connector to the door side airbag sensor.

    NOTICE:
    When connecting any airbag connector, take care not to damage the airbag wire harness.


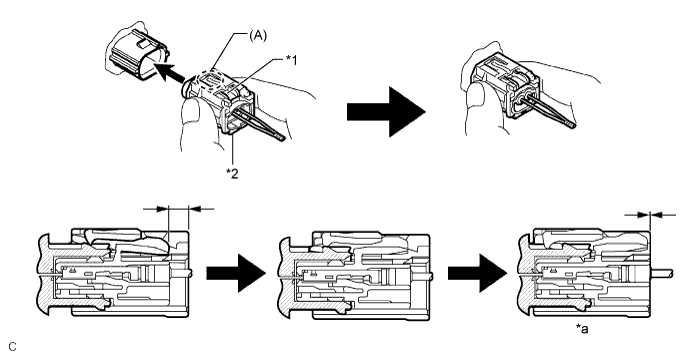
    1. Be sure to engage the connectors until they are locked (when locking, make sure that a click sound can be heard).


      H043305E12


      Text in Illustration 
      *1
      White Housing Lock
      *2
      Yellow CPA
      *a
      Connection is Completed
      -
      -

      HINT:
      When engaged, the white housing lock will slide. Be sure not to hold the white housing lock and part (A), as it may result in an insecure fit.

  1. Check that there is no looseness in the installation parts of the door side airbag sensor.


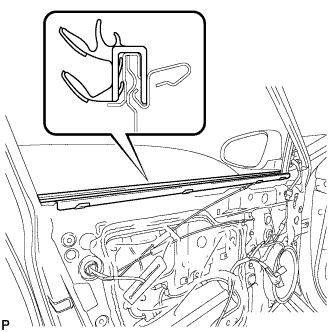
7. INSTALL FRONT DOOR INNER GLASS WEATHERSTRIP


    B277196
  1. Install the front door inner glass weatherstrip.


8. INSTALL FRONT DOOR TRIM BOARD SUB-ASSEMBLY


    B277193E01
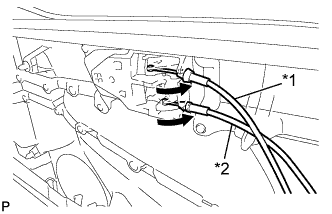
  1. Connect the front door lock remote control cable assembly and front door inside locking cable assembly.
    Text in Illustration 
    *1
    Front Door Inside Locking Cable Assembly
    *2
    Front Door Lock Remote Control Cable Assembly


    B277191E01
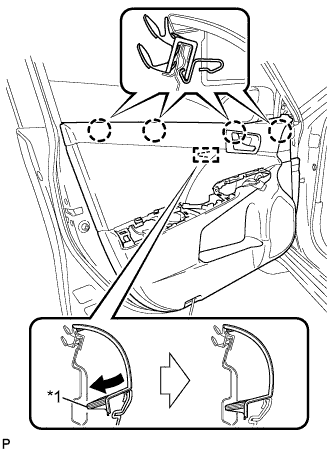
  1. Engage the front door trim board sub-assembly with the 4 claws and reference boss as shown in the illustration.
    Text in Illustration 
    *1
    Reference Boss


    B277189
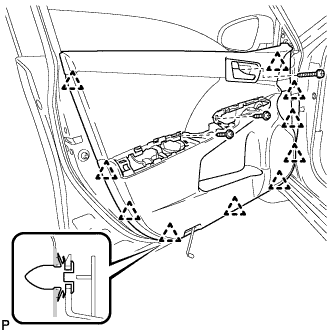
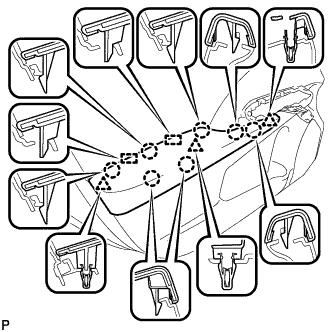
  1. Engage the 10 clips and install to front door trim board sub-assembly.

  1. Install the 3 screws.

  1. If protective tape has been applied, remove it.


9. INSTALL COURTESY LIGHT ASSEMBLY
  1. Connect the connector.


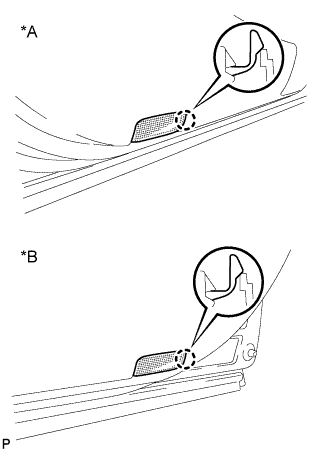
    E226715E01
  1. Engage the claw to install the courtesy light assembly.
    Text in Illustration 
    *A
    for LH Side
    *B
    for RH Side


10. INSTALL FRONT DOOR ARMREST ASSEMBLY


    B277188
  1. Engage the 2 guides, 3 clips and 7 claws, and install the front armrest assembly.


11. INSTALL POWER WINDOW REGULATOR MASTER SWITCH ASSEMBLY WITH FRONT DOOR ARMREST BASE PANEL (for Driver Side)
  1. Connect each connector.


    B277184
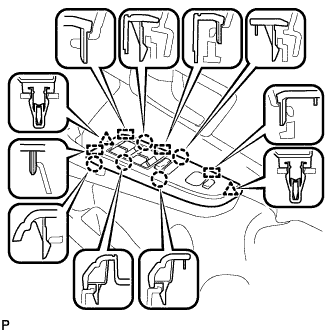
  1. Engage the 4 guides, 2 clips and 5 claws, and install the power window regulator master switch assembly with front door armrest base panel.


12. INSTALL POWER WINDOW REGULATOR SWITCH ASSEMBLY WITH FRONT DOOR ARMREST BASE PANEL (for Front Passenger Side)
  1. Connect each connector.


    B277186
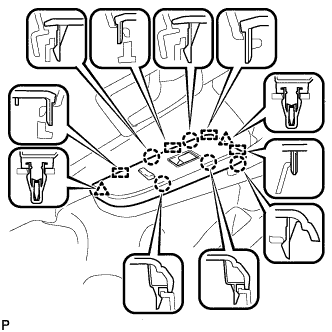
  1. Engage the 4 guides, 2 clips and 5 claws, and install the power window regulator switch assembly with front door armrest base panel.


13. INSTALL FRONT DOOR LOWER FRAME BRACKET GARNISH


    B277182
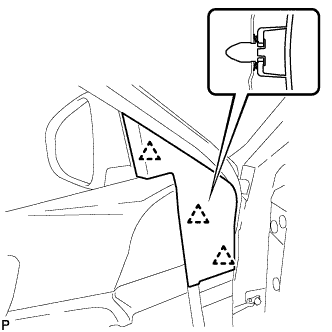
  1. Engage the 3 clips to install the front door lower frame bracket garnish.


14. INSTALL FRONT DOOR INSIDE HANDLE BEZEL PLUG


    B277181
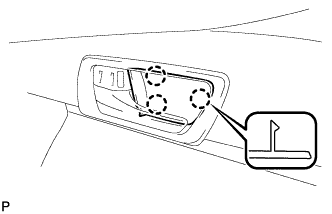
  1. Engage the 3 claws to install the front door inside handle bezel plug.


15. CONNECT CABLE TO NEGATIVE BATTERY TERMINAL

NOTICE:
When disconnecting the cable, some systems need to be initialized after the cable is reconnected (Click here).


16. INITIALIZE POWER WINDOW CONTROL SYSTEM (for Driver Side)
(Click here)


17. INSPECT POWER WINDOW OPERATION
(Click here)


18. INSPECT SRS WARNING LIGHT
for Separate Type Yaw Rate Sensor: (Click here)
for Built-in Type Yaw Rate Sensor: (Click here)