 |
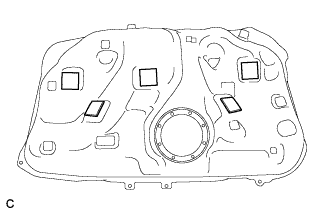
Install 5 new No. 1 fuel tank cushions as shown in the illustration.
FUEL TANK > INSTALLATION |
| 1. INSTALL NO. 1 FUEL TANK CUSHION |
|
Install 5 new No. 1 fuel tank cushions as shown in the illustration.
| 2. INSTALL NO. 1 FUEL TUBE CLAMP |
Install the No. 1 fuel tube clamp.
| 3. INSTALL NO. 2 FUEL TUBE CLAMP |
Install the No. 2 fuel tube clamp.
| 4. INSTALL FUEL TANK VENT HOSE |
Install the fuel tank vent hose to the No. 2 fuel tube clamp.
| 5. INSTALL FUEL TANK BREATHER ELBOW TUBE SUB-ASSEMBLY |
Install the fuel tank breather elbow tube sub-assembly to the No. 2 fuel tube clamp.
| 6. INSTALL FUEL TANK MAIN TUBE SUB-ASSEMBLY |
Install the fuel tank main tube sub-assembly to the No. 1 fuel tube clamp.
| 7. INSTALL FUEL TANK ASSEMBLY |
Support the fuel tank using an engine lifter.
Raise the engine lifter, then install the fuel tank to the vehicle.
Tighten the 4 bolts of the 2 fuel tank bands.
| 8. CONNECT FUEL TANK TO FILLER PIPE HOSE |
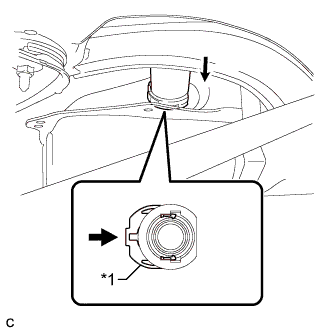 |
Push in the fuel tank to filler pipe hose connector to the fuel tank assembly and push the retainer so that the claws engage.
| *1 | Retainer |
 | Push |
| 9. CONNECT FUEL TANK VENT HOSE |
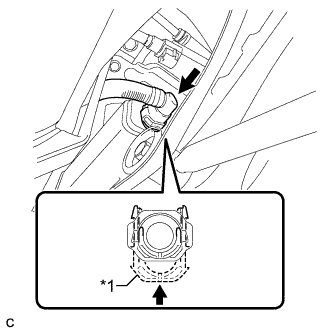 |
Push in the fuel tank vent hose connector to the charcoal canister and push up the retainer so that the claws engage.
| *1 | Retainer |
| Push |
| 10. CONNECT FUEL TANK BREATHER ELBOW TUBE SUB-ASSEMBLY |
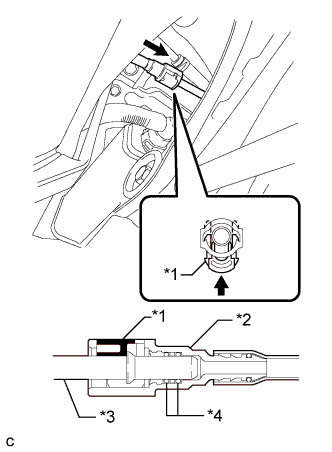 |
Push in the fuel tube connector to the pipe and push up the retainer so that the claws engage.
| *1 | Retainer |
| *2 | Fuel Tube Connector |
| *3 | Fuel Pipe |
| *4 | O-ring |
| Push |
| 11. CONNECT FUEL TANK MAIN TUBE SUB-ASSEMBLY |
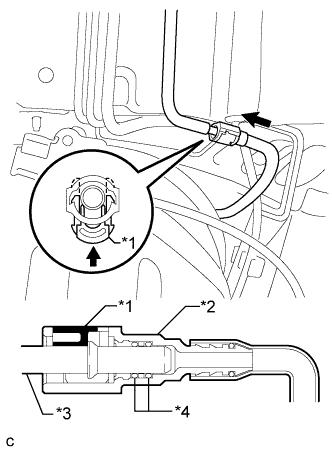 |
Push in the fuel tube connector to the fuel pipe and push up the retainer so that the claws engage.
| *1 | Retainer |
| *2 | Fuel Tube Connector |
| *3 | Fuel Pipe |
| *4 | O-ring |
| Push |
| 12. INSTALL NO. 1 FUEL TANK PROTECTOR |
Install the lower center fuel tank protector with the 3 clips.
| 13. INSTALL REAR NO. 1 STABILIZER BAR BRACKET |
Install the 2 rear No. 1 stabilizer bar brackets with the 4 bolts.
| 14. INSTALL NO. 3 PARKING BRAKE CABLE ASSEMBLY |
Install the No. 3 parking brake cable assembly with the nut.
| 15. INSTALL NO. 2 PARKING BRAKE CABLE ASSEMBLY |
Install the No. 2 parking brake cable assembly with the nut.
| 16. INSTALL NO. 1 FLOOR UNDER COVER |
Install the No. 1 floor under cover with the 2 bolts, 3 nuts and 2 clips.
| 17. INSTALL NO. 2 FLOOR UNDER COVER (w/ Floor Under Cover) |
Install the No. 2 floor under cover with the 2 bolts, 3 nuts and 2 clips.
| 18. INSTALL CENTER EXHAUST PIPE ASSEMBLY |
| 19. INSTALL FUEL SUCTION TUBE WITH PUMP AND GAUGE ASSEMBLY |
| 20. ADD FUEL |
| 21. INSPECT FOR EXHAUST GAS LEAK |