REAR SUSPENSION REAR SUSPENSION MEMBER INSTALLATION
PROCEDURE

 1.INSTALL HOLE PLUG
Install the 2 hole plugs to the rear suspension member sub-assembly.
52272A
2.INSTALL REAR SUSPENSION MEMBER BODY MOUNTING FRONT CUSHION LH
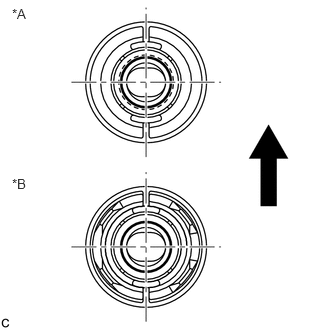
| *A | Type A |
| *B | Type B |

|
Front of the Vehicle |
Temporarily install a new rear suspension member body mounting front cushion LH to the position shown in the illustration.
Using SST and a press, install the rear suspension member body mounting front cushion LH to the rear suspension member sub-assembly.
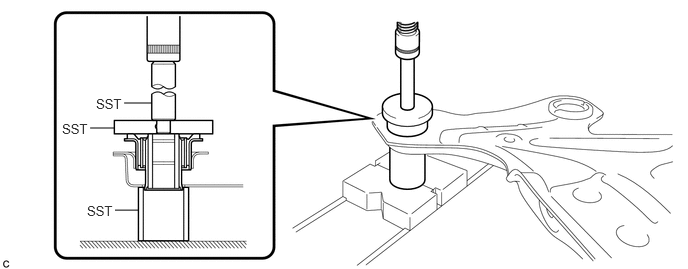
- SST
- 09710-30012 (09710-04061)
09950-60010 (09951-00650)
09950-70010 (09951-07100)
- HINT:
-
Slowly press in the rear suspension member body mounting front cushion LH.
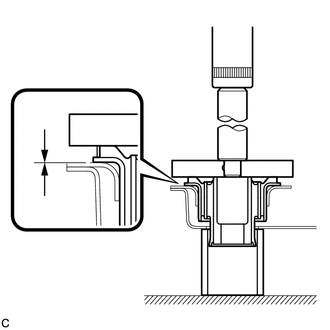
While observing from the side, press in the rear suspension member body mounting front cushion LH until there is no clearance between the rear suspension member body mounting front cushion LH and the rear suspension member sub-assembly as shown in the illustration.
- NOTICE:
-
Do not press the rear suspension member excessively, or it will easily deform.
52271E
3.INSTALL REAR SUSPENSION MEMBER BODY MOUNTING FRONT CUSHION RH
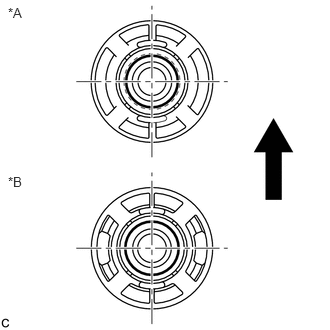
| *A | Type A |
| *B | Type B |
|
|
Front of the Vehicle |
Temporarily install a new rear suspension member body mounting front cushion RH to the position shown in the illustration.
Using SST and a press, install the rear suspension member body mounting front cushion RH to the rear suspension member sub-assembly.
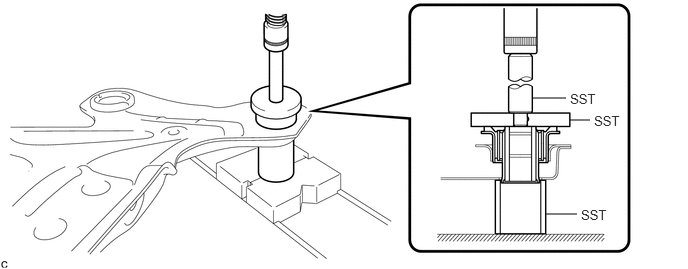
- SST
- 09710-30012 (09710-04061)
09950-60010 (09951-00650)
09950-70010 (09951-07100)
- HINT:
-
Slowly press in the rear suspension member body mounting front cushion RH.
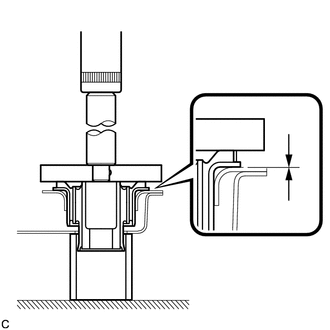
While observing from the side, press in the rear suspension member body mounting front cushion RH until there is no clearance between the rear suspension member body mounting front cushion RH and the rear suspension member sub-assembly as shown in the illustration.
- NOTICE:
-
Do not press the rear suspension member excessively, or it will easily deform.
52275A
4.INSTALL REAR SUSPENSION MEMBER BODY MOUNTING REAR CUSHION (for LH Side)
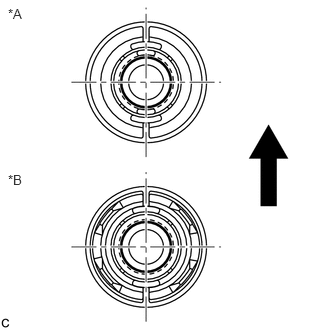
| *A | Type A |
| *B | Type B |
|
|
Front of the Vehicle |
Temporarily install a new rear suspension member body mounting rear cushion (LH side) to the position shown in the illustration.
Using SST and a press, install the rear suspension member body mounting rear cushion (LH side) to the rear suspension member sub-assembly.
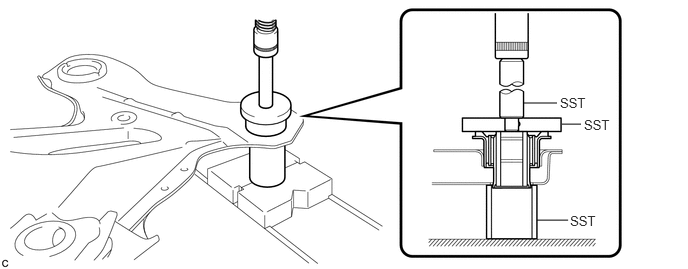
- SST
- 09710-30012 (09710-04061)
09950-60010 (09951-00650)
09950-70010 (09951-07100)
- HINT:
-
Slowly press in the rear suspension member body mounting rear cushion.
While observing from the side, press in the rear suspension member body mounting rear cushion (LH side) until there is no clearance between the rear suspension member body mounting rear cushion (LH side) and the rear suspension member sub-assembly as shown in the illustration.
- NOTICE:
-
Do not press the rear suspension member excessively, or it will easily deform.
52275A
5.INSTALL REAR SUSPENSION MEMBER BODY MOUNTING REAR CUSHION (for RH Side)
- HINT:
-
Perform the same procedure as the LH side.
51249
6.INSTALL REAR SUSPENSION MEMBER DAMPER (w/ Dynamic Damper)
Install the rear suspension member damper to the rear suspension member sub-assembly with the 2 bolts.
- Torque:
- 29 N*m (296 kgf*cm, 21 ft.*lbf)
48720A
7.INSTALL REAR NO. 1 SUSPENSION ARM ASSEMBLY LH
48710A
8.INSTALL REAR NO. 1 SUSPENSION ARM ASSEMBLY RH
- HINT:
-
Perform the same procedure as the LH side.
48740F
9.TEMPORARILY TIGHTEN REAR NO. 2 SUSPENSION ARM ASSEMBLY LH
48730F
10.TEMPORARILY TIGHTEN REAR NO. 2 SUSPENSION ARM ASSEMBLY RH
- HINT:
-
Perform the same procedure as the LH side.
51206A
11.INSTALL REAR SUSPENSION MEMBER SUB-ASSEMBLY
w/ Member Cushion:
Install 2 new differential support member cushions and 2 new differential support member upper stoppers to the rear suspension member sub-assembly.
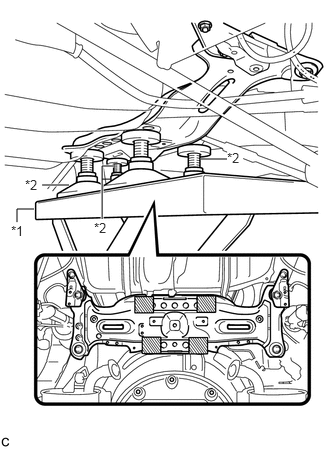
| *1 | Engine Lifter |
| *2 | Attachment |

|
Attachment Placement Location |
Support the rear suspension member sub-assembly with an engine lifter using 4 attachments or equivalent tools.
- NOTICE:
- ·
Make sure to secure the rear suspension member sub-assembly to prevent it from dropping.
·Use the attachments to keep the rear suspension member sub-assembly level.
Raise the rear suspension member sub-assembly until there is no clearance between the rear suspension member sub-assembly and the vehicle body.
- NOTICE:
-
When raising the rear suspension member sub-assembly, be careful not to damage the vehicle body or other components installed on the vehicle.
Install the rear suspension member sub-assembly, rear suspension member lower stopper sub-assembly LH and rear suspension member lower stopper sub-assembly RH with the 4 nuts.
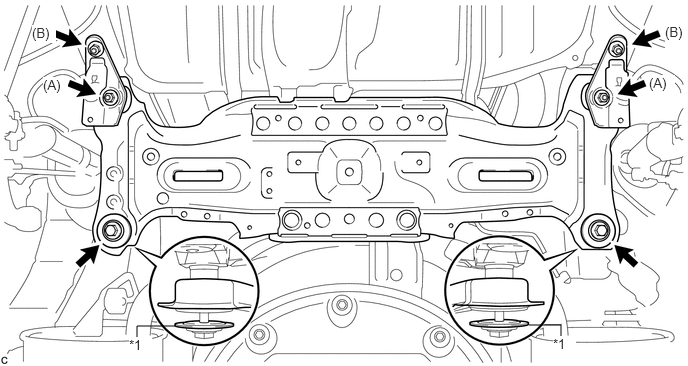
| *1 | Rear suspension member lower stopper | - | - |
- Torque:
- Nut A : 55 N*m (561 kgf*cm, 41 ft.*lbf)
- Nut B : 38 N*m (387 kgf*cm, 28 ft.*lbf)
Install the 2 rear suspension member lower stoppers with the 2 bolts to the rear suspension member sub-assembly.
- Torque:
- 55 N*m (561 kgf*cm, 41 ft.*lbf)
- NOTICE:
-
Be sure to install the rear suspension member sub-assembly with the rear suspension member lower stoppers in the correct direction, as shown in the illustration.
17573A
12.INSTALL NO. 3 EXHAUST PIPE SUPPORT BRACKET
Install the No. 3 exhaust pipe support bracket to the rear suspension member sub-assembly with the 2 bolts.
- Torque:
- 33 N*m (337 kgf*cm, 24 ft.*lbf)
58339N
13.INSTALL JACK UP BRACKET
Install the jack up bracket to the rear suspension member sub-assembly with the 2 bolts.
- Torque:
- 39 N*m (398 kgf*cm, 29 ft.*lbf)
48720A
14.CONNECT REAR NO. 1 SUSPENSION ARM ASSEMBLY LH
48710A
15.CONNECT REAR NO. 1 SUSPENSION ARM ASSEMBLY RH
- HINT:
-
Perform the same procedure as the LH side.
48740F
16.CONNECT REAR NO. 2 SUSPENSION ARM ASSEMBLY LH
48730F
17.CONNECT REAR NO. 2 SUSPENSION ARM ASSEMBLY RH
- HINT:
-
Perform the same procedure as the LH side.
48812
18.INSTALL REAR STABILIZER BAR
48840A
19.CONNECT REAR STABILIZER LINK ASSEMBLY LH
Connect the rear stabilizer link assembly LH to the rear stabilizer bar with nut.
- Torque:
- 39 N*m (400 kgf*cm, 29 ft.*lbf)
If the ball joint turns together with the nut, use a hexagon wrench to hold the stud.
48830D
20.CONNECT REAR STABILIZER LINK ASSEMBLY RH
- HINT:
-
Perform the same procedure as the LH side.
21. STABILIZE SUSPENSION
48720A
22.FULLY TIGHTEN REAR NO. 1 SUSPENSION ARM ASSEMBLY LH
48710A
23.FULLY TIGHTEN REAR NO. 1 SUSPENSION ARM ASSEMBLY RH
- HINT:
-
Perform the same procedure as the LH side.
48740F
24.FULLY TIGHTEN REAR NO. 2 SUSPENSION ARM ASSEMBLY LH
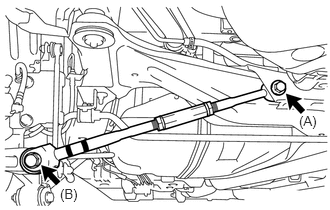
Fully tighten the bolt (A).
- Torque:
- 100 N*m (1020 kgf*cm, 74 ft.*lbf)
Fully tighten the bolt (B).
- Torque:
- 100 N*m (1020 kgf*cm, 74 ft.*lbf)
- NOTICE:
-
When fully tightening the bolt, keep the nut from rotating.
48730F
25.FULLY TIGHTEN REAR NO. 2 SUSPENSION ARM ASSEMBLY RH
- HINT:
-
Perform the same procedure as the LH side.
89407C
26.INSTALL REAR HEIGHT CONTROL SENSOR SUB-ASSEMBLY (w/ Height Control Sensor)
17420
27.INSTALL CENTER EXHAUST PIPE ASSEMBLY
28.INSTALL REAR WHEELS
- Torque:
- 103 N*m (1049 kgf*cm, 76 ft.*lbf)
29.INITIALIZE HEIGHT CONTROL SENSOR SIGNAL (w/ Height Control Sensor)
30.INSPECT AND ADJUST HEADLIGHT AIMING (w/ Height Control Sensor)
31.INSPECT AND ADJUST REAR WHEEL ALIGNMENT