AUDIO / VIDEO RADIO ANTENNA CORD INSTALLATION
PROCEDURE

 86101J
1.INSTALL NO. 2 ANTENNA CORD SUB-ASSEMBLY (w/o Digital Audio Broadcasting Antenna)
- HINT:
-
The double-sided tape and tape are not available as supply parts. If these pieces of tape still have enough adhesion to secure the roof headlining and antenna cord, reuse them. If the roof headlining has been replaced with a new one, or if the tape and/or the double-sided tape is no longer sticky, apply new tape following the procedure below.
Apply new double-sided tape.
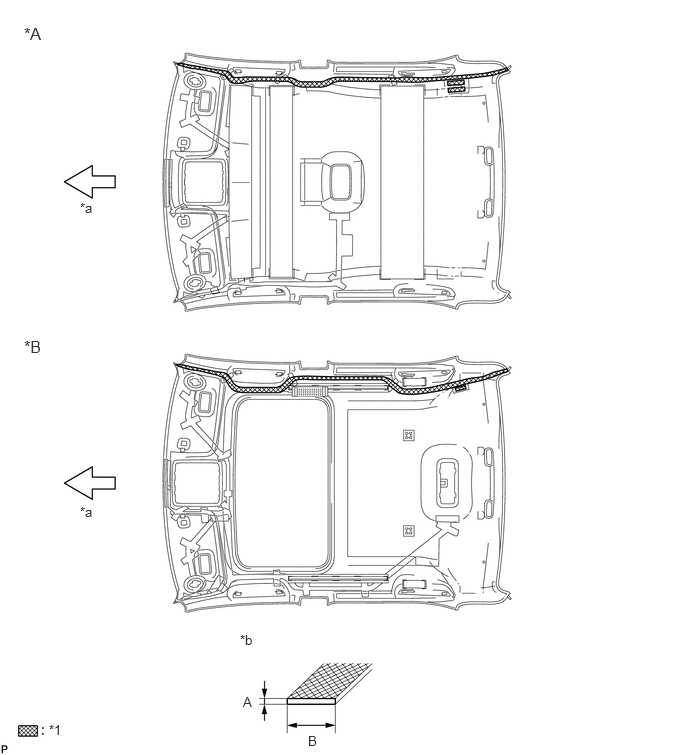
| *A | w/o Sliding Roof | *B | w/ Sliding Roof |
| *1 | Double-sided Tape | - | - |
| *a | Front | *b | Double-sided Tape Size |
| Area | Dimension |
|---|---|
| A | 1.0 mm (0.0394 in.) |
| B | 10.0 mm (0.394 in.) |
Remove the old double-sided tape from the roof headlining assembly.
Prepare the appropriate amount of new double-sided tape.
- HINT:
-
Be careful not to touch the adhesive surface.
Apply the double-sided tape to the roof headlining while aligning the tape with the markings on the roof headlining assembly.
Peel off the release paper from the double-sided tape.
Install the No. 2 antenna cord sub-assembly to the roof headlining assembly from the front of the vehicle.
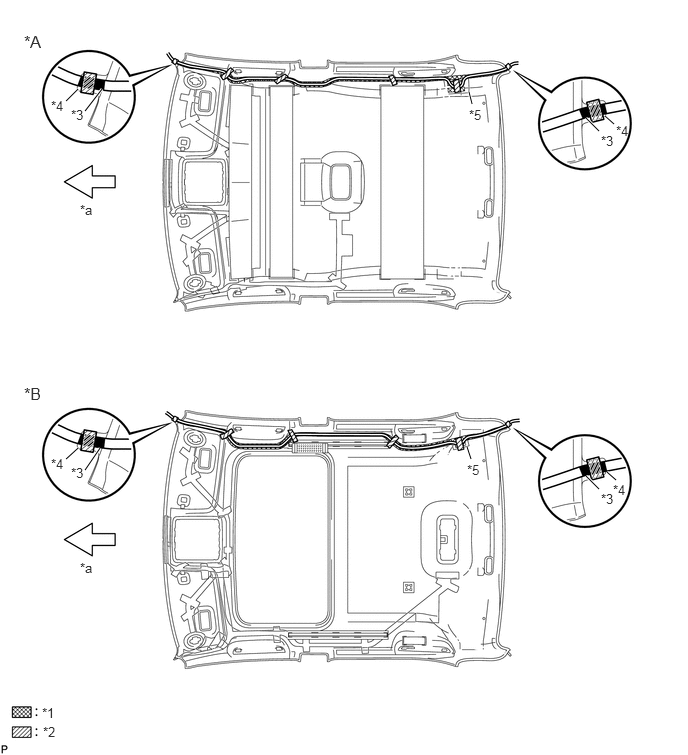
| *A | w/o Sliding Roof | *B | w/ Sliding Roof |
| *1 | Double-sided Tape | *2 | Tape |
| *3 | Marking Tape | *4 | Protrusion |
| *5 | Adjustment Area | - | - |
| *a | Front | - | - |
- HINT:
-
Align the taped part of the antenna cable with the protrusion of the roof headlining, and apply tape to secure the cable to the headlining.
Put the strips of tape back to the positions shown in the illustration in order to secure the antenna cord to the roof headlining assembly.
- HINT:
- ·
If the tape is no longer sticky, use other tape, such as packing tape, that has enough adhesion to secure the antenna cord to the roof headlining assembly.
·For the right front corner of the roof headlining assembly, align the marking tape on the antenna cord with the protrusion of the roof headlining, and wrap tape around the antenna cord and roof headlining assembly once or twice to securely hold them.
·For the right rear corner of the roof headlining assembly, align the marking tape on the antenna cord with the rear edge of the roof headlining, and secure the antenna cord to the roof headlining assembly with tape.
·If the entire length of the antenna cord does not fit, adjust the length by tucking in the cord at the area shown in the illustration.
86101J
2.INSTALL NO. 2 ANTENNA CORD SUB-ASSEMBLY (w/ Digital Audio Broadcasting Antenna)
- HINT:
-
The double-sided tape and tape are not available as supply parts. If these pieces of tape still have enough adhesion to secure the roof headlining and antenna cord, reuse them. If the roof headlining has been replaced with a new one, or if the tape and/or the double-sided tape is no longer sticky, apply new tape following the procedure below.
Apply new double-sided tape.
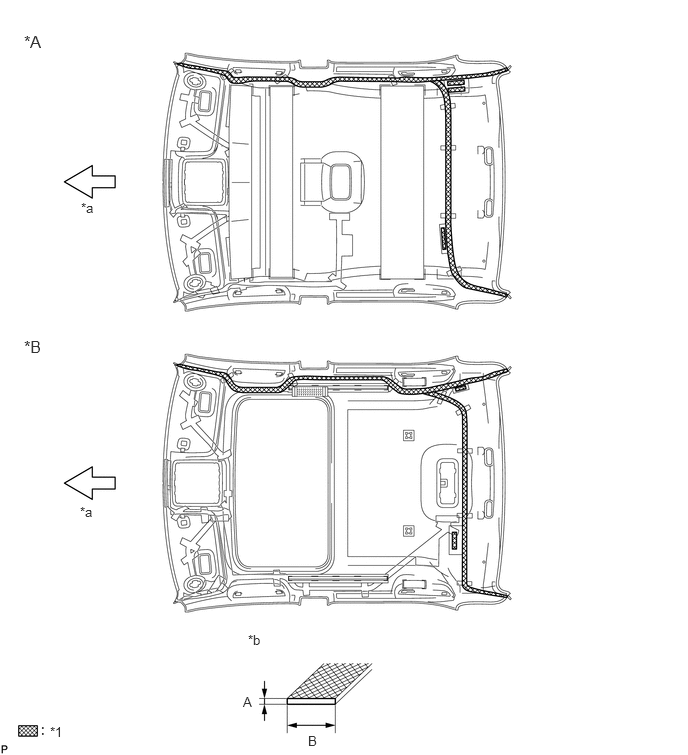
| *A | w/o Sliding Roof | *B | w/ Sliding Roof |
| *1 | Double-sided Tape | - | - |
| *a | Front | *b | Double-sided Tape Size |
| Area | Dimension |
|---|---|
| A | 1.0 mm (0.0394 in.) |
| B | 10.0 mm (0.394 in.) |
Remove the old double-sided tape from the roof headlining assembly.
Prepare the appropriate amount of new double-sided tape.
- HINT:
-
Be careful not to touch the adhesive surface.
Apply the double-sided tape to the roof headlining while aligning the tape with the markings on the roof headlining assembly.
Peel off the release paper from the double-sided tape.
Install the No. 2 antenna cord sub-assembly to the roof headlining assembly from the front of the vehicle.
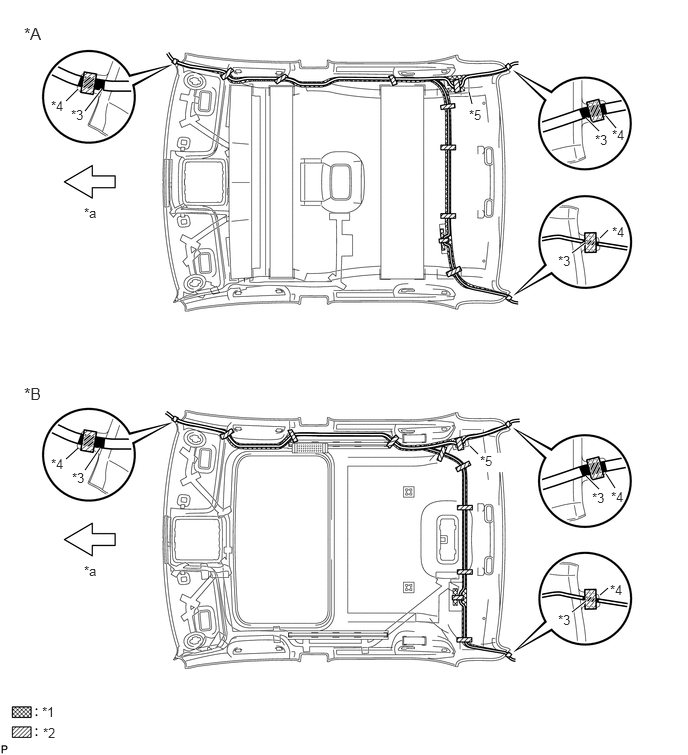
| *A | w/o Sliding Roof | *B | w/ Sliding Roof |
| *1 | Double-sided Tape | *2 | Tape |
| *3 | Marking Tape | *4 | Protrusion |
| *5 | Adjustment Area | - | - |
| *a | Front | - | - |
- HINT:
-
Align the taped part of the antenna cable with the protrusion of the roof headlining, and apply tape to secure the cable to the headlining.
Put the strips of tape back to the positions shown in the illustration in order to secure the antenna cord to the roof headlining assembly.
- HINT:
- ·
If the tape is no longer sticky, use other tape, such as packing tape, that has enough adhesion to secure the antenna cord to the roof headlining assembly.
·For the right front corner of the roof headlining assembly, align the marking tape on the antenna cord with the protrusion of the roof headlining, and wrap tape around the antenna cord and roof headlining assembly once or twice to securely hold them.
·For the rear corner of the roof headlining assembly, align the marking tape on the antenna cord with the rear edge of the roof headlining, and secure the antenna cord to the roof headlining assembly with tape.
·If the entire length of the antenna cord does not fit, adjust the length by tucking in the cord at the area shown in the illustration.
63341
3.INSTALL NO. 1 ROOF SILENCER PAD (w/o Sliding Roof)
Align the marking on the roof headlining assembly with the No. 1 roof silencer pad and install the pad using hot-melt glue as shown in the illustration.
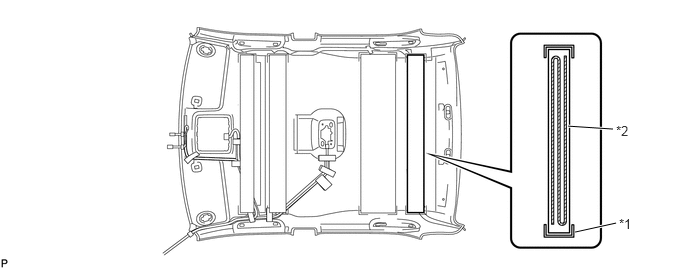
| *1 | Marking | *2 | Hot-melt Glue |
- NOTICE:
-
Securely attach the No. 1 roof silencer pad before the hot-melt glue cools.
4.INSTALL ROOF HEADLINING ASSEMBLY
86101
5.INSTALL ANTENNA CORD SUB-ASSEMBLY (for LHD)
Engage the 8 clamps to install the antenna cord sub-assembly.
86101
6.INSTALL ANTENNA CORD SUB-ASSEMBLY (for RHD)
Engage the 10 clamps to install the antenna cord sub-assembly.
55972C
7.INSTALL NO. 2 SIDE DEFROSTER NOZZLE DUCT
55845A
8.INSTALL NO. 3 HEATER TO REGISTER DUCT
9.INSTALL INSTRUMENT PANEL SAFETY PAD ASSEMBLY