BRAKE SYSTEM (OTHER) BRAKE SYSTEM ON-VEHICLE INSPECTION
CAUTION / NOTICE / HINT
- NOTICE:
-
A DTC may be stored during the inspection procedure. Be sure to clear the DTCs and check that no DTCs are output after the inspection is finished.
PROCEDURE

 1.INSPECT PRESSURE SENSOR
Check auxiliary battery voltage.
- Standard voltage:
11 to 14 V (while the power switch is off)
Set a pedal effort gauge and SST, and connect the intelligent tester.
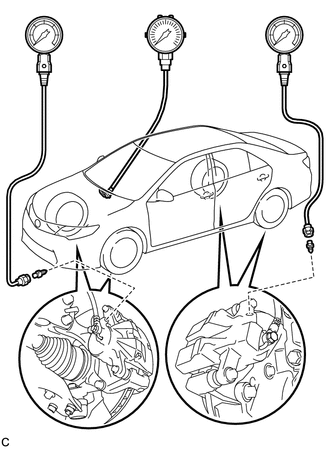
| *1 | Pedal Effort Gauge |
| *2 | SST (LSPV Gauge) |
| *3 | SST (No. 1 Nipple) |
Set a pedal effort gauge and SST.
- SST
- 09709-29018 (09709-00060)
Connect the intelligent tester to the DLC3 with the power switch off, shift lever in P and the parking brake applied.
Turn the power switch on (IG) and turn the intelligent tester on.
Bleed air from SST (LSPV gauge).
Inspect the wheel cylinder pressure sensor and regulator pressure sensor.
Enter the following menus: Chassis / ABS/VSC/TRC / Active Test / Power Supply Air Bleeding Pattern 1.
- Chassis > ABS/VSC/TRC > Active Test
-
Active Test Display Power Supply Air Bleeding Pattern1 -
Data List Display Regulator Pressure Sensor Output Wheel Cylinder Pressure Sensor - 50004 105 62 307,308
Select "Wheel Cylinder Pressure Sensor" and "Regulator Pressure Sensor Output".
Check the value output from "Wheel Cylinder Pressure Sensor" and "Regulator Pressure Sensor Output" by depressing the brake pedal.
- Standard Result:
Pedal Effort
N (kgf, lbf)Regulator Pressure Sensor Output
(V)Rear Right Wheel Hydraulic Pressure
(MPa (kgf/cm2, psi))Rear Left Wheel Hydraulic Pressure
(MPa (kgf/cm2, psi))50 (5, 11.2) 0.53 to 1.33 0.10 to 4.10 (1.1 to 41.8, 15 to 594) 0.10 to 4.10 (1.1 to 41.8, 15 to 594) 100 (10, 22.5) 1.32 to 2.12 3.98 to 7.98 (40.6 to 81.3, 578 to 1157) 3.98 to 7.98 (40.6 to 81.3, 578 to 1157) 150 (15, 33.7) 2.10 to 2.90 7.81 to 11.8 (79.7 to 120.4, 1133 to 1713) 7.81 to 11.8 (79.7 to 120.4, 1133 to 1713) 200 (20, 45.0) 2.90 to 3.70 11.8 to 15.7 (119.6 to 160.2, 1700 to 2280) 11.8 to 15.7 (119.6 to 160.2, 1700 to 2280)
- Standard Result:
Pedal Effort
N (kgf, lbf)Wheel Cylinder Pressure Sensor
(V)Front Right Wheel Hydraulic Pressure
(MPa (kgf/cm2, psi))Front Left Wheel Hydraulic Pressure
(MPa (kgf/cm2, psi))50 (5, 11.2) 0.67 to 1.07 0.00 to 3.81 (0.0 to 38.8, 0 to 552) 0.00 to 3.81 (0.0 to 38.8, 0 to 552) 100 (10, 22.5) 1.14 to 1.94 3.12 to 5.12 (31.9 to 52.2, 453 to 742) 3.12 to 5.12 (31.9 to 52.2, 453 to 742) 150 (15, 33.7) 1.81 to 2.61 6.40 to 10.4 (65.3 to 106.0, 929 to 1508) 6.40 to 10.4 (65.3 to 106.0, 929 to 1508) 200 (20, 45.0) 2.49 to 3.29 9.72 to 13.7 (99.2 to 139.9, 1410 to 1990) 9.72 to 13.7 (99.2 to 139.9, 1410 to 1990)
After inspection, turn "Power Supply Air Bleeding Pattern 1" off.
Remove pedal effort gauge and SST.
Remove pedal effort gauge and SST, and bleed brake line.
Inspect accumulator sensor.
Enter the following menus: Chassis / ABS/VSC/TRC / Data List "Accumulator Sensor".
- Chassis > ABS/VSC/TRC > Data List
-
Tester Display Accumulator Sensor - 50003 105 13
Depress the brake pedal 4 or 5 times and operate the booster pump motor.
After confirming that the booster pump motor stops, check the output voltage.
- Standard voltage:
2.9 to 4.2 V
47210L
2.INSPECT BRAKE BOOSTER WITH MASTER CYLINDER ASSEMBLY
Check auxiliary battery voltage.
- Standard voltage:
11 to 14 V (while the power switch is off)
Connect the intelligent tester and set a pedal effort gauge.
Set a pedal effort gauge.
Connect the intelligent tester to the DLC3 with the power switch off, shift lever in P and the parking brake applied.
Turn the power switch on (IG) and turn the intelligent tester on.
Clear the DTCs.
Check operation without the brake booster.
Inspect and adjust the brake pedal height.
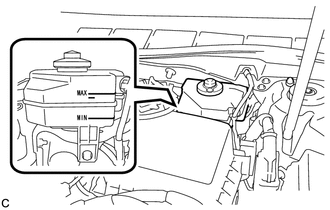
| *a | Fluid Level Support Line |
| *b | MIN Line |
Adjust the brake fluid level in the reservoir between the MIN line and fluid level support line.
Turn the intelligent tester on and enter the following menus: Chassis / ABS/VSC/TRC / Utility / ECB (Electronically Controlled Brake system) Utility / Zero Down.
- Chassis > ABS/VSC/TRC > Utility
-
Tester Display ECB Utility - 50005 105 167
- NOTICE:
-
Go to the next step without turning the power switch off.
Enter the following menus: Chassis / ABS/VSC/TRC / Data List "Wheel Cylinder Pressure Sensor", "Stroke Sensor" and "Stroke Sensor 2".
- Chassis > ABS/VSC/TRC > Data List
-
Tester Display Stroke Sensor Stroke Sensor2 Wheel Cylinder Pressure Sensor - 50003 105 11,12,308
Check the value output from "Wheel Cylinder Pressure Sensor", "Stroke Sensor" and "Stroke Sensor 2" by depressing the brake pedal.
- Standard Voltage:
Pedal Effort
N (kgf, lbf)Wheel Cylinder Pressure Sensor
(V)Stroke Sensor
(V)Stroke Sensor 2
(V)200 (20, 45.0) 0.47 to 1.27 1.17 to 1.87 3.13 to 3.83 500 (51, 112.4) 0.95 to 1.75 1.44 to 2.17 1.86 to 2.56
Turn the power switch off to finish "Zero Down".
Turn the power switch on and wait for 20 seconds, then enter the following menus: Chassis / ABS/VSC/TRC / Data List "Accumulator Sensor", and check the output voltage.
- Chassis > ABS/VSC/TRC > Data List
-
Tester Display Accumulator Sensor - 50003 105 13
- Standard voltage:
2.9 to 4.2 V
3.INSPECT STROKE SIMULATOR
Check auxiliary battery voltage.
- Standard voltage:
11 to 14 V (while the power switch is off)
Connect the intelligent tester and set a pedal effort gauge.
Set a pedal effort gauge.
Connect the intelligent tester to the DLC3 with the power switch off, shift lever in P and the parking brake applied.
Turn the power switch on (IG) and turn the intelligent tester on.
Clear the DTCs.
Check operation with the brake booster.
Turn the power switch on (IG).
Enter the following menus: Chassis / ABS/VSC/TRC / Data List "Stroke Sensor" and "Stroke Sensor 2".
- Chassis > ABS/VSC/TRC > Data List
-
Tester Display Stroke Sensor Stroke Sensor2 - 50003 105 11,12
Depress the brake pedal 4 or 5 times.
Check the value output from "Stroke Sensor" and "Stroke Sensor 2" by depressing the brake pedal.
- Standard Voltage:
Pedal Effort
N (kgf, lbf)Stroke Sensor
(V)Stroke Sensor 2
(V)50 (5, 11.2) 1.26 to 1.96 3.04 to 3.74 100 (10, 22.5) 1.47 to 2.17 2.83 to 3.53 150 (15, 33.7) 1.60 to 2.30 2.70 to 3.40