EXTERIOR PANELS / TRIM FRONT DOOR BELT MOULDING INSTALLATION
PROCEDURE

 1. PRECAUTION
- NOTICE:
-
After turning the power switch off, waiting time may be required before disconnecting the cable from the auxiliary battery negative (-) terminal. Therefore, make sure to read the disconnecting the cable from the auxiliary battery negative (-) terminal notices before proceeding with work.
-
Click hereGeneral>INTRODUCTION>REPAIR INSTRUCTION>PRECAUTION
75720
2.INSTALL FRONT DOOR BELT MOULDING ASSEMBLY
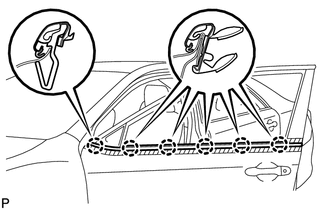
Engage the 6 claws to install the front door belt moulding assembly.
68102
3.INSTALL FRONT DOOR GLASS SUB-ASSEMBLY
- HINT:
-
Use the same procedure for the RH side and LH side.
-
Click hereVehicle Exterior>DOOR / HATCH>FRONT DOOR>REASSEMBLY
67832
4.INSTALL FRONT DOOR SERVICE HOLE COVER
- HINT:
-
Use the same procedure for the RH side and LH side.
-
Click hereVehicle Exterior>DOOR / HATCH>FRONT DOOR>REASSEMBLY
5.INSTALL MIRROR SUB-ASSEMBLY WITH COVER
6.CONNECT CABLE TO AUXILIARY BATTERY NEGATIVE TERMINAL
- NOTICE:
-
When disconnecting the cable, some systems need to be initialized after the cable is reconnected.
-
Click hereGeneral>INTRODUCTION>REPAIR INSTRUCTION>INITIALIZATION
64718C
7.INSTALL LUGGAGE TRIM SERVICE HOLE COVER
8.INITIALIZE POWER WINDOW CONTROL SYSTEM (for Driver Side)
9.INSPECT POWER WINDOW OPERATION