MIRROR (EXT) POWER MIRROR CONTROL SYSTEM(w/ Memory) Driver Side Power Mirror cannot be Adjusted with Power Mirror Switch
SYSTEM DESCRIPTION
When the mirror adjust switch is operated, the main body ECU (multiplex network body ECU) detects the switch operation and sends the mirror adjust switch signal to the outer mirror control ECU assembly (driver door) via CAN communication. On receiving the signal, the outer mirror control ECU assembly (driver door) operates the vertical and horizontal mirror motors, which are built into the mirror sub-assembly (driver door), to adjust the mirror surface position.
WIRING DIAGRAM
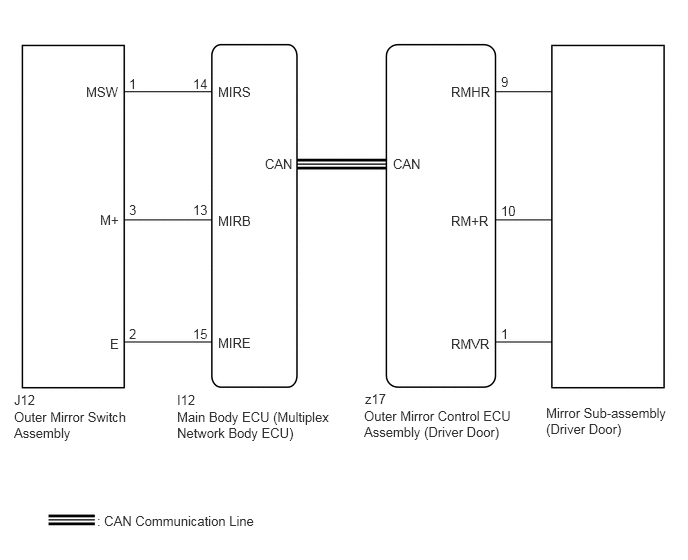
PROCEDURE
Check for CAN communication system DTCs.
Click herePower Source / Network>NETWORKING>CAN COMMUNICATION SYSTEM>DIAGNOSIS SYSTEM
- OK:
CAN communication DTC is not output.
- Result:
Proceed to OK NG
OK
NG
Connect the intelligent tester to the DLC3.
Turn the power switch on (IG).
Turn the intelligent tester on.
Enter the following menus: Body / Main Body / Data List.
Read the Data List according to the display on the intelligent tester.
- Body Electrical > Main Body > Data List
-
Tester Display Measurement Item Range Normal Condition Diagnostic Note Mirror Selection SW (R) Mirror select switch signal for RH mirror ON or OFF ON: Mirror select switch in R position
OFF: Mirror select switch off or in L position- Mirror Position SW (R) Mirror adjust switch signal (Right) ON or OFF ON: Mirror adjust switch pressed right
OFF: Mirror adjust switch not pressed rightCheck with the mirror select switch in the R position. Mirror Position SW (L) Mirror adjust switch signal (Left) ON or OFF ON: Mirror adjust switch pressed left
OFF: Mirror adjust switch not pressed leftCheck with the mirror select switch in the R position. Mirror Position SW (Up) Mirror adjust switch signal (Up) ON or OFF ON: Mirror adjust switch pressed up
OFF: Mirror adjust switch not pressed upCheck with the mirror select switch in the R position. Mirror Position SW (Dwn) Mirror adjust switch signal (Down) ON or OFF ON: Mirror adjust switch pressed down
OFF: Mirror adjust switch not pressed downCheck with the mirror select switch in the R position.
- Body Electrical > Main Body > Data List
-
Tester Display Mirror Selection SW (R) Mirror Position SW (R) Mirror Position SW (L) Mirror Position SW (Up) Mirror Position SW (Dwn) - 50003 123 98,100,101,102,103
- OK:
On the intelligent tester screen, ON or OFF is displayed for each item according to the table above.
- Result:
Proceed to OK NG
OK
NG
Enter the following menus: Body / Mirror R / Active Test.
Perform the Active Test according to the display on the intelligent tester.
- Body Electrical > Mirror R > Active Test
-
Tester Display Measurement Item Control Range Diagnostic Note Mirror Up/Down Mirror vertical operation Up / Down ·Operate with power switch on (IG) and the vehicle stopped.
·This test activates the mirror up or down.
·This operation can be confirmed by watching the mirror move in the desired direction.
Mirror Right/Left Mirror horizontal operation Right / Left ·Operate with power switch on (IG) and the vehicle stopped.
·This test tilts the mirror right or left.
·This operation can be confirmed by watching the mirror move in the desired direction.
- Body Electrical > Mirror R > Active Test
-
Tester Display Mirror Up/Down - 50004 224 2
- Body Electrical > Mirror R > Active Test
-
Tester Display Mirror Right/Left - 50004 224 3
- OK:
Power mirror operation is normal.
- Result:
Proceed to OK NG
OK
NG
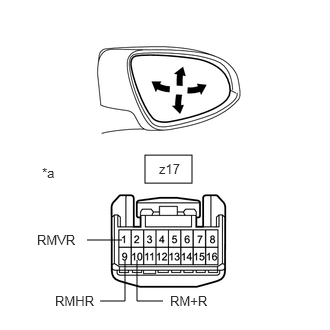
| *a | Component without harness connected
(Mirror Sub-assembly RH) |
Remove the mirror sub-assembly RH.
Click hereVehicle Exterior>MIRROR (EXT)>OUTER REAR VIEW MIRROR>REMOVAL
Apply auxiliary battery voltage and check the operation of the mirror sub-assembly RH.
- OK:
Measurement Condition Specified Condition Auxiliary battery positive (+) → Terminal z17-1 (RMVR)
Auxiliary battery negative (-) → Terminal z17-10 (RM+R)Turns upward Auxiliary battery negative (-) → Terminal z17-1 (RMVR)
Auxiliary battery positive (+) → Terminal z17-10 (RM+R)Turns downward Auxiliary battery positive (+) → Terminal z17-9 (RMHR)
Auxiliary battery negative (-) → Terminal z17-10 (RM+R)Turns left Auxiliary battery negative (-) → Terminal z17-9 (RMHR)
Auxiliary battery positive (+) → Terminal z17-10 (RM+R)Turns right
- Result:
Proceed to OK NG
OK
NG
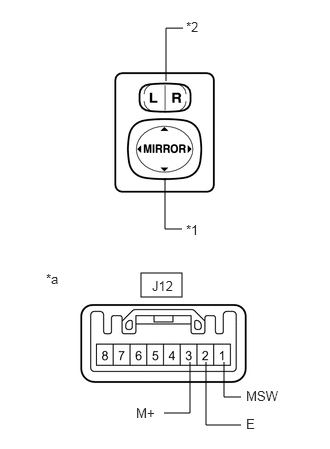
| *1 | Mirror Adjust Switch |
| *2 | Mirror Select Switch |
| *a | Component without harness connected
(Outer Mirror Switch Assembly) |
Remove the outer mirror switch assembly.
Click hereVehicle Exterior>MIRROR (EXT)>OUTER MIRROR SWITCH>REMOVAL
Measure the resistance according to the value(s) in the table below.
- Standard Resistance:
Tester Connection Switch Condition Specified Condition J12-3 (M+) - J12-2 (E) Mirror adjust switch pressed up 90 to 110 Ω Mirror adjust switch pressed down 437 to 503 Ω Mirror adjust switch pressed left 744 to 856 Ω Mirror adjust switch pressed right 225 to 275 Ω J12-1 (MSW) - J12-2 (E) Mirror select switch L 90 to 110 Ω Mirror select switch R Below 10 Ω Mirror select switch off 10 kΩ or higher
- Result:
Proceed to OK NG
OK
NG
Disconnect the J12 connector from the outer mirror switch assembly.
Disconnect the I12 connector from the main body ECU (multiplex network body ECU).
Measure the resistance according to the value(s) in the table below.
- Standard Resistance:
Tester Connection Condition Specified Condition J12-2 (E) - I12-15 (MIRE) Always Below 1 Ω J12-3 (M+) - I12-13 (MIRB) Always Below 1 Ω J12-1 (MSW) - I12-14 (MIRS) Always Below 1 Ω J12-2 (E) - Body ground Always 10 kΩ or higher J12-3 (M+) - Body ground Always 10 kΩ or higher J12-1 (MSW) - Body ground Always 10 kΩ or higher
- Result:
Proceed to OK NG
OK
NG