PARK ASSIST / MONITORING TOYOTA PARKING ASSIST-SENSOR SYSTEM(for 4 Sensor Type) Clearance Sonar Main Switch Circuit
DESCRIPTION
The back sonar or clearance sonar switch assembly is installed at the base of the driver side of the instrument panel.
When the back sonar or clearance sonar switch assembly is turned on, an on signal is sent to the clearance warning ECU assembly. The Toyota parking assist-sensor system operates according to this signal.
WIRING DIAGRAM
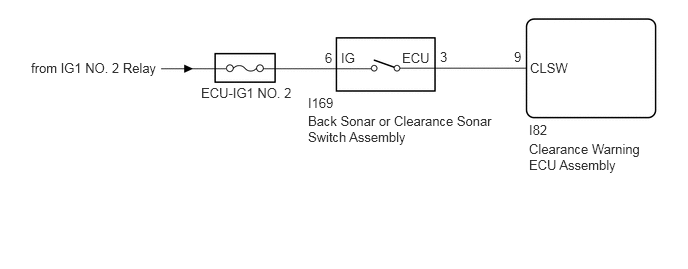
CAUTION / NOTICE / HINT
- NOTICE:
-
Inspect the fuses for circuits related to this system before performing the following procedure.
PROCEDURE
Connect the GTS to the DLC3.
Turn the power switch on (IG).
Turn the GTS on.
Enter the following menus: Body Electrical / Clearance Sonar / Data List.
Read the Data List according to the display on the GTS.
- Body Electrical > Clearance Sonar > Data List
-
Tester Display Measurement Item Range Normal Condition Diagnostic Note Main Switch Back sonar or clearance sonar switch assembly OFF or ON OFF: Back sonar or clearance sonar switch assembly off
ON: Back sonar or clearance sonar switch assembly on- Clearance Sonar ECU Type Type of clearance sonar ECU Normal Normal: Normal clearance sonar type -
- Body Electrical > Clearance Sonar > Data List
-
Tester Display Main Switch Clearance Sonar ECU Type - 50003 170 1,4
- Result:
Result Proceed to Both of the following conditions are met:
·The display changes as shown above when the back sonar or clearance sonar switch assembly is operated.
·"Normal" is displayed.
A "Normal" is not displayed. B Both of the following conditions are met:
·The display does not change as shown above when the back sonar or clearance sonar switch assembly is operated.
·"Normal" is displayed.
C
A
B
C
Remove the back sonar or clearance sonar switch assembly.
Click hereAudio / Visual / Telematics>PARK ASSIST / MONITORING>CLEARANCE SONAR MAIN SWITCH>REMOVAL
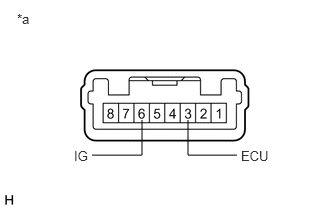
| *a | Component without harness connected
(Back Sonar or Clearance Sonar Switch Assembly) |
Measure the resistance according to the value(s) in the table below.
- Standard Resistance:
Tester Connection Condition Specified Condition 6 (IG) - 3 (ECU) Back sonar or clearance sonar switch assembly on Below 1 Ω 6 (IG) - 3 (ECU) Back sonar or clearance sonar switch assembly off 10 kΩ or higher
- Result:
Proceed to OK NG
OK
NG
Measure the voltage according to the value(s) in the table below.
- Standard Voltage:
Tester Connection Condition Specified Condition I169-6 (IG) - Body ground Power switch on (IG) 11 to 14 V I169-6 (IG) - Body ground Power switch off Below 1 V
- Result:
Proceed to OK NG
OK
NG
Disconnect the I82 clearance warning ECU assembly connector.
Measure the resistance according to the value(s) in the table below.
- Standard Resistance:
Tester Connection Condition Specified Condition I82-9 (CLSW) - I169-3 (ECU) Always Below 1 Ω I82-9 (CLSW) - Body ground Always 10 kΩ or higher
- Result:
Proceed to OK NG
OK
NG