Home › Engine / Hybrid System › 2AR-FXE ENGINE MECHANICAL › ENGINE ASSEMBLY

ENGINE ASSEMBLY > INSTALLATION

for Preparation Click here


HINT:
Perform "Inspection After Repair" after replacing the engine assembly.

  1. w/ EGR System: (Click here)
  1. w/o EGR System: (Click here)


1. REMOVE ENGINE STAND
  1. Using a chain block and engine sling device, secure the engine assembly.

    NOTICE:
    1. Adjust the angle of the sling device carefully to prevent the engine assembly or engine hanger from deforming or becoming damaged.
    2. Servicing an engine assembly while it is hanging is dangerous. This can be done only when installing/removing the engine assembly to/from an engine stand.

  1. Remove the engine stand from the engine.


2. INSTALL ENGINE WIRE
  1. Install the engine wire to the engine with transaxle.


3. INSTALL FLYWHEEL SUB-ASSEMBLY


    A195875E06
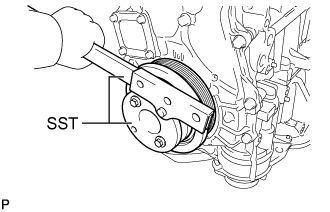
  1. Using SST, hold the crankshaft.

    SST
    09213-54015  
    09330-00021  

    HINT:
    SST (Crankshaft pulley holding tool) Fixing bolt part No. : 91551-80650 (2 pcs)


    A192239E03
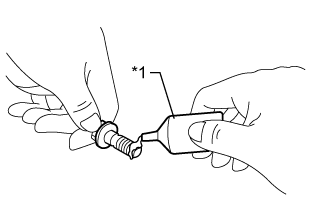
  1. Apply a few drops of adhesive to 2 or 3 threads at the tip of each of the 8 bolts.
    Text in Illustration 
    *1
    Adhesive

    Adhesive:
    Toyota Genuine Adhesive 1324, Three Bond 1324 or equivalent


    A259955E02
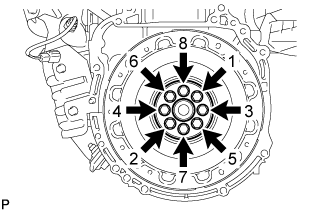
  1. Install and uniformly tighten the 8 bolts in the sequence shown in the illustration.

    Torque:
    130 N*m{ 1325 kgf*cm , 96 ft.*lbf }

    NOTICE:
    Do not start the engine for at least an hour after installing the flywheel sub-assembly.

  1. Check that the crankshaft turns smoothly.


4. INSTALL TRANSMISSION INPUT DAMPER ASSEMBLY


    A195875E06
  1. Using SST, hold the crankshaft.

    SST
    09213-54015  
    09330-00021  

    HINT:
    SST (Crankshaft pulley holding tool) Fixing bolt part No. : 91551-80650 (2 pcs)

  1. Install the transmission input damper.
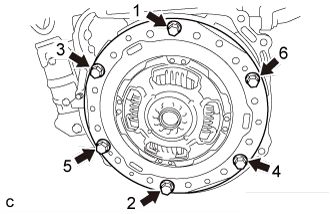


    A260502E02
  1. Install and uniformly tighten the 6 bolts in the sequence shown in the illustration.

    Torque:
    30 N*m{ 306 kgf*cm , 22 ft.*lbf }

    NOTICE:
    1. Take care not to insert the transmission input damper in the wrong direction.


5. INSTALL HYBRID VEHICLE TRANSAXLE ASSEMBLY


    C244781E01
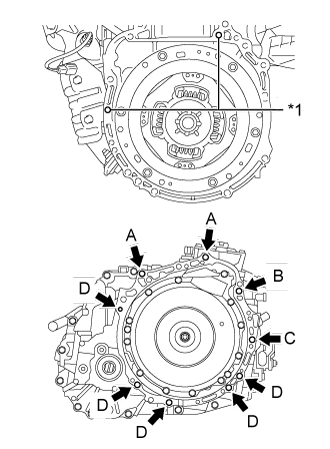
  1. Make sure that the knock pins are installed to the engine.
    Text in Illustration 
    *1
    Knock Pin

  1. Install the hybrid vehicle transaxle assembly to the engine with the 9 bolts.
    Bolt
    Bolt Length
    Torque
    A, B
    55 mm (2.17 in.)
    64 N*m (653 kgf*cm, 47 ft.*lbf)
    C
    65 mm (2.56 in.)
    46 N*m (469 kgf*cm, 34 ft.*lbf)
    D
    32 mm (1.26 in.)
    44 N*m (449 kgf*cm, 32 ft.*lbf)
    E
    38 mm (1.50 in.)
    28 N*m (286 kgf*cm, 21 ft.*lbf)

    NOTICE:
    1. Do not apply grease either to the spline or to the input shaft.
    2. Make sure that the wire harness or similar items are not pinched between the contact surfaces.
    3. Do not forcibly pry on the hybrid vehicle transaxle.
    4. Make sure to align the hybrid vehicle transaxle so that the input shaft of the hybrid vehicle transaxle will be inserted straight into the inner splines of the transmission input damper.
    5. When inserting the input shaft of the hybrid vehicle transaxle into the inner splines of the transmission input damper, do not shake the hybrid vehicle transaxle excessively.
    6. When mounting the hybrid vehicle transaxle to the engine, make sure to securely fit the knock pins into the knock holes.

    HINT:
    Temporarily tighten bolt B first.


6. INSTALL ENGINE MOUNTING BRACKET RH
  1. Install the engine mounting bracket RH with the 3 bolts.

    Torque:
    54 N*m{ 551 kgf*cm , 40 ft.*lbf }


7. INSTALL DRIVE SHAFT BEARING BRACKET
  1. Install the drive shaft bearing bracket with the 3 bolts.

    Torque:
    64 N*m{ 653 kgf*cm , 47 ft.*lbf }


8. TEMPORARILY INSTALL FRONT ENGINE MOUNTING INSULATOR
  1. Temporarily install the front engine mounting insulator with the 3 nuts.

    HINT:
    Perform this procedure only when replacement of the front engine mounting insulator is necessary.


9. TEMPORARILY INSTALL ENGINE MOUNTING INSULATOR LH
  1. Temporarily install the engine mounting insulator LH with the 3 nuts.

    HINT:
    Perform this procedure only when replacement of the engine mounting insulator LH is necessary.


10. TEMPORARILY INSTALL ENGINE MOUNTING INSULATOR RH
  1. Temporarily install the engine mounting insulator RH with the 3 nuts.

    HINT:
    Perform this procedure only when replacement of the engine mounting insulator RH is necessary.


11. INSTALL FRONT FRAME ASSEMBLY
  1. Install the engine mounting insulator LH with the nut.

    Torque:
    95 N*m{ 969 kgf*cm , 70 ft.*lbf }

  1. Install the engine mounting insulator RH with the nut.

    Torque:
    95 N*m{ 969 kgf*cm , 70 ft.*lbf }

  1. Install the front engine mounting insulator with the bolt.

    Torque:
    87 N*m{ 887 kgf*cm , 64 ft.*lbf }


  1. Fully tighten the 9 temporarily installed nuts of the engine mounting insulators to the specified torque.
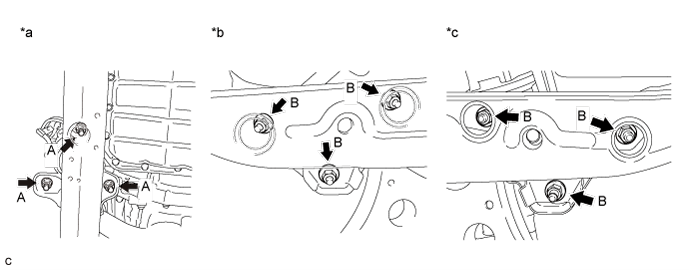

    A172973E04


    Text in Illustration 
    *a
    Front Engine Mounting Insulator
    *b
    Engine Mounting Insulator RH
    *c
    Engine Mounting Insulator LH
    -
    -

    HINT:
    Perform this procedure only when replacement of the engine mounting insulator is necessary.

    Torque:
    A:
    52 N*m{ 530 kgf*cm , 38 ft.*lbf }
    B:
    87 N*m{ 887 kgf*cm , 64 ft.*lbf }


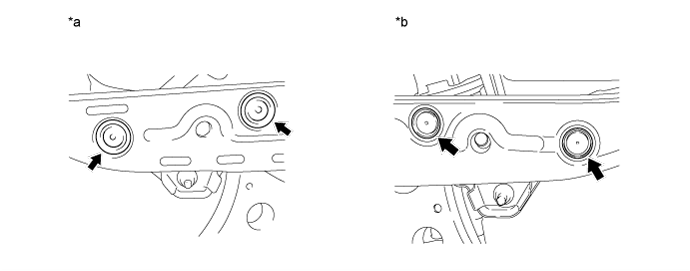
  1. Install the 4 hole plugs.


    A256545E01


    Text in Illustration 
    *a
    Engine Mounting Insulator RH
    *b
    Engine Mounting Insulator LH

    HINT:
    Perform this procedure only when replacement of the engine mounting insulator is necessary.

  1. Connect the No. 4 engine wire to the front frame assembly with the bolt.

    Torque:
    8.0 N*m{ 82 kgf*cm , 71 in.*lbf }


12. INSTALL ENGINE ASSEMBLY WITH TRANSAXLE
  1. Set the engine assembly with transaxle on an engine lifter.
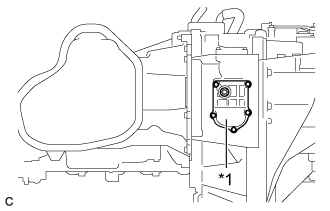
    NOTICE:
    1. Install a height adjustment attachment and plate lift attachment onto the engine assembly with transaxle.
    2. Do not position a height adjustment attachment or plate lift attachment onto the front frame assembly.
    3. To prevent the oil pan from deforming, do not place any attachments onto the oil pan of the engine assembly with transaxle.
    4. Make sure to support the engine assembly with transaxle securely to prevent it from falling.

    5. A346911E01
      To prevent coolant leaks, do not position the height adjustment attachments or plate lift attachments under the No. 2 motor water jacket cover assembly.
      Text in Illustration 
      *1
      No. 2 Motor Water Jacket Cover Assembly

  1. Remove the engine hangers .

  1. Install the engine assembly to the vehicle.
    NOTICE:
    Do not raise the engine more than necessary. If the engine is raised excessively, the vehicle may also be lifted up.

    HINT:
    1. Make sure that the engine is clear of all wiring and hoses.
    2. While raising the engine into the vehicle, do not allow it to contact the vehicle.


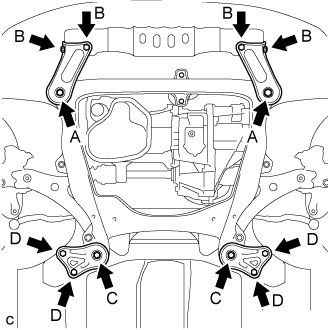
    A260218E04
  1. Install the frame side rail plate RH and LH with the 4 bolts and 2 nuts.

    Torque:
    A:
    85 N*m{ 867 kgf*cm , 62 ft.*lbf }
    B:
    32 N*m{ 326 kgf*cm , 24 ft.*lbf }

  1. Install the front suspension member brace rear RH and LH with the 4 bolts and 2 nuts.

    Torque:
    C:
    85 N*m{ 867 kgf*cm , 62 ft.*lbf }
    D:
    32 N*m{ 326 kgf*cm , 24 ft.*lbf }

    HINT:
    Perform "Inspection After Repair" after replacing the engine assembly.
    1. w/ EGR System: (Click here)
    2. w/o EGR System: (Click here)


13. INSTALL FLYWHEEL HOUSING UNDER COVER
  1. Install the flywheel housing under cover.


14. INSTALL FRONT DRIVE SHAFT HOLE SNAP RING LH
  1. Install a new front drive shaft hole snap ring LH.

    NOTICE:
    Face the end gap of the front drive shaft hole snap ring downward.


15. INSTALL FRONT DRIVE SHAFT ASSEMBLY LH
  1. Coat the spline of the front drive inboard joint assembly with ATF.

  1. Coat the lip of the hybrid vehicle transaxle assembly type T oil seal with MP grease.
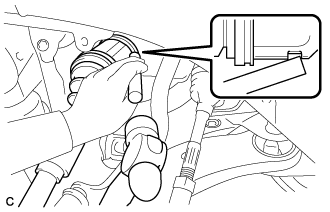


    C165536
  1. Align the inboard joint splines, and using a brass bar and a hammer, install the front drive shaft assembly LH.
    NOTICE:
    1. Face the end gap of the front drive shaft hole snap ring LH downward.
    2. Do not damage the hybrid vehicle transaxle assembly type T oil seal.
    3. Do not damage the front axle inboard joint boot.
    4. Make sure to center the front drive shaft assembly LH during installation to prevent damage to the front drive shaft hole snap ring LH.

    HINT:
    Confirm whether the drive shaft is securely driven in by checking the reaction force and sound.


    C240136E01
  1. Align the matchmarks and install the front drive shaft assembly LH to the front axle hub sub-assembly.
    Text in Illustration 
    *a
    Matchmark

    NOTICE:
    Be careful not to damage the front axle outboard joint boot or speed sensor rotor.


16. INSTALL FRONT DRIVE SHAFT ASSEMBLY RH
  1. Coat the spline of the front drive inboard joint assembly with ATF.

  1. Coat the lip of the hybrid vehicle transaxle assembly type T oil seal with MP grease.

  1. Install a new bearing bracket hole snap ring to the front drive shaft assembly RH.

  1. Install the front drive shaft assembly RH.
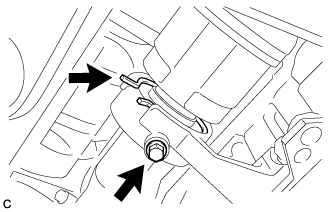
    NOTICE:
    1. Do not damage the hybrid vehicle transaxle assembly type T oil seal.
    2. Do not damage the front axle inboard joint boot.
    3. When inserting the front drive shaft assembly RH, keep it level.


    C239409
  1. Install the bearing bracket hole snap ring and a new bolt.
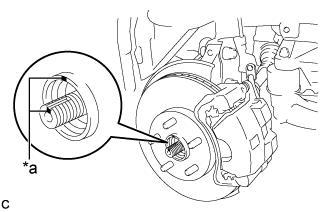
    Torque:
    32 N*m{ 330 kgf*cm , 24 ft.*lbf }


    C240137E01
  1. Align the matchmarks and install the front drive shaft assembly RH to the front axle hub sub-assembly.
    Text in Illustration 
    *a
    Matchmark

    NOTICE:
    Be careful not to damage the front axle outboard joint boot or speed sensor rotor.


17. INSTALL FRONT LOWER NO. 1 SUSPENSION ARM SUB-ASSEMBLY LH
  1. Connect the front lower No. 1 suspension arm sub-assembly to the front lower ball joint assembly with the bolt and 2 nuts.

    Torque:
    75 N*m{ 765 kgf*cm , 55 ft.*lbf }


18. INSTALL FRONT LOWER NO. 1 SUSPENSION ARM SUB-ASSEMBLY RH

HINT:
Use the same procedure described for the LH side.


19. CONNECT TIE ROD ASSEMBLY LH
  1. Connect the tie rod assembly LH to the steering knuckle with the nut.

    Torque:
    49 N*m{ 500 kgf*cm , 36 ft.*lbf }

  1. Install a new cotter pin.

    NOTICE:
    Further tighten the nut up to 60° if the holes for the cotter pin are not aligned.


20. CONNECT TIE ROD ASSEMBLY RH

HINT:
Use the same procedure described for the LH side.


21. INSTALL FRONT SPEED SENSOR LH
  1. Install the front speed sensor and front flexible hose to the front shock absorber assembly with the bolt and clamp.

    Torque:
    19 N*m{ 192 kgf*cm , 14 ft.*lbf }

    NOTICE:
    Do not twist the front speed sensor when installing it.

    HINT:
    Install the speed sensor harness bracket first and then the front flexible hose.

  1. Install the front speed sensor to the steering knuckle with the bolt.

    Torque:
    8.5 N*m{ 87 kgf*cm , 75 in.*lbf }

    NOTICE:
    Do not twist the front speed sensor when installing it.


22. INSTALL FRONT SPEED SENSOR RH

HINT:
Use the same procedure described for the LH side.


23. INSTALL FRONT STABILIZER LINK ASSEMBLY LH
  1. Install the front stabilizer link assembly to the front shock absorber assembly with the nut.

    Torque:
    74 N*m{ 755 kgf*cm , 55 ft.*lbf }

    If the ball joint turns together with the nut, use a wrench to hold the stud bolt.


24. INSTALL FRONT STABILIZER LINK ASSEMBLY RH

HINT:
Use the same procedure described for the LH side.


25. INSTALL FRONT AXLE SHAFT NUT LH
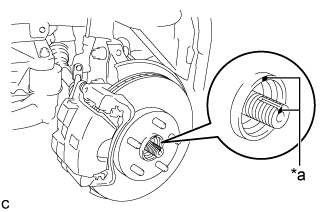
  1. Clean the threaded parts on the front drive shaft assembly and a new axle shaft nut using a non-residue solvent.
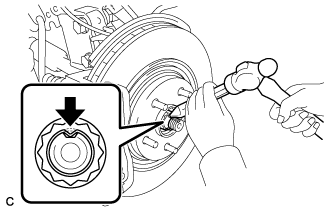
    NOTICE:
    1. Be sure to perform this work even when using a new drive shaft.
    2. Keep the threaded parts free of oil and foreign matter.


    C165538
  1. Using a socket wrench (30 mm), install the front axle shaft nut.

    Torque:
    294 N*m{ 2998 kgf*cm , 217 ft.*lbf }

  1. Using a chisel and hammer, stake the front axle shaft nut.


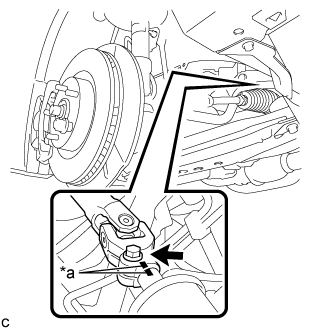
26. CONNECT STEERING INTERMEDIATE SHAFT ASSEMBLY


    C238511E02
  1. Align the matchmarks and install the steering intermediate shaft to the steering link assembly.
    Text in Illustration 
    *a
    Matchmark

  1. Install the bolt.

    Torque:
    35 N*m{ 360 kgf*cm , 26 ft.*lbf }


27. INSTALL FRONT AXLE HUB NUT RH

HINT:
Use the same procedure described for the LH side.


28. INSTALL FRONT EXHAUST PIPE ASSEMBLY (TWC: Rear Catalyst)


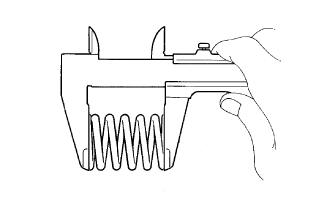
    A077857E03
  1. Using a vernier caliper, measure the free length of the compression springs.
    Standard
    42.0 mm (1.65 in.)
    Minimum
    40.5 mm (1.60 in.)
    If the length is less than the minimum, replace the compression spring.

  1. Temporarily install a new gasket to the exhaust manifold converter sub-assembly (TWC: Front Catalyst).
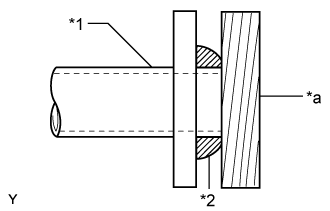


    A104635E18
  1. Using a plastic hammer and wooden block, tap in the gasket until its surface is flush with the exhaust manifold converter sub-assembly (TWC: Front Catalyst).
    Text in Illustration 
    *1
    Exhaust Manifold Converter Sub-assembly (TWC: Front Catalyst)
    *2
    Gasket
    *a
    Wooden Block

    NOTICE:
    1. Be sure to install the gasket in the correct direction.
    2. Do not reuse the gasket.
    3. Do not damage the gasket.
    4. Do not push in the gasket by using the exhaust pipe when connecting it.

  1. Install a new gasket to the front exhaust pipe assembly (TWC: Rear Catalyst).

  1. Connect the front exhaust pipe assembly (TWC: Rear Catalyst) to the exhaust pipe support.


  1. Install the front exhaust pipe assembly (TWC: Rear Catalyst) with the 2 compression springs, 2 bolts and 2 nuts.
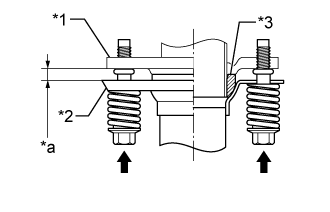
    Torque:
    43 N*m{ 438 kgf*cm , 32 ft.*lbf }


    HINT:
    A258941E04
    After the installation, check that the gaps between the flanges of the exhaust manifold converter sub-assembly (TWC: Front Catalyst) and front exhaust pipe assembly (TWC: Rear Catalyst) are consistent front-to-rear and left-to-right.
    Text in Illustration 
    *1
    Exhaust Manifold Converter Sub-assembly (TWC: Front Catalyst)
    *2
    Front Exhaust Pipe Assembly (TWC: Rear Catalyst)
    *3
    Gasket
    *a
    Space between Flanges: 8.5 mm (0.335 in.)

  1. Connect the heated oxygen sensor connector.


29. INSTALL NO. 1 COOLER REFRIGERANT DISCHARGE HOSE
  1. Remove the vinyl tape from the hose.

  1. Sufficiently apply compressor oil to a new O-ring and the fitting surface of the compressor with motor assembly.

    Compressor oil:
    ND-OIL 11 or equivalent

  1. Install the O-ring to the No. 1 cooler refrigerant discharge hose.

    NOTICE:
    1. Keep the O-ring and O-ring fitting surfaces free from dirt or any foreign objects.
    2. Do not use any compressor oil other than ND-OIL 11 or equivalent. If any compressor oil other than ND-OIL 11 or equivalent is used, compressor motor insulation performance may decrease, resulting in a leakage of electric power.

  1. Install the No. 1 cooler refrigerant discharge hose to the compressor with motor assembly with the bolt.

    Torque:
    9.8 N*m{ 100 kgf*cm , 87 in.*lbf }


30. INSTALL NO. 1 COOLER REFRIGERANT SUCTION HOSE
  1. Remove the vinyl tape from the hose.

  1. Sufficiently apply compressor oil to a new O-ring and the fitting surface of the compressor with motor assembly.

    Compressor oil:
    ND-OIL 11 or equivalent

  1. Install the O-ring to the No. 1 cooler refrigerant suction hose.

    NOTICE:
    1. Keep the O-ring and O-ring fitting surfaces free from dirt or any foreign objects.
    2. Do not use any compressor oil other than ND-OIL 11 or equivalent. If any compressor oil other than ND-OIL 11 or equivalent is used, compressor motor insulation performance may decrease, resulting in a leakage of electric power.

  1. Install the No. 1 cooler refrigerant suction hose to the compressor with motor assembly with the bolt.

    Torque:
    9.8 N*m{ 100 kgf*cm , 87 in.*lbf }


31. INSTALL ENGINE MOVING CONTROL ROD
  1. Temporarily install the engine moving control rod to the engine moving control rod bracket with the bolt.

    HINT:
    Perform this procedure only when replacement of the engine moving control rod is necessary.


32. INSTALL ENGINE MOVING CONTROL ROD BRACKET


  1. When the engine moving control rod has been replaced.
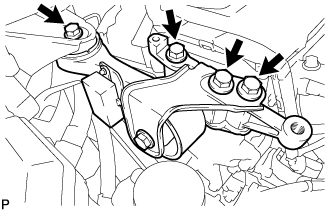


      A259959
    1. Temporarily install the engine moving control rod bracket with the 4 bolts.
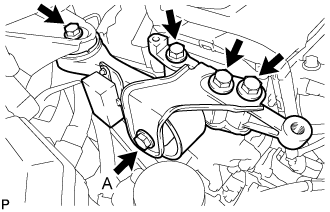


    2. A260731E02
    3. Fully tighten the engine moving control rod bracket with the bolts except bolt A.
      Torque:
      38 N*m{ 387 kgf*cm , 28 ft.*lbf }


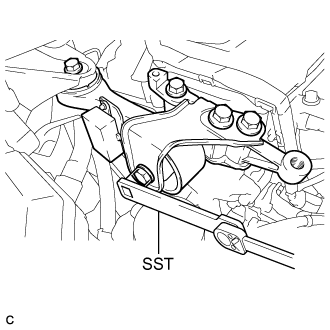
    4. A264179E01
    5. Using SST, fully tighten the bolt A.

      SST
      09961-00950  

      Torque:
      Without SST:
      52 N*m{ 530 kgf*cm , 38 ft.*lbf }
      With SST:
      33 N*m{ 340 kgf*cm , 25 ft.*lbf }

      NOTICE:
      1. The "with SST" torque value is effective when using SST with a fulcrum length of 150 mm (5.91 in.) and a torque wrench with a fulcrum length of 260 mm (10.24 in.) (Click here).
      2. The "with SST" torque value is effective when SST is parallel to the torque wrench.
      3. Fully tighten bolt A using SST.


    A259959
  1. When the engine moving control rod has been reused.

    1. Temporarily install the engine moving control rod bracket with the 4 bolts.

    2. Fully tighten the engine moving control rod bracket with the 4 bolts.

      Torque:
      38 N*m{ 387 kgf*cm , 28 ft.*lbf }


33. INSTALL EARTH WIRE
  1. Install the earth wire with the bolt.

    Torque:
    8.0 N*m{ 82 kgf*cm , 71 in.*lbf }


34. INSTALL NO. 2 ENGINE MOUNTING STAY RH
  1. Install the No. 2 engine mounting stay RH with the 2 bolts.

    Torque:
    38 N*m{ 387 kgf*cm , 28 ft.*lbf }


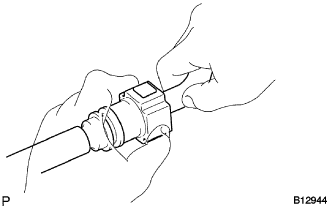
35. CONNECT FUEL MAIN TUBE


    B012944
  1. Push in the fuel tube connector to the fuel pipe until the connector makes a "click" sound.
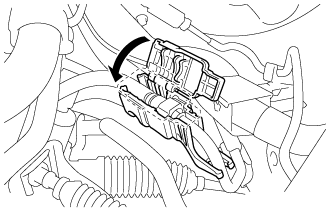
    NOTICE:
    1. Check for damage or contamination on the connected part of the pipe.
    2. Check if the pipe and the connector are securely connected by trying to pull them apart.


    A210152
  1. Install the No. 1 fuel pipe clamp.


36. CONNECT INLET HEATER WATER HOSE
  1. Connect the inlet heater water hose.


37. CONNECT OUTLET HEATER WATER HOSE
  1. Connect the outlet heater water hose.


38. CONNECT NO. 5 INVERTER COOLING HOSE
  1. Connect the No. 5 inverter cooling hose to the hybrid vehicle transaxle assembly.


39. CONNECT NO. 1 RADIATOR HOSE
  1. Connect the air fuel ratio sensor wire to the No. 1 radiator hose with the hose clamp.


40. CONNECT NO. 2 RADIATOR HOSE
  1. Connect the No. 2 radiator hose.


41. CONNECT TRANSMISSION CONTROL CABLE ASSEMBLY
  1. Connect the transmission control cable assembly to the 2 transmission control cable brackets.

  1. Install a new clip to the No. 1 transmission control cable bracket.
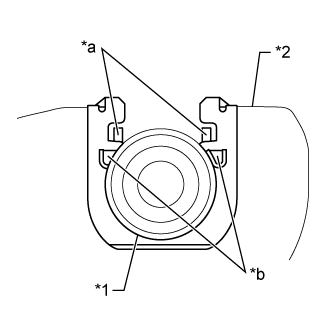


    C245030E01
  1. Install the transmission control cable assembly to the No. 1 transmission control cable bracket
    Text in Illustration 
    *1
    No. 1 Transmission Control Cable Assembly
    *2
    No. 1 Transmission Control Cable Bracket
    *a
    Claw A
    *b
    Claw B

    NOTICE:
    1. Make sure that the claws A on the clip are securely fit into the bracket holes.
    2. Make sure that the cable is securely installed inside of the claws B of the clip.

  1. Connect the transmission control cable assembly to the control shaft lever with the nut.

    Torque:
    15 N*m{ 153 kgf*cm , 11 ft.*lbf }


42. INSTALL NO. 4 ENGINE WIRE
  1. Install the 3 wire harness clamps and connect the No. 4 engine wire to the fan shroud.


43. INSTALL INVERTER WITH CONVERTER ASSEMBLY

CAUTION:
Wear insulated gloves.


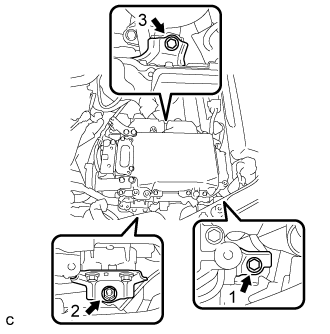
    A258760E01
  1. Temporarily install the inverter with converter assembly with the 2 bolts and nut.

    NOTICE:
    1. Since the inverter with converter assembly is very heavy, 2 people are needed to install the inverter with converter assembly. When installing the inverter with converter assembly, do not damage the parts around it.
    2. To prevent damage, do not hold the inverter with converter assembly by the connectors.
    3. To prevent damage due to static electricity, do not touch the terminals of the disconnected connectors.

  1. Fully tighten the 2 bolts and nut in the order shown in the illustration.

    Torque:
    21 N*m{ 214 kgf*cm , 15 ft.*lbf }


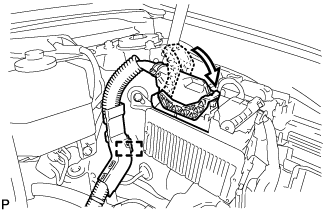
44. CONNECT ENGINE WIRE


    A259954
  1. Connect the wire harness clamp.

  1. Connect the connector to the ECM with the lock lever.

  1. Install the earth wire with the bolt.

    Torque:
    8.0 N*m{ 82 kgf*cm , 71 in.*lbf }

  1. Connect the 4 connectors and wire harness clamp.


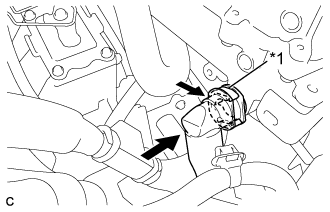
45. CONNECT NO. 1 INVERTER COOLING HOSE ASSEMBLY


    A260014E01
  1. Connect the No. 1 inverter cooling hose assembly to the inverter with converter assembly and lock the hose with the retainer.
    Text in Illustration 
    *1
    Retainer

    NOTICE:
    1. Insert the retainer until a click sound is heard.
    2. Pull on the hose to confirm that the hose is securely connected.
    3. If there is foreign matter on the union or the O-ring, clean it with water and finger scouring.
    4. To prevent foreign matter from entering the cooling system, do not remove the pieces of cloth or plastic bags from the pipes and disconnected hoses until installation.


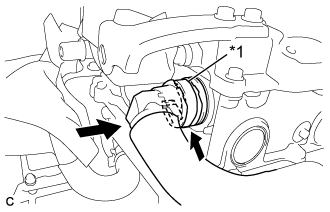
46. CONNECT NO. 4 INVERTER COOLING HOSE


    A260015E01
  1. Connect the No. 4 inverter cooling hose assembly to the inverter with converter assembly and lock the hose with the retainer.
    Text in Illustration 
    *1
    Retainer

    NOTICE:
    1. Insert the retainer until a click sound is heard.
    2. Pull on the hose to confirm that the hose is securely connected.
    3. If there is foreign matter on the union or the O-ring, clean it with water and finger scouring.
    4. To prevent foreign matter from entering the cooling system, do not remove the pieces of cloth or plastic bags from the pipes and disconnected hoses until installation.


47. CONNECT NO. 3 ENGINE ROOM WIRE
  1. Connect the clamp.

  1. Install the No. 3 engine room wire with the nut.

    Torque:
    8.0 N*m{ 82 kgf*cm , 71 in.*lbf }

  1. Install the relay block cover.


48. CONNECT LOW VOLTAGE CONNECTOR


    A255156
  1. Connect the 3 low voltage connectors and lock the connector with the lock lever.

    NOTICE:
    1. Do not allow any foreign objects or water to enter the inverter with converter assembly.
    2. Make sure that the connectors are fully engaged.


49. REMOVE CONNECTOR COVER ASSEMBLY
  1. Remove the bolt and connector cover assembly.

    NOTICE:
    1. Make sure to pull the connector cover assembly straight up, as a connector is connected to the bottom of the cover.
    2. Do not allow any foreign objects or water to enter the inverter with converter assembly.


50. CONNECT NO. 4 FLOOR WIRE

CAUTION:
Wear insulated gloves.

NOTICE:
  1. Do not damage the terminals, connector housings or inverter with converter assembly when connecting them.
  2. Do not touch the connector waterproofing rubber or terminals.
  3. Do not allow any foreign objects or water to enter the inverter with converter assembly.
  4. Make sure that the connectors are fully engaged.
  5. Make sure that the connector does not come out when its body is pulled.

  1. Connect the No. 4 floor wire and wire harness clamp to the inverter with converter assembly.

  1. Secure the No. 4 floor wire to the inverter with converter assembly with the bolt.

    Torque:
    8.0 N*m{ 82 kgf*cm , 71 in.*lbf }


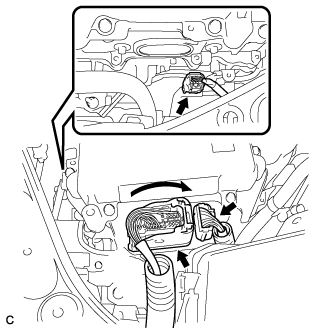
51. CONNECT NO. 4 ENGINE WIRE

CAUTION:
Wear insulated gloves.

NOTICE:
  1. Do not damage the terminals, connector housings or inverter with converter assembly when connecting them.
  2. Do not touch the connector waterproofing rubber or terminals.
  3. Do not allow any foreign objects or water to enter the inverter with converter assembly.
  4. Make sure that the connectors are fully engaged.
  5. Make sure that the connector does not come out when its body is pulled.

  1. Connect the No. 4 engine wire to the inverter with converter assembly.

  1. Connect the wire harness clamp.


52. INSTALL CONNECTOR COVER ASSEMBLY

CAUTION:
Wear insulated gloves.

NOTICE:
  1. Make sure that the interlock is fully engaged.
  2. Do not allow any foreign objects or water to enter the inverter with converter assembly.

  1. Install the connector cover assembly with the 2 bolts.

    Torque:
    8.0 N*m{ 82 kgf*cm , 71 in.*lbf }


53. INSTALL NO. 3 MOTOR CABLE BRACKET
  1. Install the No. 3 motor cable bracket with the 2 bolts.

    Torque:
    10 N*m{ 102 kgf*cm , 7 ft.*lbf }

  1. Connect the hose clamp.


54. CONNECT MOTOR CABLE

CAUTION:
Wear insulated gloves.

NOTICE:
  1. Do not damage the terminals, connector housings or inverter with converter assembly when connecting them.
  2. Do not touch the connector waterproofing rubber or terminals.
  3. Do not allow any foreign objects or water to enter the inverter with converter assembly.

  1. Connect the motor cable to the inverter with converter assembly.

  1. Connect the 3 wire harness clamps.

  1. Using an insulated tool, install the 3 bolts and motor cable to the inverter with converter assembly.

    Torque:
    8.0 N*m{ 82 kgf*cm , 71 in.*lbf }

    NOTICE:
    1. The connector should be connected securely.
    2. The bolts should be tightened securely.


55. INSTALL UPPER INVERTER COVER

CAUTION:
Wear insulated gloves.

  1. Install the upper inverter cover (motor cable side) with the 2 bolts.

    Torque:
    8.0 N*m{ 82 kgf*cm , 71 in.*lbf }

    NOTICE:
    1. Do not touch the upper inverter cover waterproofing rubber.
    2. Visually confirm that the upper inverter cover waterproofing rubber is securely installed before installing the upper inverter cover.
    3. Make sure that the interlock is fully engaged.


56. CONNECT GENERATOR CABLE

CAUTION:
Wear insulated gloves.

NOTICE:
  1. Do not damage the terminals, connector housings or inverter with converter assembly when connecting them.
  2. Do not touch the connector waterproofing rubber or terminals.
  3. Do not allow any foreign objects or water to enter the inverter with converter assembly.

  1. Connect the generator cable to the inverter with converter assembly.

  1. Connect the 2 wire harness clamps.

  1. Using an insulated tool, install the 3 bolts and generator cable to the inverter with converter assembly.

    Torque:
    8.0 N*m{ 82 kgf*cm , 71 in.*lbf }

    NOTICE:
    1. The connector should be connected securely.
    2. The bolts should be tightened securely.


57. INSTALL UPPER INVERTER COVER

CAUTION:
Wear insulated gloves.

  1. Install the upper inverter cover (motor cable side) with the 2 bolts.

    Torque:
    8.0 N*m{ 82 kgf*cm , 71 in.*lbf }

    NOTICE:
    1. Do not touch the upper inverter cover waterproofing rubber.
    2. Visually confirm that the upper inverter cover waterproofing rubber is securely installed before installing the upper inverter cover.
    3. Make sure that the interlock is fully engaged.


58. INSTALL NO. 4 INVERTER BRACKET
  1. Temporarily install the No. 4 inverter bracket with the 3 bolts.
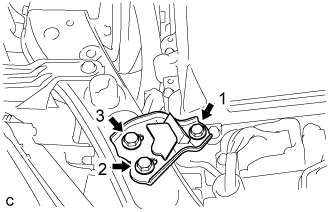


    A258738E01
  1. Tighten the 3 bolts in the order shown in the illustration.

    Torque:
    10 N*m{ 102 kgf*cm , 7 ft.*lbf }


59. INSTALL NO. 5 INVERTER BRACKET
  1. Temporarily install the No. 5 inverter bracket with the 2 bolts.
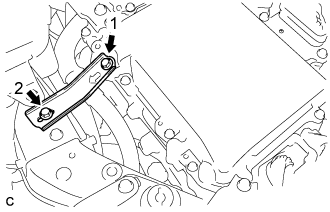


    A258737E01
  1. Tighten the 2 bolts in the order shown in the illustration.

    Torque:
    10 N*m{ 102 kgf*cm , 7 ft.*lbf }


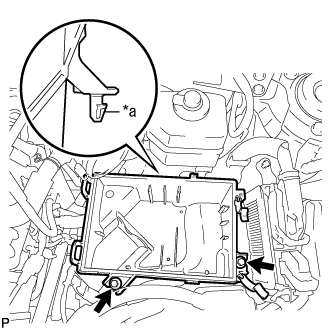
60. INSTALL AIR CLEANER CASE SUB-ASSEMBLY


    A259768E03
  1. Insert the projection of the air cleaner case sub-assembly to the hole of the No. 2 air cleaner bracket as shown in the illustration.
    Text in Illustration 
    *a
    Projection

  1. Tighten the 2 bolts.

    Torque:
    5.0 N*m{ 51 kgf*cm , 44 in.*lbf }


61. INSTALL AIR CLEANER FILTER ELEMENT


62. INSTALL AIR CLEANER CAP SUB-ASSEMBLY
  1. Install the air cleaner hose with the hose clamp.
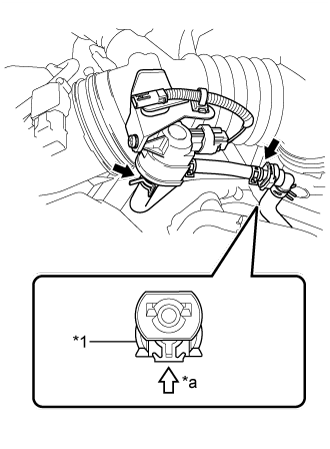


    A259685E01
  1. Connect the 2 fuel vapor feed hoses.
    Text in Illustration 
    *1
    Retainer
    *a
    Push

    NOTICE:
    1. Check that there are no scratches or foreign matter around the connected part of the fuel tube connector and pipe before performing this work.
    2. Connect the quick connector and push the retainer in until the retainer makes a "click" sound to lock the claws of the retainer.
    3. After connecting the fuel vapor feed hose to the fuel tube connector, check that the fuel vapor feed hose is securely connected by pulling on the fuel tube connector and the fuel vapor feed hose.

  1. Install the air cleaner cap sub-assembly with the 2 clamps.

  1. Connect the connector.

  1. Connect the ventilation hose to the cylinder head cover.

  1. Connect the mass air flow meter connector and wire harness clamp to the air cleaner cap sub-assembly.


63. INSTALL INLET AIR CLEANER ASSEMBLY
  1. Install the inlet air cleaner with the 2 bolts.

    Torque:
    8.0 N*m{ 82 kgf*cm , 71 in.*lbf }


64. INSTALL SERVICE PLUG GRIP

CAUTION:
Wear insulating gloves.

NOTICE:
Before connecting the service plug, check that no parts and tools remain and that the high voltage terminals and connectors are connected securely.


  1. Wear insulated gloves and install the service plug grip in the order shown in the illustration.
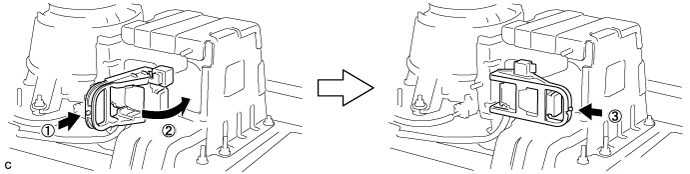

    A258775

  1. Rotate the handle of the service plug grip 90° toward the battery and slide it in the direction shown by the arrow until a click sound is heard.


65. INSTALL NO. 8 HYBRID VEHICLE BATTERY SHIELD PANEL
  1. Install the No. 8 hybrid vehicle battery shield panel with the 2 nuts.

    Torque:
    7.5 N*m{ 76 kgf*cm , 66 in.*lbf }


66. INSTALL LUGGAGE COMPARTMENT FRONT TRIM COVER
  1. Engage the 2 claws.

  1. Engage the 8 fasteners and install the luggage compartment front trim cover.


67. INSTALL LUGGAGE COMPARTMENT FLOOR MAT
  1. Install the luggage compartment floor mat.


68. INSTALL BAGGAGE HOLDER NET (w/ Partition Net)
  1. Install the baggage holder net.


69. CONNECT CABLE TO NEGATIVE AUXILIARY BATTERY TERMINAL

NOTICE:
When disconnecting the cable, some systems need to be initialized after the cable is reconnected (Click here).


70. INSTALL LUGGAGE TRIM SERVICE HOLE COVER
  1. Engage the claw to connect the luggage trim service hole cover.


71. ADD ENGINE OIL


72. ADD ENGINE COOLANT (for Engine)
  1. Tighten the radiator drain cock plug by hand.

  1. Slowly fill the radiator with TOYOTA Super Long Life Coolant (SLLC).
    Item
    Capacity
    Engine coolant
    7.2 liters (7.6 US qts, 6.3 lmp. qts)

    NOTICE:
    Never use water as a substitute for engine coolant.

    HINT:
    TOYOTA vehicles are filled with TOYOTA SLLC at the factory. In order to avoid damage to the engine cooling system and other technical problems, only use TOYOTA SLLC or similar high quality ethylene glycol based non-silicate, non-amine, non-nitrite, non-borate coolant with long-life hybrid organic acid technology (coolant with long-life hybrid organic acid technology is a combination of low phosphates and organic acids).

  1. Slowly pour coolant into the radiator reserve tank assembly until it reaches the full line.

  1. Squeeze the No. 1 and No. 2 radiator hoses several times by hand, and then check the level of the coolant.
    If the coolant level is low, add coolant.

  1. Install the radiator cap sub-assembly and reserve tank cap.

  1. Put the engine in inspection mode (Click here).

  1. Bleed air from the cooling system.

    NOTICE:
    1. Before starting the engine, turn the A/C switch off.
    2. Adjust the heater control to the maximum hot setting.
    3. Adjust the blower speed to the low setting.


    1. Warm up the engine until the thermostat opens. While the thermostat is open, circulate the coolant for several minutes.

      HINT:
      The thermostat open timing can be confirmed by squeezing the No. 2 radiator hose by hand, and sensing vibrations when the engine coolant starts to flow inside the hose.

    2. Squeeze the No. 1 and No. 2 radiator hoses several times by hand to bleed air.

      CAUTION:
      When squeezing the radiator hoses:
      1. Wear protective gloves.
      2. Be careful as the radiator hoses are hot.
      3. Keep your hands away from the cooling fans.

      NOTICE:
      1. Make sure that the radiator reserve tank assembly still has some coolant in it.
      2. If the coolant temperature gauge indicates an excessive temperature, turn off the engine and let it cool.
      3. If there is not enough coolant, the engine may overheat or be seriously damaged.
      4. If the radiator reserve tank assembly does not have enough coolant, perform the following: 1) stop the engine, 2) wait until the coolant has cooled down, and 3) add coolant until the reserve tank assembly is filled to the full line.

  1. Stop the engine and wait until the engine coolant cools down.

  1. Add engine coolant to the full line on the radiator reserve tank assembly.


73. ADD ENGINE COOLANT (for Inverter)

NOTICE:
  1. Do not reuse the drained coolant because it may contain foreign objects.
  2. If the vehicle is driven with air in the inverter cooling system, damage may occur and the following DTCs may be set.

    DTC Code
    Detection Item
    P0A01-725
    Motor Electronics Coolant Temperature Sensor Circuit Range / Performance
    P0A01-726
    Motor Electronics Coolant Temperature Sensor Circuit Intermittent
    P0A08-264
    DC / DC Converter Status Circuit
    P0A78-284
    Drive Motor "A" Inverter Performance
    P0A78-286
    Drive Motor "A" Inverter Performance
    P0A7A-322
    Generator Inverter Performance
    P0A7A-324
    Generator Inverter Performance
    P0A93-346
    Inverter Cooling System Performance
    P0A94-553
    DC / DC Converter Performance
    P0A94-557
    DC / DC Converter Performance
    P0AEE-276
    Drive Motor Inverter Temperature Sensor "A" Circuit Intermittent / Erratic
    P0AEE-277
    Motor Inverter Temperature Sensor "A" Circuit Range / Performance
    P0BD0-314
    Generator Inverter Temperature Sensor Circuit Range / Erratic
    P0BCD-315
    Generator Inverter Temperature Sensor Circuit Range / Performance
    P0C3C-625
    DC / DC Converter Temperature Sensor "A" Intermittent / Erratic
    P0C39-626
    DC / DC Converter Temperature Sensor "A" Range / Performance
    P0C41-627
    DC / DC Converter Temperature Sensor "B" Intermittent / Erratic
    P0C3E-628
    DC / DC Converter Temperature Sensor "B" Range / Performance
    P0C73-776
    Motor Electronics Coolant Pump "A" Control Performance


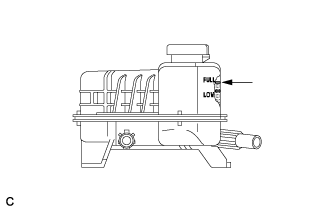
    A258733
  1. Slowly pour coolant into the reserve tank until it reaches the FULL line.

    Coolant quantity:
    3.2 liters (3.4 US qts, 2.8 Imp. qts.)

    NOTICE:
    To prevent foreign matter such as dust or dirt from entering the cooling system, make sure to confirm that the container used to add coolant is clean and free of foreign matter such as dust or dirt.

  1. When using the intelligent tester:

    1. Connect the intelligent tester to the DLC3.

    2. Turn the power switch on (IG).

    3. Enter the following menus: Powertrain / Hybrid Control / Active Test / Activate the Water Pump.

    4. Keep the coolant at the FULL line in the reserve tank to compensate for the drop in coolant level when the air bleeds.

      Standard:
      Air bleeding from the inverter cooling system is completed when the noise made by the inverter water pump assembly becomes smaller and the circulation of coolant in the reserve tank improves.

      HINT:
      1. If free spinning of the inverter water pump is detected for approximately 5 seconds, failsafe control will be activated to suspend the operation of the pump for approximately 15 seconds and resume operation for approximately 4 seconds repeatedly. Operation of the inverter water pump will return to normal if coolant is added.
      2. Loud noise made by the inverter water pump assembly and poor circulation of coolant in the reserve tank indicates that there is air in the cooling system.

      HINT:
      Loud noise made by the water pump and poor circulation of coolant in the reserve tank indicates that there is air in the cooling system.

  1. When not using the intelligent tester:

    1. Turn the power switch on (READY).[*1]

    2. Turn the power switch off and add coolant to the FULL line because the coolant level drops as the air bleeds.[*2]

      NOTICE:
      1. Be sure to turn the power switch off before adding SLLC.
      2. Do not work on the components in the engine compartment while the vehicle is in the READY-on state because the engine is in intermittent operation.

    3. Repeat steps [*1] and [*2] until air bleeding from the cooling system is completed.

      Standard:
      Air bleeding from the inverter cooling system is completed when the noise made by the inverter water pump assembly becomes smaller and the circulation of coolant in the reserve tank improves.

      HINT:
      Loud noise made by the water pump and poor circulation of coolant in the reserve tank indicates that there is air in the cooling system.

  1. After the air is completely bled from the cooling system, tighten the reserve tank cap.


    A258733
  1. Add coolant to the FULL line of the reserve tank.


74. ADD HYBRID TRANSAXLE FLUID
(Click here)


75. CHARGE WITH REFRIGERANT
  1. Perform vacuum purging using a vacuum pump or appropriate equipment.


  1. Charge the air conditioning system with refrigerant.
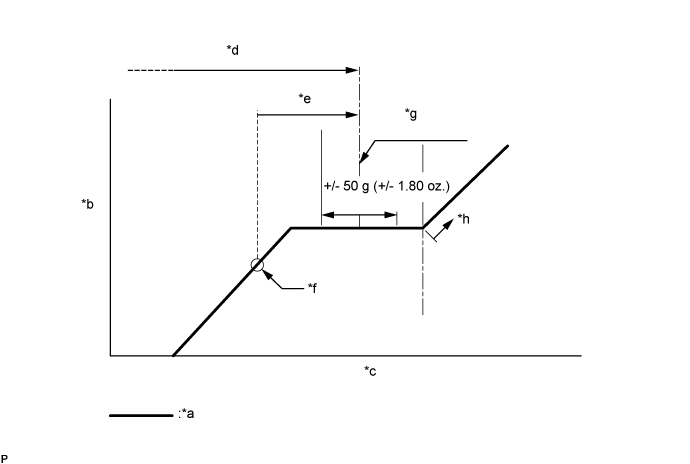
    Refrigerant type:
    HFC-134a (R134a)


    E143108E11


    Text in Illustration 
    *a
    Sub-cool System
    *b
    High Pressure
    *c
    Refrigerant Amount
    *d
    Standard charge amount
    *e
    Charge additional 100 g (3.5 oz.)
    *f
    Point where bubbles disappear
    *g
    Mean value in proper range
    *h
    Overcharged

    Standard charge amount:
    480 to 580g (16.9 to 20.4oz.)

    SST
    09985-20010   (09985-02010, 09985-02050, 09985-02060, 09985-02070, 09985-02080, 09985-02090, 09985-02110, 09985-02130, 09985-02140, 09985-02150)

    NOTICE:
    1. Do not turn the A/C switch on before charging the air conditioning system with refrigerant. Doing so may cause the compressor to work without refrigerant, resulting in overheating of the compressor.
    2. The refrigerant amount should be checked by quantity (weight).

    HINT:
    Ensure that sufficient refrigerant is available to recharge the system when using a refrigerant recovery unit. Refrigerant recovery units are not always able to recover 100% of the refrigerant from an air conditioning system.


76. WARM UP ENGINE


77. INSPECT FOR FUEL LEAK
  1. Check fuel pump operation.

    1. Connect the intelligent tester to the DLC3.

    2. Turn the power switch on (IG) and turn the intelligent tester on.

      NOTICE:
      Do not start the engine.

    3. Enter the following menus: Powertrain / Engine and ECT / Active Test / Control the Fuel Pump / Speed.

    4. Check for pressure in the fuel inlet tube from the fuel line. Check that sounds of fuel flowing from the fuel tank can be heard. If no sounds can be heard, check the integration relay, fuel pump, ECM and wiring connectors.

  1. Inspect for fuel leaks.

    1. Check that there are no fuel leaks from the fuel system after doing any maintenance or repairs. If there is a fuel leak, repair or replace parts as necessary.

  1. Turn the power switch off.

  1. Disconnect the intelligent tester from the DLC3.


78. INSPECT FOR OIL LEAK


79. INSPECT FOR COOLANT LEAK

NOTICE:
Before performing each inspection, turn the A/C switch off.


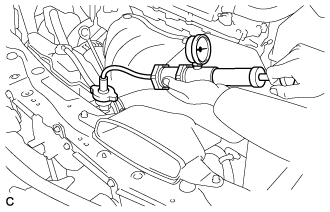
    A255285
  1. Fill the radiator with coolant and attach a radiator cap tester.

  1. Put the engine in inspection mode (Click here).

  1. Warm up the engine.

  1. Using a radiator cap tester, increase the pressure inside the radiator to 118 kPa (1.2 kgf/cm2, 17 psi), and check that the pressure does not drop.
    If the pressure drops, check the hoses, radiator and water pump for leaks. If no external leaks are found, check the heater core, cylinder block and cylinder head.


80. INSPECT FOR EXHAUST GAS LEAK


81. INSPECT REFRIGERANT LEAK
  1. After recharging the air conditioning system with refrigerant, inspect for refrigerant leaks using a halogen leak detector.

  1. Carry out the test under the following conditions:
    1. Power switch off.
    2. Secure good ventilation (the halogen leak detector may react to volatile gases which are not refrigerant, such as gasoline vapor and exhaust gas).
    3. Repeat the inspection 2 or 3 times.
    4. Measure the pressure to make sure that there is some refrigerant remaining in the air conditioning system.
      Pressure when the compressor is off: approx. 392 to 588 kPa (3.9 to 5.9 kgf/cm2, 57 to 85 psi)


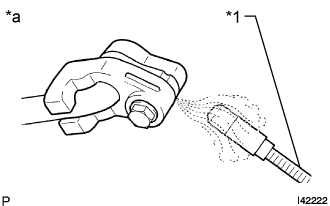
    I042222E40
  1. Using a halogen leak detector, inspect for refrigerant leaks from the air conditioning system.
    Text in Illustration 
    *1
    Halogen Leak Detector
    *a
    Inspect for Leak


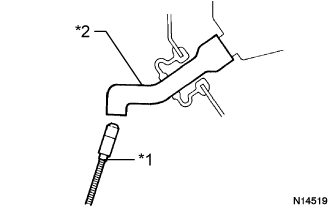
    N014519E08
  1. Bring the halogen leak detector close to the drain hose with the detector power off, and then turn the detector on.
    Text in Illustration 
    *1
    Halogen Leak Detector
    *2
    Drain Hose

    HINT:
    1. After the blower motor has stopped, leave the cooling unit for more than 15 minutes.
    2. Bring the halogen leak detector sensor under the drain hose.
    3. When bringing the halogen leak detector close to the drain hose, make sure that the halogen leak detector does not react to volatile gases. If it is not possible to avoid interference from volatile gases, the vehicle should be lifted up to allow checking for leaks.

  1. If a refrigerant leak is not detected from the drain hose, remove the blower motor control from the cooling unit. Insert the halogen leak detector sensor into the unit and check for a leak.

  1. Disconnect the pressure sensor connector and leave it for approximately 20 minutes. Bring the halogen leak detector close to the pressure sensor and check for a leak.

    HINT:
    When checking for leaks, the presence of oily dirt at a joint can indicate a leak.


82. INSPECT IGNITION TIMING
  1. Put the engine in inspection mode (Click here).

  1. Warm up and stop the engine.

  1. When using the intelligent tester:
    Check the ignition timing.

    1. Connect the intelligent tester to the DLC3.

    2. Put the engine in inspection mode (Click here).

    3. Enter the following menus: Powertrain / Engine and ECT / Data List / IGN Advance.

      Standard ignition timing:
      5 to 20 degrees BTDC

      NOTICE:
      1. Check the ignition timing with the cooling fans off.
      2. Turn off all electrical systems and the A/C.
      3. When checking the ignition timing, the shift lever should be in P.

      HINT:
      Refer to the intelligent tester operator's manual for further details.

    4. Check that the ignition timing advances immediately when the engine speed is increased.

    5. Enter the following menus: Powertrain / Engine and ECT / Active Test / Connect the TC and TE1 / ON.

    6. Monitor IGN Advance of the Data List.

      Standard ignition timing:
      8 to 12 degrees BTDC

      NOTICE:
      When checking the ignition timing, the shift lever should be in P.

      HINT:
      Refer to the intelligent tester operator's manual for further details.

    7. Enter the following menus: Connect the TC and TE1 / OFF.

    8. Turn the power switch off.

    9. Turn the intelligent tester off.

    10. Disconnect the intelligent tester from the DLC3.


  1. When not using the intelligent tester:
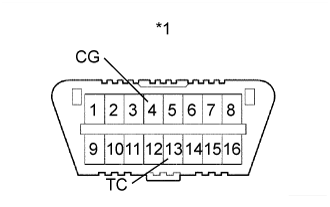


      A122830E35
    1. Using SST, connect terminals 13 (TC) and 4 (CG) of the DLC3.
      Text in Illustration 
      *1
      DLC3

      SST
      09843-18040  

      NOTICE:
      1. Confirm the terminals before connecting them. Connecting the wrong terminals may result in damage to electrical components.
      2. Check the ignition timing with the cooling fans off.
      3. Turn off all electrical systems and the A/C.
      4. When checking the ignition timing, the shift lever should be in P.

    2. Remove the No. 1 engine cover sub-assembly.

    3. Pull out the wire harness.

      NOTICE:
      After checking, wrap the wire harness with tape.


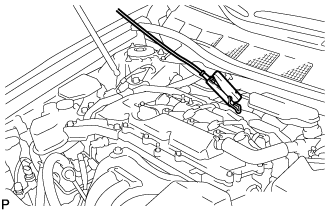
    4. A259770
    5. Connect the clip of the timing light to the wire harness.

      NOTICE:
      Use a timing light that detects the primary signal.

    6. Inspect the ignition timing at idle.

      Standard ignition timing:
      8 to 12 degrees BTDC

      NOTICE:
      When checking the ignition timing, the shift lever should be in P.

      HINT:
      After running the engine at 1000 to 1300 rpm for 5 seconds, check that it returns to idle speed.

    7. Disconnect terminals 13 (TC) and 4 (CG) of the DLC3.

    8. Inspect the ignition timing at idle.

      Standard ignition timing:
      5 to 20 degrees BTDC

    9. Confirm that the ignition timing advances when the engine rpm is increased.

    10. Remove the timing light.

    11. Install the No. 1 engine cover sub-assembly.


83. INSPECT ENGINE IDLE SPEED
  1. Put the engine in inspection mode (Click here).

  1. Warm up and stop the engine.

  1. When using the intelligent tester:

    1. Connect the intelligent tester to the DLC3.

    2. Put the engine in inspection mode (Click here).

    3. Enter the following menus: Powertrain / Engine and ECT / Data List / Engine Speed.

      HINT:
      Refer to the intelligent tester operator's manual for further details.

    4. Inspect the engine idle speed.

      Standard idle speed:
      900 to 1050 rpm

      NOTICE:
      1. Turn all electrical systems and the A/C off.
      2. Inspect the idle speed with the cooling fans off.
      3. When checking the ignition timing, the shift lever should be in P.

    5. Turn the power switch off.

    6. Turn the intelligent tester off.

    7. Disconnect the intelligent tester from the DLC3.


  1. When not using the intelligent tester:
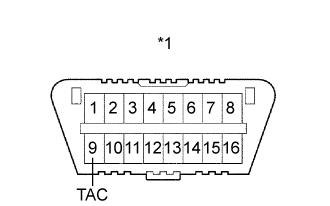


      A124242E04
    1. Using SST, connect a tachometer tester probe to terminal 9 (TAC) of the DLC3.
      Text in Illustration 
      *1
      DLC3

      SST
      09843-18030  

    2. Put the engine in inspection mode (Click here).

    3. Inspect the engine idle speed.

      Standard idle speed:
      900 to 1050 rpm

      NOTICE:
      1. Turn all electrical systems and the A/C off.
      2. Inspect the idle speed with the cooling fans off.
      3. When checking the ignition timing, the shift lever should be in P.

    4. Disconnect the tachometer probe from the DLC3.


84. INSPECT CO/HC

HINT:
This check determines whether or not the idle CO / HC complies with regulations.

  1. Put the engine in inspection mode (Click here).

  1. Warm up the engine.

  1. Run the engine at 2500 rpm for approximately 180 seconds.

  1. Insert a CO/HC meter testing probe at least 40 cm (1.31 ft.) into the tailpipe while idling.

  1. Check the CO/HC concentration while idling and when the engine is running at 2500 rpm.

    HINT:
    When doing a 2 mode (with the engine idling/ running at 2500 rpm) test, the measurement procedures are determined by applicable local regulations.
    If the CO/HC concentration does not comply with the regulations, troubleshoot in the order given below.


    1. Check the DTCs.

      1. w/ EGR System: (Click here)
      1. w/o EGR System: (Click here)

    2. See the table below for possible causes, then inspect the applicable parts and repair them if necessary.

      CO
      HC
      Problem
      Possible Cause
      Normal
      High
      Rough idle
      1. Faulty ignition:
        1. Incorrect timing
        2. Fouled, shorted or improperly gapped plugs
      2. Incorrect valve clearance
      3. Leaks from intake and exhaust valves
      4. Leaks from cylinders
      Low
      High
      Rough idle (Fluctuating HC reading)
      1. Vacuum leaks:
        1. PCV hoses
        2. Intake manifold
        3. Throttle body
      2. Lean mixture causing misfire
      High
      High
      Rough idle (Black smoke from exhaust)
      1. Restricted air cleaner filter element
      2. Plugged PCV valve
      3. Faulty EFI systems:
        1. Faulty pressure regulator
        2. Faulty engine coolant temperature sensor
        3. Faulty mass air flow meter
        4. Faulty ECM
        5. Faulty injectors
        6. Throttle body


85. INSTALL NO. 1 ENGINE COVER SUB-ASSEMBLY
  1. Fit the 3 retainers and install the No. 1 engine cover sub-assembly.


86. INSTALL COOL AIR INTAKE DUCT SEAL
  1. Install the cool air intake duct seal with the 9 clips.


87. INSPECT AND ADJUST SHIFT LEVER POSITION
(Click here)


88. INSTALL FRONT FENDER APRON SEAL LH


89. INSTALL FRONT FENDER APRON SEAL RH


90. INSTALL ENGINE UNDER COVER LH


91. INSTALL FRONT WHEEL OPENING EXTENSION PAD LH


92. INSTALL ENGINE UNDER COVER RH


93. INSTALL FRONT WHEEL OPENING EXTENSION PAD RH


94. INSTALL FRONT BUMPER ABSORBER LOWER


95. INSTALL FRONT WHEEL

Torque:
103 N*m{ 1049 kgf*cm , 76 ft.*lbf }


96. CHECK SPEED SENSOR SIGNAL
(Click here)


97. INSPECT AND ADJUST FRONT WHEEL ALIGNMENT
(Click here)