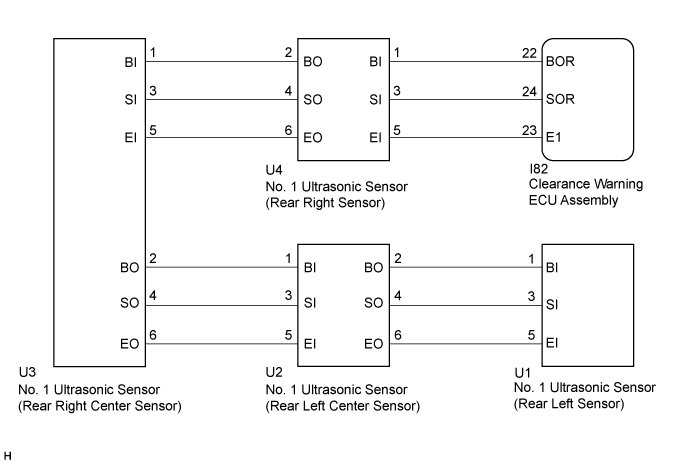
DTC C1AED Rear Sensor Communication Malfunction |
| DTC No. | DTC Detection Condition | Trouble Area |
| C1AED | An open or short circuit in the communication line between the rear sensors and ECU or a malfunction in a rear sensor during initialization mode after the power switch is turned on (IG). |
|
| 1.CHECK DTC OUTPUT (C1AED) |
Check for DTCs (Click here).
Clear the DTCs (Click here).
Recheck for DTCs (Click here).
| Result | Proceed to |
| DTC C1AED is output | A |
| No DTCs are output | B |
|
| ||||
| A | |
 |
| 2.CHECK HARNESS AND CONNECTOR (CLEARANCE WARNING ECU ASSEMBLY - REAR RIGHT SENSOR) |
Disconnect the I82 connector from the clearance warning ECU assembly.
Disconnect the U4 connector from the No. 1 ultrasonic sensor.
Measure the resistance according to the value(s) in the table below.
| Tester Connection | Condition | Specified Condition |
| I82-22 (BOR) - U4-1 (BI) | Always | Below 1 Ω |
| I82-24 (SOR) - U4-3 (SI) | Always | Below 1 Ω |
| I82-23 (E1) - U4-5 (EI) | Always | Below 1 Ω |
| I82-22 (BOR) - Body ground | Always | 10 kΩ or higher |
| I82-24 (SOR) - Body ground | Always | 10 kΩ or higher |
| I82-23 (E1) - Body ground | Always | 10 kΩ or higher |
|
| ||||
| OK | |
|
| 3.CHECK HARNESS AND CONNECTOR (REAR RIGHT SENSOR - REAR RIGHT CENTER SENSOR) |
Disconnect the U3 connector from the No. 1 ultrasonic sensor.
Measure the resistance according to the value(s) in the table below.
| Tester Connection | Condition | Specified Condition |
| U4-2 (BO) - U3-1 (BI) | Always | Below 1 Ω |
| U4-4 (SO) - U3-3 (SI) | Always | Below 1 Ω |
| U4-6 (EO) - U3-5 (EI) | Always | Below 1 Ω |
| U4-2 (BO) - Body ground | Always | 10 kΩ or higher |
| U4-4 (SO) - Body ground | Always | 10 kΩ or higher |
| U4-6 (EO) - Body ground | Always | 10 kΩ or higher |
|
| ||||
| OK | |
|
| 4.CHECK HARNESS AND CONNECTOR (REAR RIGHT CENTER SENSOR - REAR LEFT CENTER SENSOR) |
Disconnect the U2 connector from the No. 1 ultrasonic sensor.
Measure the resistance according to the value(s) in the table below.
| Tester Connection | Condition | Specified Condition |
| U3-2 (BO) - U2-1 (BI) | Always | Below 1 Ω |
| U3-4 (SO) - U2-3 (SI) | Always | Below 1 Ω |
| U3-6 (EO) - U2-5 (EI) | Always | Below 1 Ω |
| U3-2 (BO) - Body ground | Always | 10 kΩ or higher |
| U3-4 (SO) - Body ground | Always | 10 kΩ or higher |
| U3-6 (EO) - Body ground | Always | 10 kΩ or higher |
|
| ||||
| OK | |
|
| 5.CHECK HARNESS AND CONNECTOR (REAR LEFT CENTER SENSOR - REAR LEFT SENSOR) |
Disconnect the U1 connector from the No. 1 ultrasonic sensor.
Measure the resistance according to the value(s) in the table below.
| Tester Connection | Condition | Specified Condition |
| U2-2 (BO) - U1-1 (BI) | Always | Below 1 Ω |
| U2-4 (SO) - U1-3 (SI) | Always | Below 1 Ω |
| U2-6 (EO) - U1-5 (EI) | Always | Below 1 Ω |
| U2-2 (BO) - Body ground | Always | 10 kΩ or higher |
| U2-4 (SO) - Body ground | Always | 10 kΩ or higher |
| U2-6 (EO) - Body ground | Always | 10 kΩ or higher |
|
| ||||
| OK | |
|
| 6.INSPECT NO. 1 ULTRASONIC SENSOR (REAR RIGHT SENSOR) |
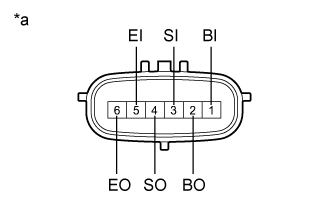 |
Measure the resistance according to the value(s) in the table below.
| Tester Connection | Condition | Specified Condition |
| 1 (BI) - 5 (EI) | Always | 10 kΩ or higher |
| 1 (BI) - 2 (BO) | Always | 10 kΩ or higher |
| 3 (SI) - 4 (SO) | Always | Below 1 Ω |
| 5 (EI) - 6 (EO) | Always | Below 1 Ω |
| *a | Component without harness connected (No. 1 Ultrasonic Sensor (Rear Right Sensor)) |
|
| ||||
| OK | |
|
| 7.INSPECT NO. 1 ULTRASONIC SENSOR (REAR RIGHT CENTER SENSOR) |
|
Measure the resistance according to the value(s) in the table below.
| Tester Connection | Condition | Specified Condition |
| 1 (BI) - 5 (EI) | Always | 10 kΩ or higher |
| 1 (BI) - 2 (BO) | Always | 10 kΩ or higher |
| 3 (SI) - 4 (SO) | Always | Below 1 Ω |
| 5 (EI) - 6 (EO) | Always | Below 1 Ω |
| *a | Component without harness connected (No. 1 Ultrasonic Sensor (Rear Right Center Sensor)) |
|
| ||||
| OK | |
|
| 8.INSPECT NO. 1 ULTRASONIC SENSOR (REAR LEFT CENTER SENSOR) |
|
Measure the resistance according to the value(s) in the table below.
| Tester Connection | Condition | Specified Condition |
| 1 (BI) - 5 (EI) | Always | 10 kΩ or higher |
| 1 (BI) - 2 (BO) | Always | 10 kΩ or higher |
| 3 (SI) - 4 (SO) | Always | Below 1 Ω |
| 5 (EI) - 6 (EO) | Always | Below 1 Ω |
| *a | Component without harness connected (No. 1 Ultrasonic Sensor (Rear Left Center Sensor)) |
|
| ||||
| OK | |
|
| 9.REPLACE NO. 1 ULTRASONIC SENSOR (REAR RIGHT SENSOR) |
Replace the No. 1 ultrasonic sensor (rear right sensor) with a known good one (Click here).
| NEXT | |
|
| 10.CHECK DTC OUTPUT (C1AED) |
Clear the DTCs (Click here).
Check for DTCs (Click here).
| Result | Proceed to |
| DTC C1AED is output | A |
| No DTCs are output | B |
|
| ||||
| A | |
|
| 11.REPLACE NO. 1 ULTRASONIC SENSOR (REAR RIGHT CENTER SENSOR) |
Replace the No. 1 ultrasonic sensor (rear right center sensor) with a known good one (Click here).
| NEXT | |
|
| 12.CHECK DTC OUTPUT (C1AED) |
Clear the DTCs (Click here).
Check for DTCs (Click here).
| Result | Proceed to |
| DTC C1AED is output | A |
| No DTCs are output | B |
|
| ||||
| A | |
|
| 13.REPLACE NO. 1 ULTRASONIC SENSOR (REAR LEFT CENTER SENSOR) |
Replace the No. 1 ultrasonic sensor (rear left center sensor) with a known good one (Click here).
| NEXT | |
|
| 14.CHECK DTC OUTPUT (C1AED) |
Clear the DTCs (Click here).
Check for DTCs (Click here).
| Result | Proceed to |
| DTC C1AED is output | A |
| No DTCs are output | B |
|
| ||||
| A | |
|
| 15.REPLACE NO. 1 ULTRASONIC SENSOR (REAR LEFT SENSOR) |
Replace the No. 1 ultrasonic sensor (rear left sensor) with a known good one (Click here).
| NEXT | |
|
| 16.CHECK DTC OUTPUT (C1AED) |
Clear the DTCs (Click here).
Check for DTCs (Click here).
| Result | Proceed to |
| DTC C1AED is output | A |
| No DTCs are output | B |
|
| ||||
| A | ||
 | ||
| ||
