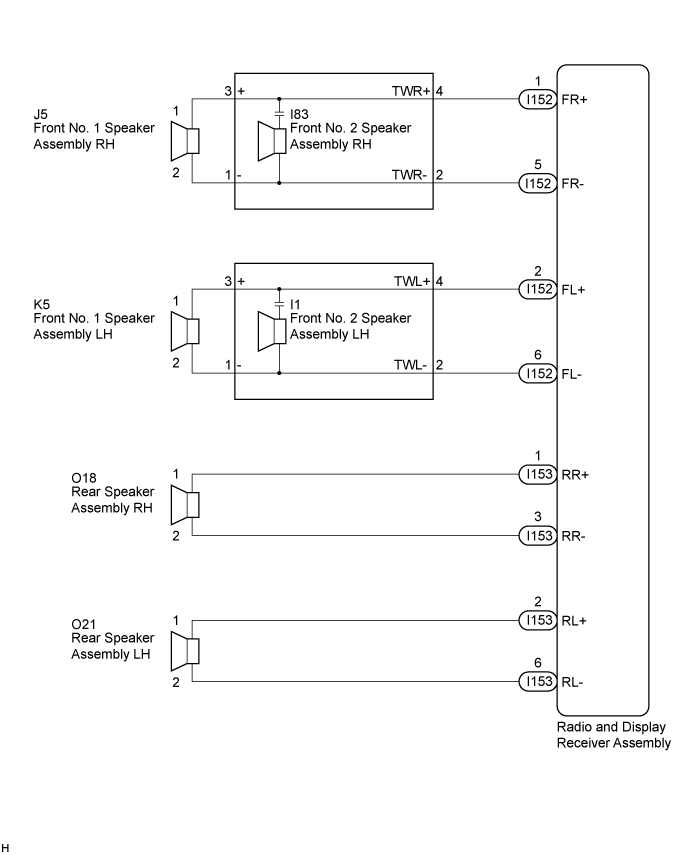
AUDIO AND VISUAL SYSTEM (for Radio and Display Type) > Speaker Circuit |
| 1.CHECK SPEAKER (OPERATION CHECK) |
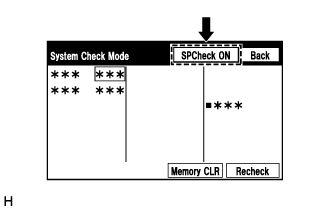 |
Enter the "System Check Mode" screen. Refer to Check Speaker in Operation Check (Click here).
Perform the operation check above and determine the speaker that is not operating.
| Result | Proceed to |
| Front No. 1 speaker assembly or front No. 2 speaker assembly | A |
| Rear speaker assembly | B |
|
| ||||
| A | |
 |
| 2.CHECK HARNESS AND CONNECTOR (RADIO AND DISPLAY RECEIVER ASSEMBLY - FRONT SPEAKER) |
Disconnect the I152 radio and display receiver assembly connector.
Disconnect the I83 and I1 front No. 2 speaker assembly connectors.
Disconnect the J5 and K5 front No. 1 speaker assembly connectors.
Measure the resistance between each of the front No. 2 speaker assemblies and the radio and display receiver assembly to check for an open circuit in the wire harness.
| Tester Connection | Condition | Specified Condition |
| I152-1 (FR+) - I83-4 (TWR+) | Always | Below 1 Ω |
| I152-5 (FR-) - I83-2 (TWR-) | Always | Below 1 Ω |
| I152-2 (FL+) - I1-4 (TWL+) | Always | Below 1 Ω |
| I152-6 (FL-) - I1-2 (TWL-) | Always | Below 1 Ω |
Measure the resistance between each of the front No. 1 speaker assemblies and the front No. 2 speaker assemblies to check for an open circuit in the wire harness.
| Tester Connection | Condition | Specified Condition |
| I83-3 (+) - J5-1 | Always | Below 1 Ω |
| I83-1 (-) - J5-2 | Always | Below 1 Ω |
| I1-3 (+) - K5-1 | Always | Below 1 Ω |
| I1-1 (-) - K5-2 | Always | Below 1 Ω |
Measure the resistance between the radio and display receiver assembly and body ground to check for a short circuit in the wire harness.
| Tester Connection | Condition | Specified Condition |
| I152-1 (FR+) - Body ground | Always | 10 kΩ or higher |
| I152-5 (FR-) - Body ground | Always | 10 kΩ or higher |
| I152-2 (FL+) - Body ground | Always | 10 kΩ or higher |
| I152-6 (FL-) - Body ground | Always | 10 kΩ or higher |
Measure the resistance between each of the front No. 2 speaker assemblies and body ground to check for a short circuit in the wire harness.
| Tester Connection | Condition | Specified Condition |
| I83-3 (+) - Body ground | Always | 10 kΩ or higher |
| I83-1 (-) - Body ground | Always | 10 kΩ or higher |
| I1-3 (+) - Body ground | Always | 10 kΩ or higher |
| I1-1 (-) - Body ground | Always | 10 kΩ or higher |
|
| ||||
| OK | |
|
| 3.INSPECT FRONT NO. 2 SPEAKER ASSEMBLY |
Remove the front No. 2 speaker assembly (Click here).
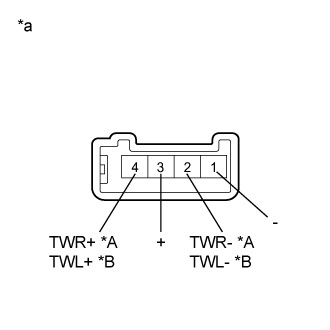 |
Measure the resistance according to the value(s) in the table below.
| Tester Connection | Condition | Specified Condition |
| 4 (TWR+) - 2 (TWR-) | Always | 10 kΩ or higher |
| 1 (-) - 2 (TWR-) | Always | Below 1 Ω |
| 3 (+) - 4 (TWR+) | Always | Below 1 Ω |
| 4 (TWL+) - 2 (TWL-) | Always | 10 kΩ or higher |
| 1 (-) - 2 (TWL-) | Always | Below 1 Ω |
| 3 (+) - 2 (TWL+) | Always | Below 1 Ω |
| *A | for RH |
| *B | for LH |
| *a | Component without harness connected (Front No. 2 Speaker Assembly) |
|
| ||||
| OK | |
|
| 4.REPLACE FRONT NO. 2 SPEAKER ASSEMBLY |
Check that the malfunction disappears when a new or known good speaker is installed (Click here).
|
| ||||
| OK | ||
 | ||
| ||
| 5.INSPECT FRONT NO. 1 SPEAKER ASSEMBLY |
Remove the front No. 1 speaker assembly (Click here).
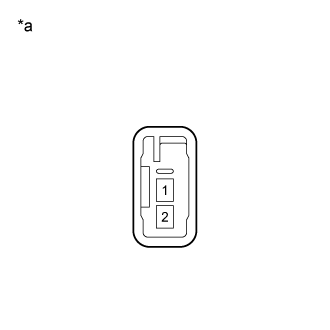 |
Measure the resistance according to the value(s) in the table below.
| Tester Connection | Condition | Specified Condition |
| 1 - 2 | Always | 3.2 to 4.8 Ω |
| *a | Component without harness connected (Front No. 1 Speaker Assembly) |
|
| ||||
| OK | ||
| ||
| ||
| 6.CHECK HARNESS AND CONNECTOR (RADIO AND DISPLAY RECEIVER ASSEMBLY - REAR SPEAKER ASSEMBLY) |
Disconnect the I153 radio and display receiver assembly connector.
Disconnect the O18 and O21 rear speaker assembly connectors.
Measure the resistance between each of the rear speaker assemblies and the radio and display receiver assembly to check for an open circuit in the wire harness.
| Tester Connection | Condition | Specified Condition |
| I153-1 (RR+) - O18-1 | Always | Below 1 Ω |
| I153-3 (RR-) - O18-2 | Always | Below 1 Ω |
| I153-2 (RL+) - O21-1 | Always | Below 1 Ω |
| I153-6 (RL-) - O21-2 | Always | Below 1 Ω |
Measure the resistance between the radio and display receiver assembly and body ground to check for a short circuit in the wire harness.
| Tester Connection | Condition | Specified Condition |
| I153-1 (RR+) - Body ground | Always | 10 kΩ or higher |
| I153-3 (RR-) - Body ground | Always | 10 kΩ or higher |
| I153-2 (RL+) - Body ground | Always | 10 kΩ or higher |
| I153-6 (RL-) - Body ground | Always | 10 kΩ or higher |
|
| ||||
| OK | |
|
| 7.INSPECT REAR SPEAKER ASSEMBLY |
Remove the rear speaker assembly (Click here).
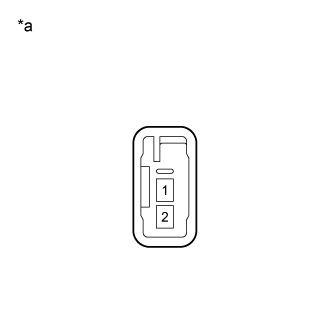 |
Measure the resistance according to the value(s) in the table below.
| Tester Connection | Condition | Specified Condition |
| 1 - 2 | Always | 3.2 to 4.8 Ω |
| *a | Component without harness connected (Rear Speaker Assembly) |
|
| ||||
| OK | ||
| ||
| ||

