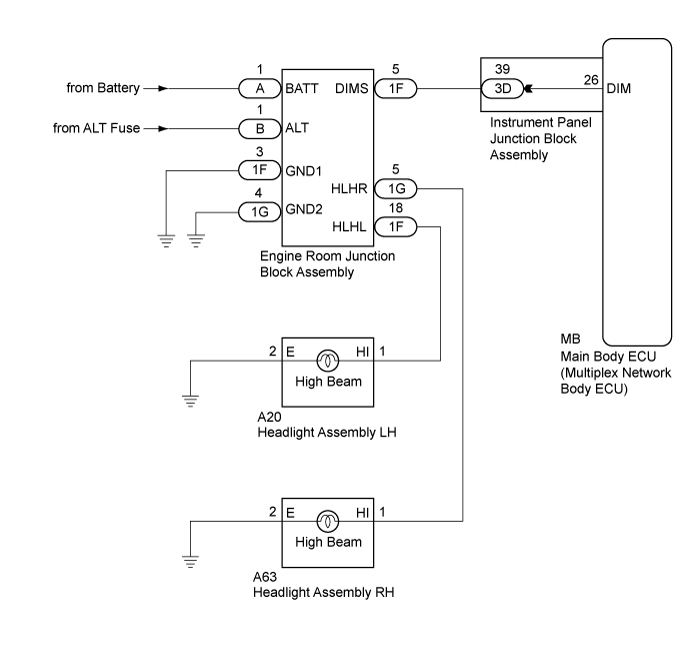
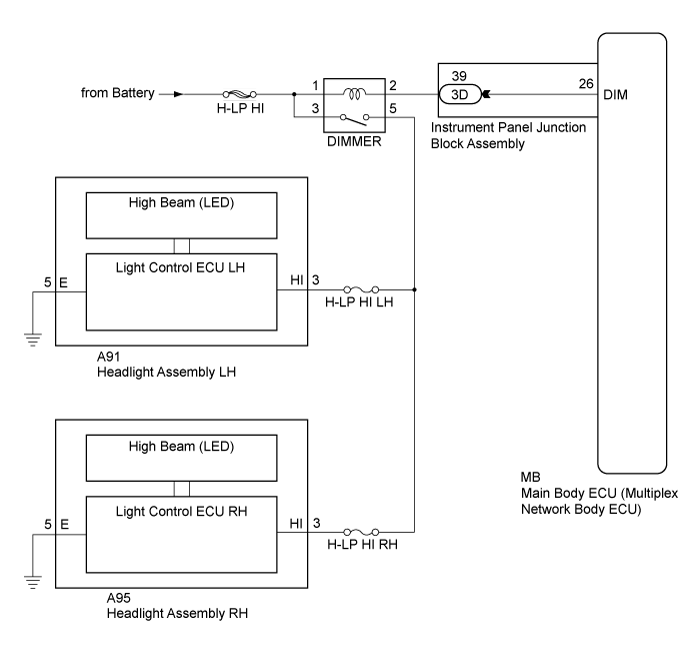
LIGHTING SYSTEM > High Beam Headlight Circuit |
| for TMC, TMMR Made: |
| for TMMK Made: |
| 1.PERFORM ACTIVE TEST USING INTELLIGENT TESTER |
Connect the intelligent tester to the DLC3.
Turn the ignition switch to ON.
Turn the intelligent tester on.
Enter the following menus: Body / Main Body / Active Test.
Perform the Active Test according to the display on the intelligent tester.
| Tester Display | Test Part | Control Range | Diagnostic Note |
| Head Light Hi | High beam headlights | ON/OFF | - |
| Result | Proceed to |
| OK | A |
| NG (for TMC, TMMR Made) | B |
| NG (for TMMK Made) | C |
|
| ||||
|
| ||||
| A | ||
 | ||
| ||
| 2.CHECK ENGINE ROOM JUNCTION BLOCK ASSEMBLY |
Using a voltmeter, check the signal reading of the engine room junction block assembly (Click here).
|
| ||||
| OK | |
 |
| 3.CHECK HARNESS AND CONNECTOR (ENGINE ROOM JUNCTION BLOCK ASSEMBLY POWER SOURCE AND BODY GROUND) |
Remove the engine room junction block assembly from the engine room relay block and junction block assembly.
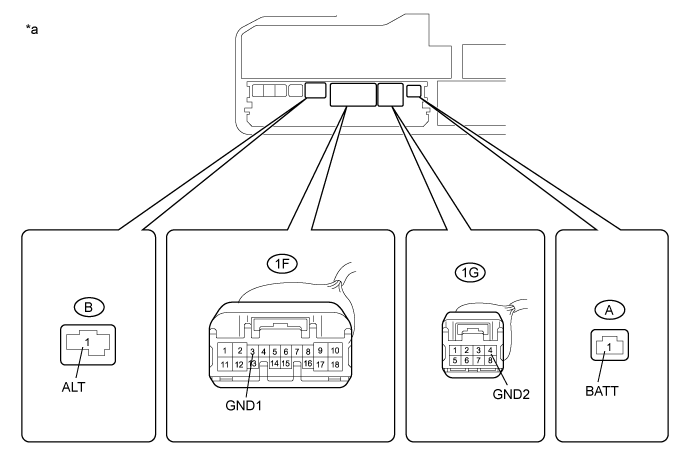
Measure the voltage according to the value(s) in the table below.
| Tester Connection | Condition | Specified Condition |
| A-1 (BATT) - Body ground | Always | 11 to 14 V |
| B-1 (ALT) - Body ground | Always | 11 to 14 V |
Measure the resistance according to the value(s) in the table below.
| Tester Connection | Condition | Specified Condition |
| 1F-3 (GND1) - Body ground | Always | Below 1 Ω |
| 1G-4 (GND2) - Body ground | Always | Below 1 Ω |
| *a | Component without engine room junction block assembly (Engine Room Relay Block and Junction Block Assembly) | - | - |
|
| ||||
| OK | |
|
| 4.CHECK HARNESS AND CONNECTOR (ENGINE ROOM JUNCTION BLOCK ASSEMBLY - INSTRUMENT PANEL JUNCTION BLOCK ASSEMBLY) |
Disconnect the 3D instrument panel junction block assembly connector.
Measure the resistance according to the value(s) in the table below.
| Tester Connection | Condition | Specified Condition |
| 1F-5 - 3D-39 | Always | Below 1 Ω |
| 3D-39 - Body ground | Always | 10 kΩ or higher |
|
| ||||
| OK | |
|
| 5.INSPECT INSTRUMENT PANEL JUNCTION BLOCK ASSEMBLY |
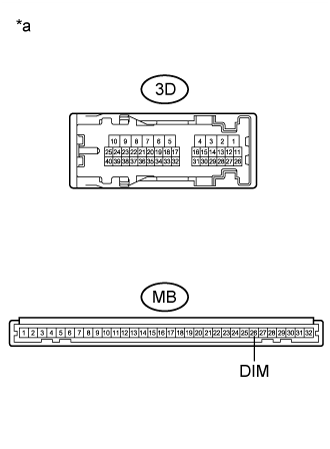 |
Remove the instrument panel junction block assembly (Click here).
Remove the main body ECU (multiplex network body ECU) from the instrument panel junction block assembly.
Measure the resistance according to the value(s) in the table below.
| Tester Connection | Condition | Specified Condition |
| 3D-39 - MB-26 (DIM) | Always | Below 1 Ω |
| *a | Component without harness connected (Instrument Panel Junction Block Assembly) |
|
| ||||
| OK | |
|
| 6.CHECK ENGINE ROOM JUNCTION BLOCK ASSEMBLY |
Replace the engine room junction block assembly with a new or a known good one (Click here).
Check that the high beam headlights operate normally.
|
| ||||
| OK | ||
| ||
| ||
| 7.INSPECT DIMMER RELAY |
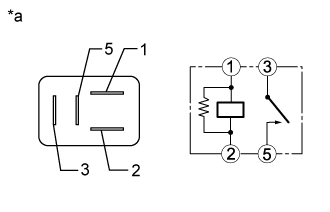 |
Remove the DIMMER relay from the No. 2 engine room relay block and junction block assembly.
Measure the resistance according to the value(s) in the table below.
| Tester Connection | Condition | Specified Condition |
| 3 - 5 | Voltage not applied between terminals 1 and 2 | 10 kΩ or higher |
| 3 - 5 | Voltage applied between terminals 1 and 2 | Below 1 Ω |
| *a | Component without harness connected (DIMMER Relay) |
|
| ||||
| OK | |
|
| 8.CHECK HARNESS AND CONNECTOR (POWER SOURCE - DIMMER RELAY) |
Measure the voltage according to the value(s) in the table below.
| Tester Connection | Condition | Specified Condition |
| Relay Terminal 1 - Body ground | Always | 11 to 14 V |
| Relay Terminal 3 - Body ground | Always | 11 to 14 V |
|
| ||||
| OK | |
|
| 9.CHECK HARNESS AND CONNECTOR (DIMMER RELAY - HEADLIGHT ASSEMBLY) |
Disconnect the A91 headlight assembly LH connector.
Disconnect the A95 headlight assembly RH connector.
Measure the resistance according to the value(s) in the table below.
| Tester Connection | Condition | Specified Condition |
| Relay Terminal 5 - A91-3 (HI) | Always | Below 1 Ω |
| Relay Terminal 5 - A95-3 (HI) | Always | Below 1 Ω |
| Relay Terminal 5 - Body ground | Always | 10 kΩ or higher |
|
| ||||
| OK | |
|
| 10.CHECK HARNESS AND CONNECTOR (DIMMER RELAY - INSTRUMENT PANEL JUNCTION BLOCK ASSEMBLY) |
Disconnect the 3D instrument panel junction block assembly connector.
Measure the resistance according to the value(s) in the table below.
| Tester Connection | Condition | Specified Condition |
| Relay Terminal 2 - 3D-39 | Always | Below 1 Ω |
| Relay Terminal 2 - Body ground | Always | 10 kΩ or higher |
|
| ||||
| OK | |
|
| 11.INSPECT INSTRUMENT PANEL JUNCTION BLOCK ASSEMBLY |
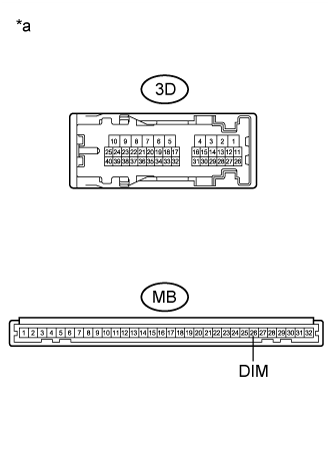 |
Remove the instrument panel junction block assembly (Click here).
Remove the main body ECU (multiplex network body ECU) from the instrument panel junction block assembly.
Measure the resistance according to the value(s) in the table below.
| Tester Connection | Condition | Specified Condition |
| 3D-39 - MB-26 (DIM) | Always | Below 1 Ω |
| *a | Component without harness connected (Instrument Panel Junction Block Assembly) |
|
| ||||
| OK | ||
| ||
| ||

