Home › Drivetrain · U761E AUTOMATIC TRANSMISSION / TRANSAXLE › AUTOMATIC TRANSAXLE SYSTEM

DTC    P074011    Torque Converter Clutch Circuit Short to Ground

for Preparation Click here


DESCRIPTION

The shift solenoid valve SL is turned on and off by signals from the ECM to control the hydraulic pressure acting on the lock-up relay valve, which then controls operation of the lock-up clutch.

DTC No.
DTC Detection Condition
Trouble Area
P074011
1. Diagnosis Condition 2. Malfunction Status 3. Malfunction Time 4. Other
  1. Lock-up is operating.
  2. A short in the shift solenoid valve SL circuit is detected.
  3. Malfunction status occurs 1 time or more
  4. 2-trip detection logic
  1. Wiring harness connector
  2. Short in shift solenoid valve SL circuit
  3. Shift solenoid valve SL
  4. ECM
Fail-safe function:
If the ECM detects a malfunction, it turns shift solenoid valve SL off.

MONITOR DESCRIPTION

Based on the signals from the throttle position sensor, the air flow meter and the crankshaft position sensor, the ECM sends a signal to the shift solenoid valve SL to regulate the hydraulic pressure and provide smoother torque converter clutch engagement. The shift solenoid valve SL responds to commands from the ECM. The valve controls the lock-up relay valve to perform the torque-converter lock-up function. If the ECM detects an open or short in the shift solenoid valve SL circuit, it will illuminate the MIL and store a DTC.

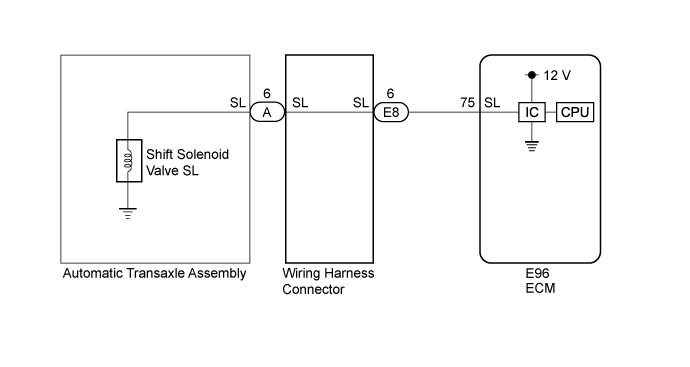
WIRING DIAGRAM


C314406E01


INSPECTION PROCEDURE

NOTICE:
Perform registration and/or initialization when parts related to the automatic transaxle are replaced (Click here).

HINT:
After performing repair, clear the DTCs and perform the following procedure to check that DTCs are not output.
  1. Perform the Lock-up Function inspection in Road Test (Click here).
  2. Turn the engine switch off.
  3. Perform step (1) again.
  4. Check for DTCs again (Click here).

1.CHECK HARNESS AND CONNECTOR (SHIFT SOLENOID VALVE SL CIRCUIT)
  1. Disconnect the E96 ECM connector.

  1. Measure the resistance according to the value(s) in the table below.

    Standard Resistance:
    Tester Connection
    Condition
    Specified Condition
    E96-75 (SL) - Body ground
    20°C (68°F)
    11 to 15 Ω


NG
Go to step 2
OK

REPLACE ECM (Click here)  

2.CHECK HARNESS AND CONNECTOR (ECM - WIRING HARNESS CONNECTOR)
  1. Disconnect the E8 connector from the wiring harness connector.

  1. Measure the resistance according to the value(s) in the table below.

    Standard Resistance:
    Tester Connection
    Condition
    Specified Condition
    E96-75 (SL) - Body ground and other terminals
    Always
    10 kΩ or higher
    E8-6 (SL) - Body ground and other terminals
    Always
    10 kΩ or higher


NG
REPAIR OR REPLACE HARNESS OR CONNECTOR
OK


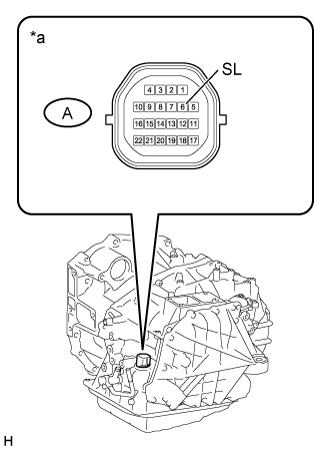
3.INSPECT TRANSMISSION WIRE (SHIFT SOLENOID VALVE SL)


    C315790E03
  1. Remove the wiring harness connector.
    Text in Illustration 
    *a
    Component without harness connected
    (Transmission Wire)

  1. Measure the resistance according to the value(s) in the table below.

    Standard Resistance:
    Tester Connection
    Condition
    Specified Condition
    A-6 (SL) - Body ground
    20°C (68°F)
    11 to 15 Ω


NG
Go to step 4
OK

REPLACE WIRING HARNESS CONNECTOR (Click here)  

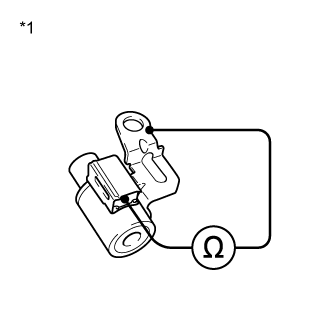
4.INSPECT SHIFT SOLENOID VALVE SL


    C133217E02
  1. Remove the shift solenoid valve SL.
    Text in Illustration 
    *1
    Shift Solenoid Valve SL

  1. Measure the resistance according to the value(s) in the table below.

    Standard Resistance:
    Tester Connection
    Condition
    Specified Condition
    Solenoid Connector (SL) - Solenoid Body (SL)
    20°C (68°F)
    11 to 15 Ω


NG
REPLACE SHIFT SOLENOID VALVE SL (Click here)
OK

REPLACE TRANSMISSION WIRE (Click here)