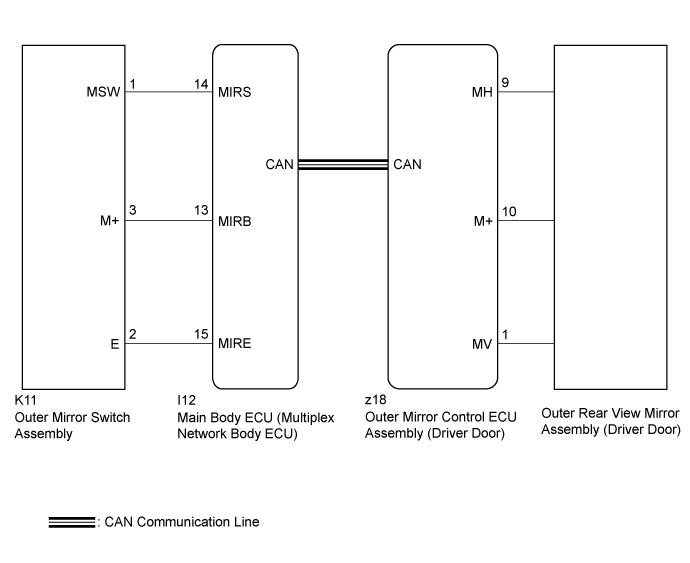
POWER MIRROR CONTROL SYSTEM (w/ Memory) > Driver Side Power Mirror cannot be Adjusted with Power Mirror Switch |
| 1.READ VALUE USING GTS |
Connect the GTS to the DLC3.
Turn the engine switch on (IG).
Turn the GTS on.
Enter the following menus: Body Electrical / Main Body / Data List.
Read the Data List according to the display on the GTS.
| Tester Display | Measurement Item/Range | Normal Condition | Diagnostic Note |
| Mirror Selection SW (L) | Mirror select switch signal for LH mirror / ON or OFF | ON: Mirror select switch in L position OFF: Mirror select switch off or in R position | - |
| Mirror Position SW (R) | Mirror adjust switch signal (Right) / ON or OFF | ON: Mirror adjust switch pressed right OFF: Mirror adjust switch not pressed right | Check with the mirror select switch in the L position. |
| Mirror Position SW (L) | Mirror adjust switch signal (Left) / ON or OFF | ON: Mirror adjust switch pressed left OFF: Mirror adjust switch not pressed left | Check with the mirror select switch in the L position. |
| Mirror Position SW (Up) | Mirror adjust switch signal (Up) / ON or OFF | ON: Mirror adjust switch pressed up OFF: Mirror adjust switch not pressed up | Check with the mirror select switch in the L position. |
| Mirror Position SW (Dwn) | Mirror adjust switch signal (Down) / ON or OFF | ON: Mirror adjust switch pressed down OFF: Mirror adjust switch not pressed down | Check with the mirror select switch in the L position. |
|
| ||||
| OK | |
 |
| 2.PERFORM ACTIVE TEST USING GTS |
Enter the following menus: Body Electrical / Mirror L / Active Test.
Perform the Active Test according to the display on the GTS.
| Tester Display | Test Part | Control Range | Diagnostic Note |
| Mirror Up/Down | Mirror vertical operation | Up / Down |
|
| Mirror Right/Left | Mirror horizontal operation | Right / Left |
|
|
| ||||
| OK | ||
 | ||
| ||
| 3.INSPECT OUTER REAR VIEW MIRROR ASSEMBLY (DRIVER DOOR) |
Remove the outer rear view mirror assembly (driver door) (Click here).
Inspect the outer rear view mirror assembly (driver door) (mirror surface) (Click here).
|
| ||||
| OK | ||
| ||
| ||
| 4.INSPECT OUTER MIRROR SWITCH ASSEMBLY |
Remove the outer mirror switch assembly (Click here).
Inspect the outer mirror switch assembly (Click here).
|
| ||||
| OK | |
|
| 5.CHECK HARNESS AND CONNECTOR (OUTER MIRROR SWITCH - MAIN BODY ECU) |
Disconnect the K11 connector from the outer mirror switch assembly.
Disconnect the I12 connector from the main body ECU (multiplex network body ECU).
Measure the resistance according to the value(s) in the table below.
| Tester Connection | Condition | Specified Condition |
| K11-2 (E) - I12-15 (MIRE) | Always | Below 1 Ω |
| K11-3 (M+) - I12-13 (MIRB) | Always | Below 1 Ω |
| K11-1 (MSW) - I12-14 (MIRS) | Always | Below 1 Ω |
| K11-2 (E) - Body ground | Always | 10 kΩ or higher |
| K11-3 (M+) - Body ground | Always | 10 kΩ or higher |
| K11-1 (MSW) - Body ground | Always | 10 kΩ or higher |
|
| ||||
| OK | ||
| ||
| ||

