 |
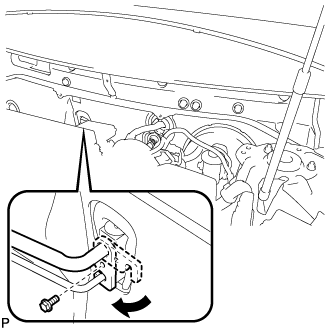
Rotate the hook connector as shown in the illustration.
COOLER EXPANSION VALVE (for TMC, TMMR Made) > INSTALLATION |
| 1. INSTALL COOLER EXPANSION VALVE |
Sufficiently apply compressor oil to 2 new O-rings and the fitting surfaces of the cooler expansion valve.
Install 2 new O-rings to the No. 1 cooler evaporator sub-assembly.
Using a 4 mm hexagon socket wrench, install the cooler expansion valve with the 2 hexagon bolts.
| 2. CONNECT AIR CONDITIONER TUBE AND ACCESSORY ASSEMBLY |
Remove the vinyl tape from the air conditioner tube and accessory assembly.
Sufficiently apply compressor oil to a new O-ring and the fitting surface of the air conditioning tube and accessory assembly.
Install the O-ring to the air conditioner tube and accessory assembly.
Connect the air conditioner tube and accessory assembly.
| 3. CONNECT SUCTION PIPE SUB-ASSEMBLY |
Remove the vinyl tape from the suction pipe sub-assembly.
Sufficiently apply compressor oil to a new O-ring and the fitting surface of the suction pipe sub-assembly.
Install the O-ring to the suction pipe sub-assembly.
Connect the suction pipe sub-assembly.
|
Rotate the hook connector as shown in the illustration.
Insert the pipe joint into the fitting hole securely and install the bolt.
| 4. INSTALL FRONT OUTER COWL TOP PANEL SUB-ASSEMBLY (for LHD) |
Install the front outer cowl top panel sub-assembly with the 10 bolts.
Engage the 2 clamps to install the wire harness to the front outer cowl top panel sub-assembly.
w/ Windshield Deicer System:
Connect the connector.
Engage the 2 clamps to install the wire harness to the front outer cowl top panel sub-assembly.
w/ Heated Windshield Defroster System:
Connect the 2 connectors.
Engage the 4 clamps to install the wire harness to the front outer cowl top panel sub-assembly.
| 5. INSTALL FRONT OUTER COWL TOP PANEL SUB-ASSEMBLY (for RHD) |
Install the front outer cowl top panel sub-assembly with the 10 bolts.
Engage the 2 clamps to install the wire harness to the front outer cowl top panel sub-assembly.
| 6. INSTALL WINDSHIELD WIPER MOTOR AND LINK ASSEMBLY |
| 7. CHARGE AIR CONDITIONING SYSTEM WITH REFRIGERANT |
Perform vacuum purging using a vacuum pump or appropriate equipment.
Charge the air conditioning system with refrigerant.
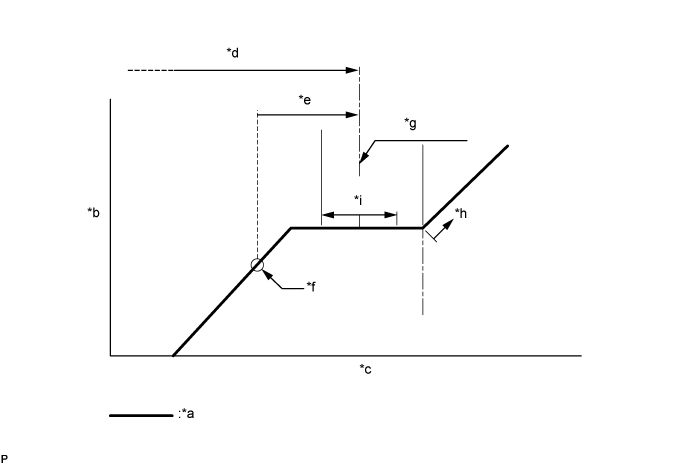
| *a | Sub-cool System | *b | High Pressure |
| *c | Refrigerant Amount | *d | Standard charge amount |
| *e | Charge additional 100 g (3.5 oz) | *f | Point where bubbles disappear |
| *g | Mean value in proper range | *h | Overcharged |
| *i | +/-50 g (+/-1.76 oz) | - | - |
| 8. WARM UP ENGINE |
Keep the A/C switch on for at least 2 minutes to warm up the compressor.
| 9. INSPECT FOR REFRIGERANT LEAK |
After recharging the air conditioning system with refrigerant, check for refrigerant leaks using a halogen leak detector.
Carry out the test under the following conditions:
Remove the front outer cowl top panel sub-assembly .
Remove the radiator side deflector RH .
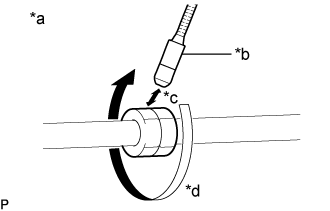 |
How to check for refrigerant leaks in pipe joints:
| *a | Check for leaks |
| *b | Halogen Leak Detector Sensor |
| *c | Distance between Sensor and Joint to be Checked: 10 mm or less |
| *d | Halogen Leak Detector Sensor Moving Speed: 25 to 50 mm/sec. |
Using a halogen leak detector, check for refrigerant leaks at the pipe joints shown in the illustration.
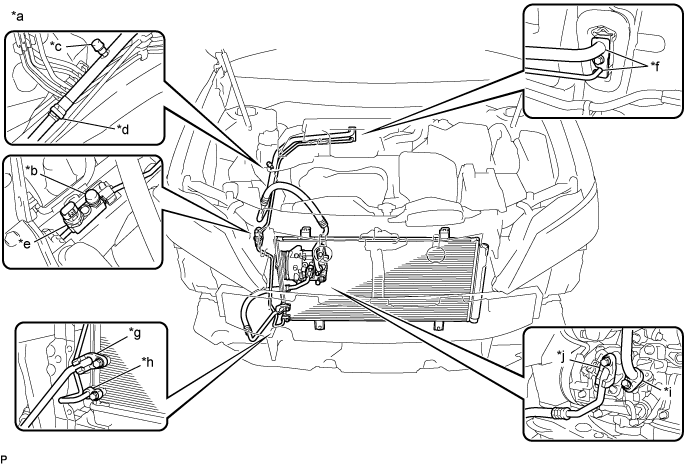
| *a | Area to be Checked | *b | Service Valve (High) |
| *c | Service Valve (Low) | *d | Pipe Joint |
| *e | Air Conditioner Pressure Sensor Joint | *f | Cooler Expansion Valve Joint |
| *g | Condenser Joint (Inlet) | *h | Condenser Joint (Outlet) |
| *i | Compressor Joint (Inlet) | *j | Compressor Joint (Outlet) |
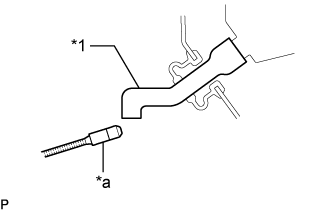 |
Bring the halogen leak detector sensor close to the drain cooler hose with the detector turned off, and then turn the detector on.
| *1 | Drain Cooler Hose |
| *a | Halogen Leak Detector |
Remove the blower motor with fan sub-assembly (Click here).
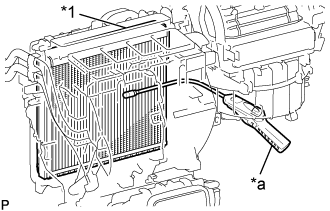 |
Insert the halogen leak detector sensor into the air conditioning unit assembly, bring the sensor close to the No. 1 cooler evaporator sub-assembly and check for refrigerant leaks.
| *1 | No. 1 Cooler Evaporator Sub-assembly |
| *a | Halogen Leak Detector |
Install the blower motor with fan sub-assembly (Click here).
Install the radiator side deflector RH .
Install the front bumper assembly (Click here).
Install the front outer cowl top panel sub-assembly (Click here for LHD or Click here for RHD).