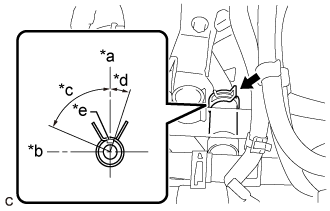
CYLINDER HEAD GASKET > INSTALLATION |
| 1. INSPECT CYLINDER HEAD SET BOLT |
![]() |
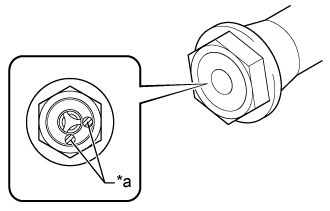
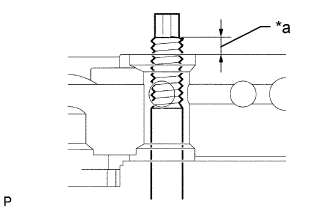
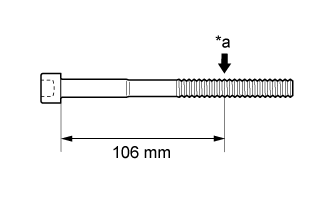
Using a vernier caliper, measure the diameter of the threads at the measurement point.
| *a | Measurement Point |
| 2. INSPECT CYLINDER HEAD SUB-ASSEMBLY |
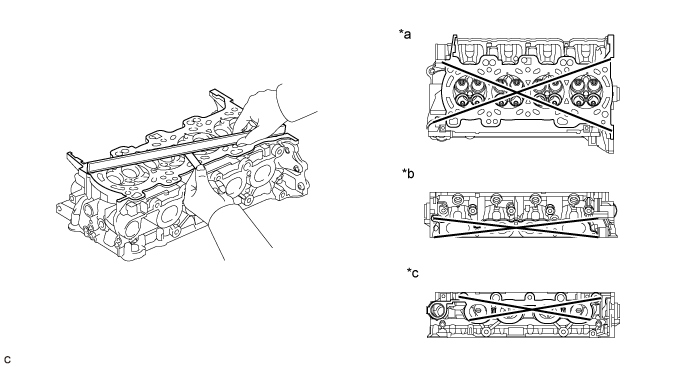
Using a precision straightedge and feeler gauge, measure the warpage of the contact surfaces where the cylinder head sub-assembly contacts the cylinder block sub-assembly, intake manifold and exhaust manifold converter sub-assembly (TWC: Front Catalyst).

| *a | Cylinder Block Sub-assembly Side | *b | Intake Manifold Side |
| *c | Exhaust Manifold Converter Sub-assembly (TWC: Front Catalyst) Side | - | - |
| Item | Specified Condition |
| Cylinder block sub-assembly side | 0.05 mm (0.00197 in.) |
| Intake manifold side | 0.10 mm (0.00394 in.) |
| Exhaust manifold converter sub-assembly (TWC: Front Catalyst) side | 0.10 mm (0.00394 in.) |
![]() |
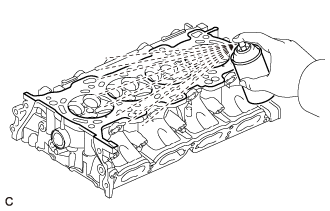
Using a dye penetrant, check the intake ports, exhaust ports and cylinder head sub-assembly surface for cracks.
If cracks are found, replace the cylinder head sub-assembly.
| 3. INSTALL CYLINDER HEAD GASKET |
Clean the cylinder block sub-assembly and cylinder head sub-assembly with solvent.
![]() |
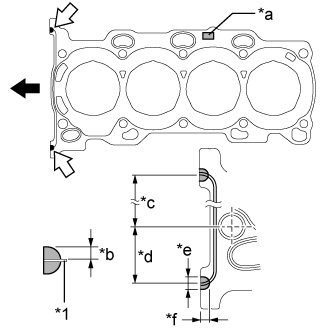
Apply a continuous line of seal packing to a new cylinder head gasket as shown in the illustration.
| *1 | Cylinder Head Gasket |
| *a | Lot No. |
| *b | 3.0 to 5.0 mm (0.118 to 0.197 in.) |
| *c | 152.5 mm (6.00 in.) |
| *d | 38 mm (1.50 in.) |
| *e | 7.0 to 9.0 mm (0.276 to 0.354 in.) |
| *f | 5.0 to 7.0 mm (0.197 to 0.276 in.) |
![]() | Front |
![]() | Seal Packing |
Place the cylinder head gasket on the cylinder block sub-assembly with the Lot No. stamp facing upward.
| 4. INSTALL CYLINDER HEAD SUB-ASSEMBLY |
Place the cylinder head sub-assembly on the cylinder block sub-assembly.
Install the 10 plate washers to the 10 cylinder head set bolts.
Apply a light coat of engine oil to the threads and under the heads of the cylinder head set bolts.
Step 1:
![]() |
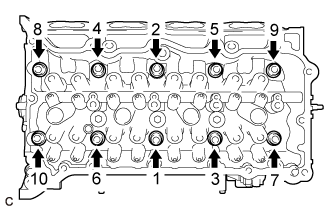
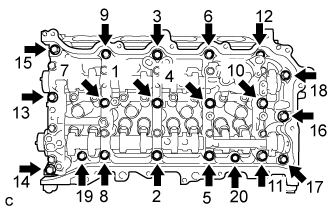
Using a 10 mm bi-hexagon wrench, install and uniformly tighten the 10 cylinder head set bolts in several steps, in the order shown in the illustration.
Step 2:
Check that the cylinder head set bolts are tightened to the specified torque.
Step 3:
![]() |
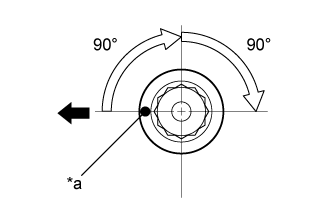
Mark each cylinder head set bolt head with paint as shown in the illustration.
| *a | Paint Mark |
![]() | Front |
Tighten the cylinder head set bolts by 90° in the order shown in step 1.
Step 4:
Tighten the cylinder head set bolts by another 90° in the order shown in step 1.
Check that the paint marks are now facing rearward.
| 5. INSTALL VALVE STEM CAP |
Apply a light coat of engine oil to the valve stem cap ends.
Install the 16 valve stem caps to the cylinder head sub-assembly.
| 6. INSTALL VALVE LASH ADJUSTER ASSEMBLY |
Inspect the 16 valve lash adjuster assemblies before installing them .
Install the 16 valve lash adjuster assemblies to the cylinder head sub-assembly.
| 7. INSTALL NO. 1 VALVE ROCKER ARM SUB-ASSEMBLY |
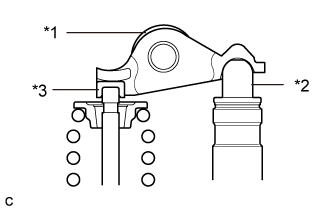
![]() |
Apply engine oil to the valve lash adjuster assembly tips and valve stem caps.
| *1 | No. 1 Valve Rocker Arm Sub-assembly |
| *2 | Valve Lash Adjuster Assembly |
| *3 | Valve Stem Cap |
Install the 16 No. 1 valve rocker arm sub-assemblies as shown in the illustration.
| 8. INSTALL NO. 1 CAMSHAFT BEARING |
![]() |
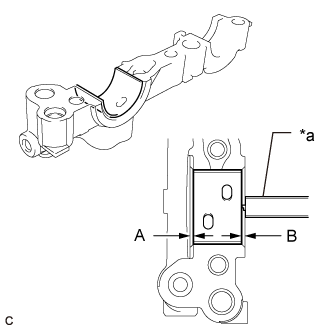
Clean the No. 1 camshaft bearing.
| *a | Vernier Caliper |
Install the No. 1 camshaft bearing to the No. 1 camshaft bearing cap.
Using a vernier caliper, measure the distance between the No. 1 camshaft bearing cap edge and the No. 1 camshaft bearing edge.
| 9. INSTALL NO. 2 CAMSHAFT BEARING |
Clean the No. 2 camshaft bearing.
Install the No. 2 camshaft bearing to the camshaft housing sub-assembly.
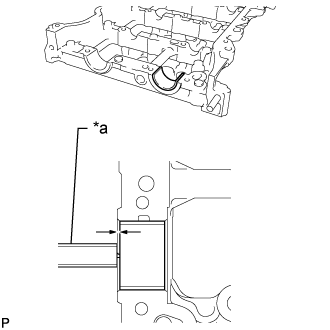
![]() |
Using a vernier caliper, measure the distance between the camshaft housing sub-assembly edge and the No. 2 camshaft bearing edge.
| *a | Vernier Caliper |
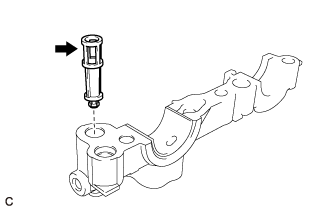
| 10. INSTALL OIL CONTROL VALVE FILTER |
![]() |
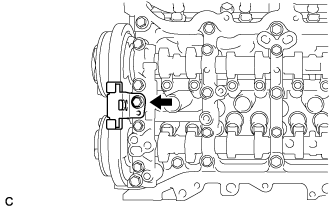
Install the oil control valve filter to the No. 1 camshaft bearing cap.
| 11. INSTALL CAMSHAFT |
Clean the camshaft journals, camshaft housing sub-assembly and camshaft bearing caps.
Apply a light coat of engine oil to the camshaft journals, camshaft housing sub-assembly and camshaft bearing caps.
Install the camshaft to the camshaft housing sub-assembly.
| 12. INSTALL NO. 2 CAMSHAFT |
Clean the camshaft journals and camshaft housing sub-assembly.
Apply a light coat of engine oil to the camshaft journals and camshaft housing sub-assembly.
Install the No. 2 camshaft to the camshaft housing sub-assembly.
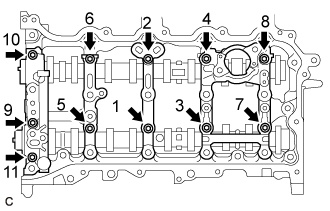
| 13. INSTALL CAMSHAFT BEARING CAP |
Place the No. 1 camshaft bearing cap, No. 2 camshaft bearing cap, No. 3 camshaft bearing cap and No. 4 camshaft bearing cap in their correct positions.
![]() |
Install the 11 bolts in the order shown in the illustration.
| 14. INSTALL CAMSHAFT HOUSING SUB-ASSEMBLY |
![]() |
Make sure that the No. 1 valve rocker arm sub-assemblies are installed as shown in the illustration.
| *1 | No. 1 Valve Rocker Arm Sub-assembly |
| *2 | Valve Lash Adjuster Assembly |
| *3 | Valve Stem Cap |
![]() |
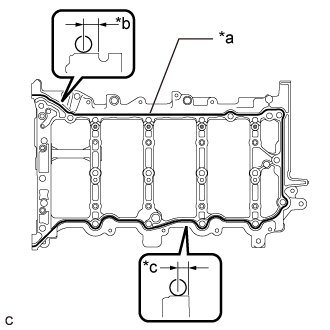
Apply seal packing in a continuous line as shown in the illustration.
| *a | Seal Packing |
| *b | 2.5 to 3.5 mm (0.0984 to 0.138 in.) |
| *c | 3.5 to 4.0 mm (0.138 to 0.157 in.) |
![]() |
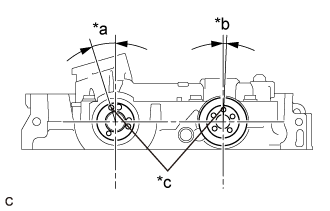
Position the knock pins of the camshaft and No. 2 camshaft as shown in the illustration.
| *a | Approximately 17° |
| *b | Approximately 2° |
| *c | Knock Pin |
![]() |
Install the camshaft housing sub-assembly, and then install the 20 bolts in the order shown in the illustration.
| 15. INSTALL CAMSHAFT TIMING EXHAUST GEAR ASSEMBLY |
![]() |
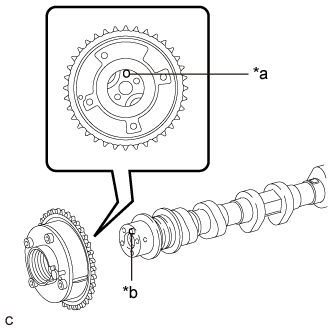
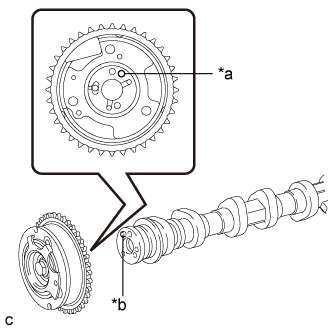
Align and fit the knock pin of the No. 2 camshaft with the knock pin hole of the camshaft timing exhaust gear assembly.
| *a | Knock Pin Hole |
| *b | Knock Pin |
![]() |
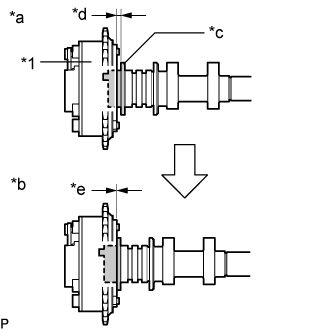
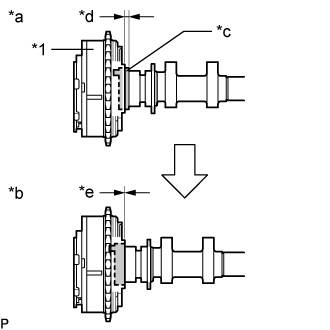
Check that there is no gap between the camshaft timing exhaust gear assembly and No. 2 camshaft flange.
| *1 | Camshaft Timing Exhaust Gear Assembly |
| *a | Incorrect |
| *b | Correct |
| *c | No. 2 Camshaft Flange |
| *d | Gap |
| *e | No Gap |
![]() |
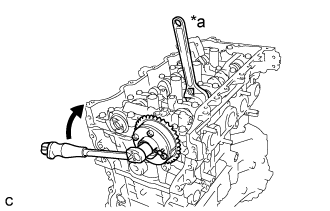
Using a wrench to hold the hexagonal portion of the No. 2 camshaft, install the bolt.
| *a | Hold |
![]() | Turn |
| 16. INSTALL CAMSHAFT TIMING GEAR ASSEMBLY |
![]() |
| Item | Identification Mark Stamp |
| Type A | A |
| Type B | D |
| *a | Identification Mark Stamp |
![]() |
Align and fit the knock pin of the camshaft with the knock pin hole of the camshaft timing gear assembly.
| *a | Knock Pin Hole |
| *b | Knock Pin |
![]() |
Check that there is no gap between the camshaft timing gear assembly and portion (A) of the camshaft shown in the illustration.
| *1 | Camshaft Timing Gear Assembly |
| *a | Incorrect |
| *b | Correct |
| *c | Portion (A) of Camshaft |
| *d | Gap |
| *e | No Gap |
![]() |
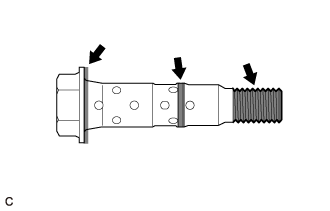
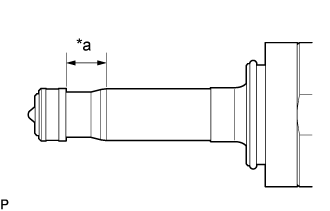
Apply engine oil to the areas of the camshaft timing gear bolt shown in the illustration.
Temporarily install the camshaft timing gear bolt.
![]() |
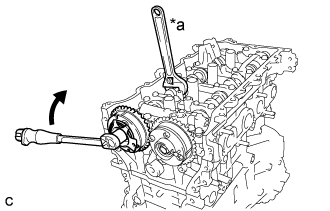
Using a wrench to hold the hexagonal portion of the camshaft, tighten the camshaft timing gear bolt.
| *a | Hold |
![]() | Turn |
| 17. ADD ENGINE OIL |
![]() |
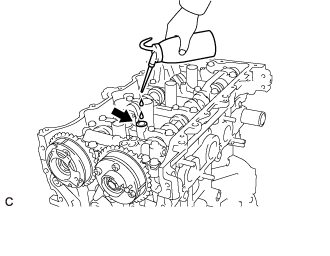
Add 50 cc (3.1 cu. in.) of engine oil into the oil hole shown in the illustration.
| 18. INSTALL NO. 1 CHAIN VIBRATION DAMPER |
![]() |
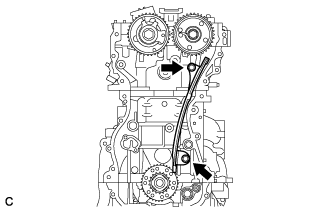
Install the No. 1 chain vibration damper with the 2 bolts.
| 19. INSTALL CHAIN SUB-ASSEMBLY |
![]() |
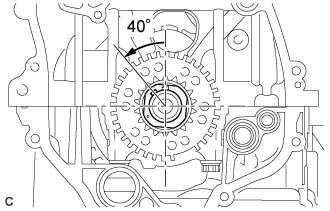
Temporarily install the crankshaft pulley set bolt.
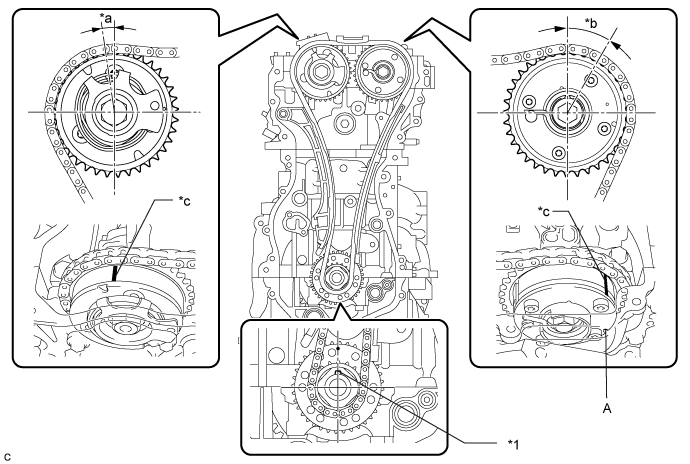
Rotate the crankshaft 40° counterclockwise to position the crankshaft pulley key as shown in the illustration.
![]() |
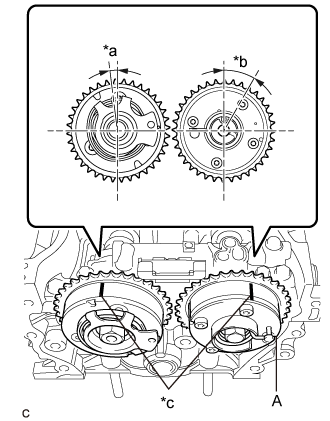
Check that the timing marks of the camshaft timing exhaust gear assembly and camshaft timing gear assembly are as shown in the illustration.
| *a | Approximately 7° |
| *b | Approximately 32° |
| *c | Timing Mark |
Place the chain sub-assembly onto the camshaft timing exhaust gear assembly, camshaft timing gear assembly and crankshaft timing sprocket.
![]() |
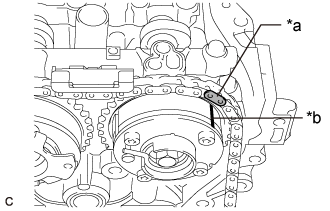
Align the mark plate (orange) of the chain sub-assembly with the timing mark of the camshaft timing exhaust gear assembly and install the chain sub-assembly to the camshaft timing exhaust gear assembly.
| *a | Mark Plate |
| *b | Timing Mark |
![]() |
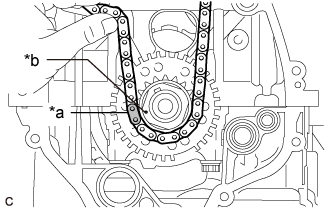
Align the mark plate (yellow) of the chain sub-assembly with the timing mark of the crankshaft timing sprocket and install the chain sub-assembly to the crankshaft timing sprocket.
| *a | Mark Plate |
| *b | Timing Mark |
![]() |
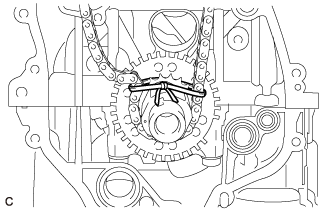
Tie a string above the crankshaft timing sprocket so that the chain sub-assembly is secure.
![]() |
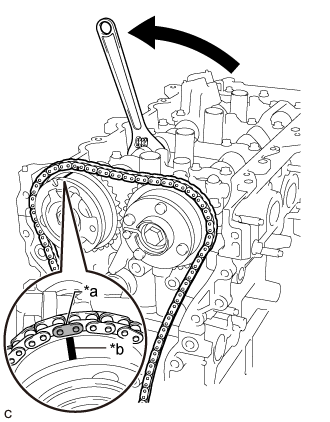
Using a wrench, hold the hexagonal portion of the camshaft and rotate the camshaft counterclockwise to align the timing mark of the camshaft timing gear assembly with the mark plate (orange) of the chain sub-assembly, and install the chain sub-assembly to the camshaft timing gear assembly.
| *a | Mark Plate |
| *b | Timing Mark |
![]() |
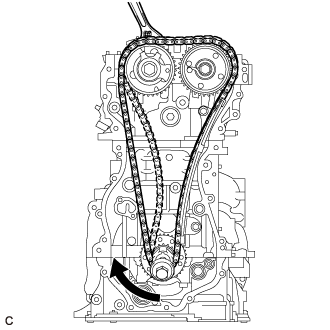
Remove the string above the crankshaft timing sprocket, rotate the crankshaft clockwise, and loosen the chain sub-assembly so that the chain tensioner slipper can be installed.
| 20. INSTALL CHAIN TENSIONER SLIPPER |
![]() |
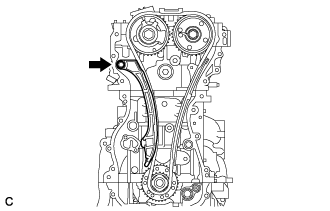
Install the chain tensioner slipper with the bolt.
| 21. INSTALL NO. 1 CHAIN TENSIONER ASSEMBLY |
![]() |
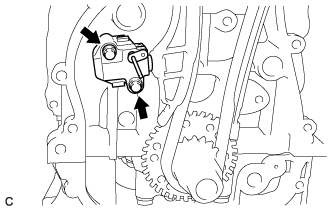
Install a new gasket and the No. 1 chain tensioner assembly with the 2 bolts.
Remove the pin from the stopper plate.
| 22. INSTALL TIMING CHAIN GUIDE |
![]() |
Install the timing chain guide with the bolt.
| 23. SET NO. 1 CYLINDER TO TDC/COMPRESSION |
Temporarily install the crankshaft pulley set bolt.

| *1 | Crankshaft Pulley Key | - | - |
| *a | Approximately 7° | *b | Approximately 32° |
| *c | Timing Mark | - | - |
Rotate the crankshaft clockwise and align the crankshaft pulley key as shown in the illustration.
Check that the timing marks on the camshaft timing gear assembly and camshaft timing exhaust gear assembly are as shown in the illustration.
| 24. INSTALL VACUUM PUMP ASSEMBLY |
When installing a new vacuum pump assembly:
![]() |
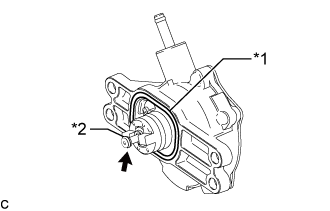
Apply engine oil to the No. 3 O-ring.
| *1 | No. 2 O-ring |
| *2 | No. 3 O-ring |
![]() | Engine Oil |
When reusing the vacuum pump assembly:
![]() |
Install a new No. 2 O-ring to the vacuum pump assembly.
| *1 | No. 2 O-ring |
| *2 | No. 3 O-ring |
![]() | Engine Oil |
Apply engine oil to a new No. 3 O-ring and install it to the vacuum pump assembly.
![]() |
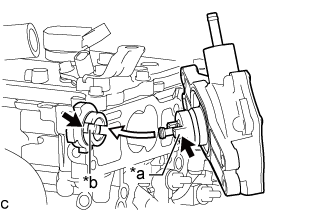
Apply engine oil to the inner surface of the installation hole.
| *a | Coupling Teeth |
| *b | Groove |
![]() | Engine Oil |
Align the coupling teeth of the vacuum pump assembly with the groove of the camshaft and install the vacuum pump assembly with the 4 bolts.
| 25. INSTALL FUEL INJECTOR SEAL |
![]() |
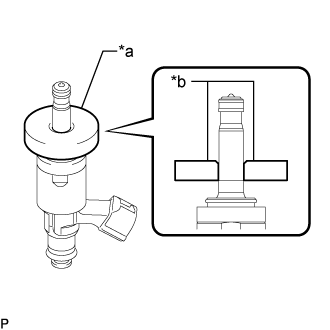
Apply engine conditioner to the area shown in the illustration. Using a piece of cloth, clean carbon deposits from the direct fuel injector assembly and its grooves.
| *a | Area to be Cleaned |
![]() |
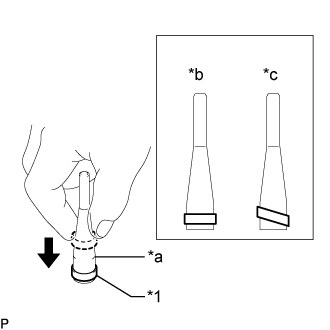
Apply engine oil to the direct fuel injector assembly contact surface of SST (guide), then attach SST (guide) to the direct fuel injector assembly with the chamfer facing the tip of the direct fuel injector assembly as shown in the illustration.
| *a | SST (Guide) |
| *b | Chamfer |
![]() |
Install a new fuel injector seal to SST (holder).
| *1 | Fuel Injector Seal |
| *a | SST (Holder) |
| *b | Correct |
| *c | Incorrect |
![]() |
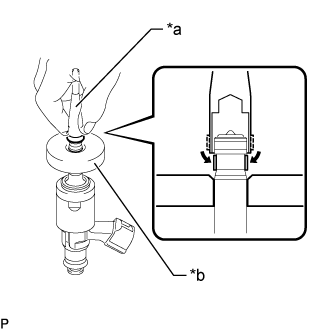
Install SST (holder) with the fuel injector seal to the tip of the direct fuel injector assembly. Slide the fuel injector seal downward into the direct fuel injector assembly groove with your fingers as shown in the illustration.
| *a | SST (Holder) |
| *b | SST (Guide) |
![]() |
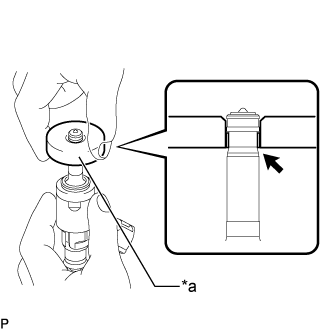
Slowly slide SST (guide) toward the tip of the direct fuel injector assembly. When the direct fuel injector assembly contact surface of SST (guide) aligns with the fuel injector seal as shown in the illustration, hold the position for 5 seconds or more to fully seat the fuel injector seal into the direct fuel injector assembly groove.
| *a | SST (Guide) |
![]() |
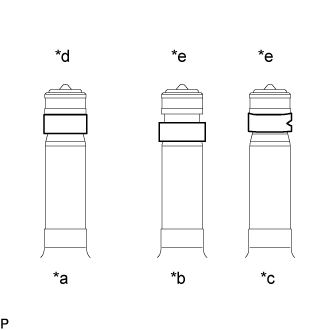
After installing the fuel injector seals, check that they are not scratched, deformed or protruding from the direct fuel injector assembly groove.
| *a | Normal |
| *b | Protruding |
| *c | Deformed |
| *d | Correct |
| *e | Incorrect |
| 26. INSTALL DIRECT FUEL INJECTOR ASSEMBLY |
![]() |
Install a new injector vibration insulator and a new C-ring to the direct fuel injector assembly.
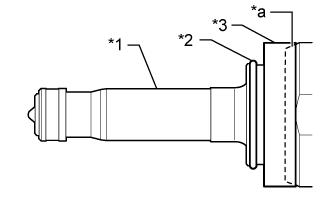
| *1 | Direct Fuel Injector Assembly |
| *2 | C-ring |
| *3 | Injector Vibration Insulator |
| *a | Taper |
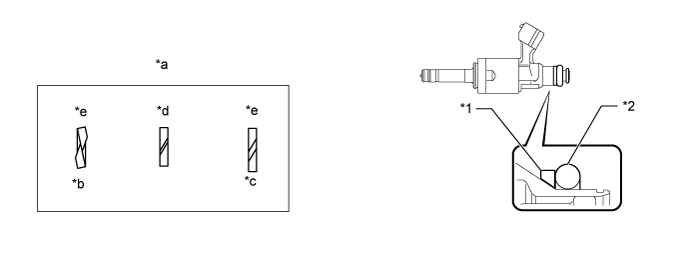
Install a new O-ring and a new No. 1 fuel injector back-up ring to the direct fuel injector assembly as shown in the illustration.

| *1 | No. 1 Fuel Injector Back-up Ring | *2 | O-ring |
| *a | No. 1 Fuel Injector Back-up Ring Opening | *b | Overlapped |
| *c | Stretched | *d | Correct |
| *e | Incorrect | - | - |
![]() |
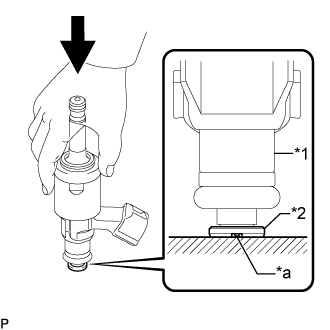
With the notch of a new No. 3 fuel injector back-up ring facing downward, install the direct fuel injector assembly to the No. 3 fuel injector back-up ring as shown in the illustration.
| *1 | Direct Fuel Injector Assembly |
| *2 | No. 3 Fuel Injector Back-up Ring |
| *a | Notch |
Install the nozzle holder clamp to each direct fuel injector assembly.
![]() |
Align the protrusion of the nozzle holder clamp with the positioning hole of the fuel delivery pipe sub-assembly and insert the direct direct fuel injector assembly.
| *a | Protrusion |
| *b | Positioning Hole |
![]() | No Gap |
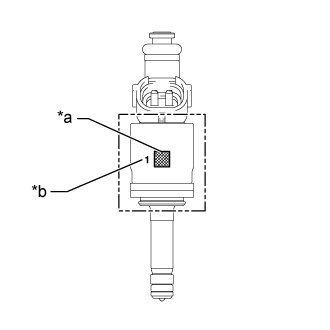
![]() |
| *a | QR Code |
| *b | Flow Classification Number |
| 27. INSTALL FUEL DELIVERY PIPE SUB-ASSEMBLY |
Apply lubricant to the direct fuel injector assembly installation holes of the cylinder head sub-assembly.
![]() |
Temporarily install the fuel delivery pipe sub- assembly so that the stud bolts protrude enough to install the nuts.
| *a | Protruding enough to install nut |
![]() |
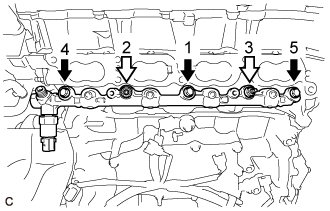
Install the fuel delivery pipe sub-assembly by uniformly tightening the 3 bolts and 2 nuts in the order shown in the illustration.
![]() | Bolt |
![]() | Nut |
| 28. INSTALL NO. 5 ENGINE WIRE |
Engage the 2 clamps and install the No. 5 engine wire.
Connect the fuel pressure sensor connector, knock control sensor connector and 4 fuel injector set connectors.
Connect the No. 5 engine wire to the fuel delivery pipe sub-assembly with the 2 bolts.
| 29. INSTALL INTAKE MANIFOLD |
Install a new manifold gasket to the intake manifold.
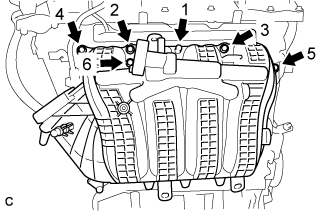
Temporarily install the intake manifold to the cylinder head sub-assembly with the 6 bolts.
![]() |
Tighten the 6 bolts in the order shown in the illustration.
| 30. INSTALL THROTTLE BODY GASKET |
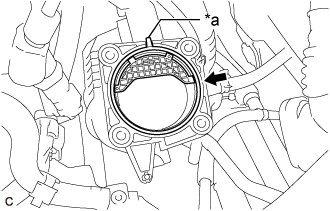
![]() |
Install a new throttle body gasket to the intake manifold with the protrusion of the throttle body gasket oriented as shown in the illustration.
| *a | Protrusion |
| 31. INSTALL THROTTLE BODY WITH MOTOR ASSEMBLY |
Connect the No. 2 water by-pass hose and No. 3 water by-pass hose to the throttle body with motor assembly and slide the 2 clips to secure them.
Install the throttle body with motor assembly to the intake manifold with the 4 bolts.
Connect the throttle body with motor assembly connector.
| 32. INSTALL PORT FUEL INJECTOR ASSEMBLY |
Apply a light coat of spindle oil or gasoline to a new O-ring, and install one to each port fuel injector assembly.
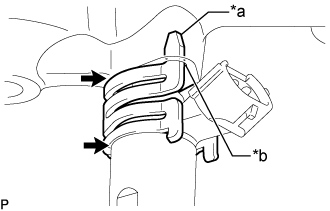
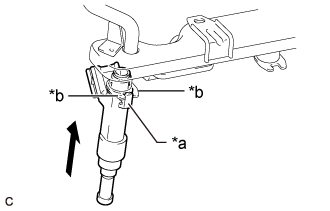
![]() |
Install the 4 port fuel injector assemblies to the fuel delivery pipe.
| *a | Claw |
| *b | Stopper |
| 33. INSTALL INJECTOR VIBRATION INSULATOR |
Install 4 new injector vibration insulators to the cylinder head sub-assembly.
| 34. INSTALL FUEL DELIVERY SPACER |
Install the 2 fuel delivery spacers to the cylinder head sub-assembly.
| 35. INSTALL FUEL DELIVERY PIPE |
Place the fuel delivery pipe with the port fuel injector assemblies onto the cylinder head sub-assembly.
Install the fuel delivery pipe with the port fuel injector assemblies with the 2 bolts.
| 36. CONNECT FUEL TUBE SUB-ASSEMBLY |
Connect the fuel tube sub-assembly to the fuel delivery pipe.
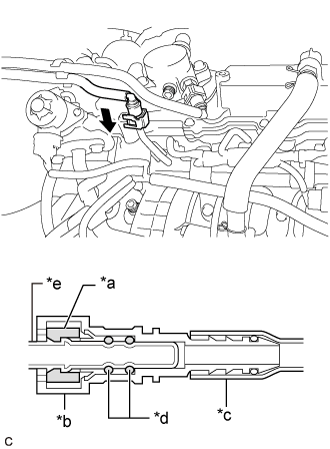
![]() |
Align the fuel tube connector with the fuel pipe, and push them together until the fuel tube connector makes a "click" sound. If it is difficult to push the fuel pipe into the fuel tube connector, apply a small amount of clean engine oil to the tip of the fuel pipe and reinsert it.
| *a | Retainer |
| *b | Fuel Tube Connector |
| *c | Nylon Tube |
| *d | O-ring |
| *e | Fuel Pipe |
![]() | Push |
After connecting the fuel pipes, check that the fuel pipe and fuel tube connector are securely connected by pulling on them.
Push in the fuel tube connector cover.
| 37. INSTALL EXHAUST MANIFOLD CONVERTER SUB-ASSEMBLY (TWC: Front Catalyst) |
Install a new exhaust manifold gasket to the cylinder head sub-assembly.
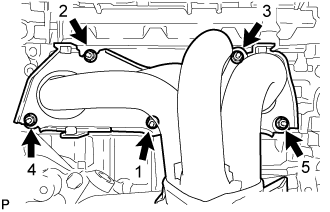
Temporarily install the exhaust manifold converter sub-assembly (TWC: Front Catalyst) to the cylinder head sub-assembly with the 5 nuts.
![]() |
Tighten the 5 nuts in the order shown in the illustration.
| 38. INSTALL NO. 2 MANIFOLD STAY |
Install the No. 2 manifold stay to the exhaust manifold converter sub-assembly (TWC: Front Catalyst) and stiffening crankcase assembly with the bolt and nut.
| 39. INSTALL MANIFOLD STAY |
Install the manifold stay to the exhaust manifold converter sub-assembly (TWC: Front Catalyst) and stiffening crankcase assembly with the bolt and nut.
| 40. INSTALL NO. 1 EXHAUST MANIFOLD HEAT INSULATOR |
Install the No. 1 exhaust manifold heat insulator to the exhaust manifold converter sub-assembly (TWC: Front Catalyst) with the 4 bolts.
| 41. INSTALL EGR VALVE WITH COOLER ASSEMBLY |
Install a new No. 2 EGR pipe gasket to the EGR valve assembly.
Install a new EGR cooler gasket to the EGR pipe connector.
![]() |
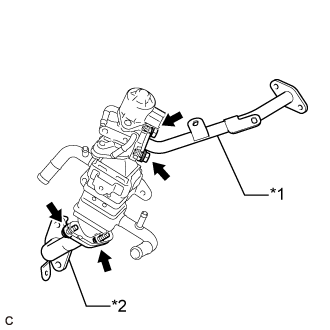
Temporarily connect the No. 2 EGR pipe to the EGR valve assembly with the 2 bolts.
| *1 | No. 2 EGR Pipe |
| *2 | EGR Pipe Connector |
Temporarily connect the EGR pipe connector to the EGR cooler assembly with the 2 bolts.
Install a new EGR cooler gasket to the EGR pipe connector.
Install a new EGR inlet gasket to the intake manifold.
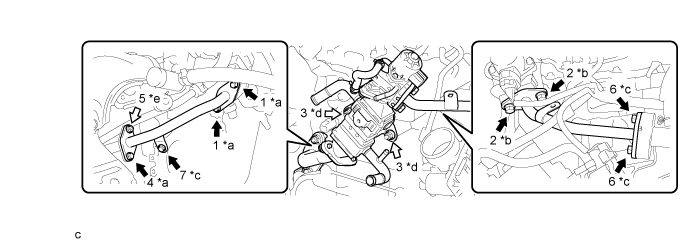
Temporarily install the EGR valve with cooler assembly, No. 2 EGR pipe and EGR pipe connector to the cylinder head sub-assembly, cylinder block sub-assembly, intake manifold and exhaust manifold converter sub-assembly (TWC: Front Catalyst) with the 4 bolts and 3 nuts.
Tighten the 8 bolts and 3 nuts in the order shown in the illustration.

| *a | Bolt (A) | *b | Bolt (B) |
| *c | Bolt (C) | *d | Nut (A) |
| *e | Nut (B) | - | - |
![]() | Bolt | ![]() | Nut |
Engage the 2 wire harness clamps to the No. 2 EGR pipe.
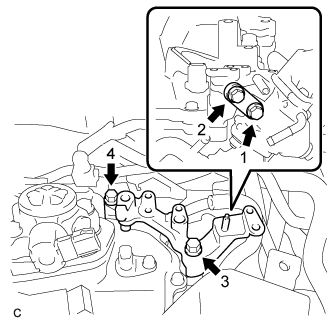
Temporarily install the 2 EGR valve brackets with the 4 bolts.
![]() |
Tighten the 4 bolts in the order shown in the illustration.
Install the fuel hose bracket to the EGR valve bracket with the engine cover joint.
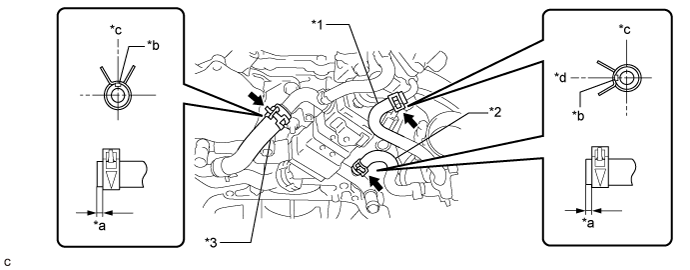
Connect the No. 4 water by-pass hose to the EGR cooler assembly and slide the clip to secure it.

| *1 | No. 2 Water By-pass Hose | *2 | No. 3 Water By-pass Hose |
| *3 | No. 4 Water By-pass Hose | - | - |
| *a | 1 to 6 mm (0.0394 to 0.236 in.) | *b | Paint Mark |
| *c | Upper | *d | Left |
Connect the No. 3 water by-pass hose to the EGR cooler assembly and slide the clip to secure it.
Connect the No. 2 water by-pass hose to the EGR valve assembly and slide the clip to secure it.
![]() |
Connect the water hose sub-assembly to the EGR cooler assembly and slide the clip to secure it.
| *a | Upper |
| *b | Front |
| *c | 75° |
| *d | 15° |
| *b | Paint Mark |
Engage the water hose to the hose clamp.
Connect the EGR valve assembly connector.
| 42. INSTALL TIMING CHAIN COVER SUB-ASSEMBLY |