2AR-FE ENGINE MECHANICAL CYLINDER BLOCK INSPECTION
PROCEDURE

 1.INSPECT CYLINDER BLOCK FOR WARPAGE
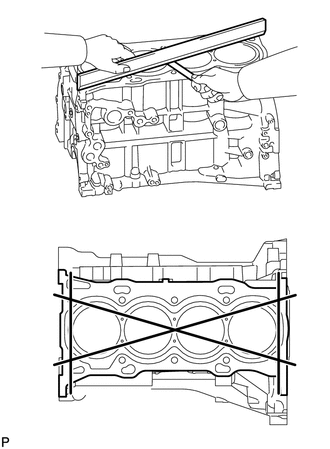
Using a precision straightedge and feeler gauge, measure the warpage of the surface which contacts the cylinder head gasket.
- Maximum Warpage:
0.05 mm (0.00197 in.)
- HINT:
-
If the warpage is more than the maximum, replace the cylinder block sub-assembly.
2.INSPECT CYLINDER BORE
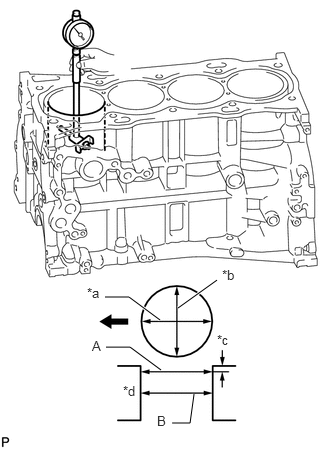
| *a | Axial Direction |
| *b | Thrust Direction |
| *c | 10 mm (0.394 in.) |
| *d | Center |

|
Front of Engine |
Using a cylinder gauge, measure the cylinder bore diameter at the positions (A) and (B) in the thrust and axial directions.
- Reference Diameter (New Parts):
90.000 to 90.013 mm (3.5433 to 3.5438 in.)
- Maximum Diameter:
90.13 mm (3.5484 in.)
- HINT:
-
If the average diameter of the 4 positions is more than the maximum, replace the cylinder block sub-assembly.
13211
3.INSPECT PISTON
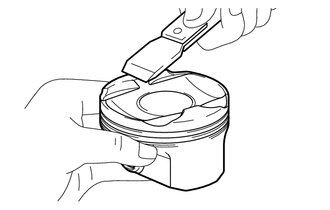
Using a gasket scraper, remove any carbon from the piston top.
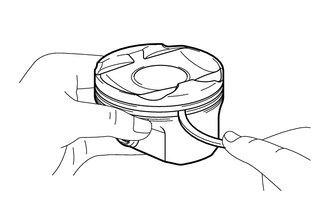
Using a groove cleaning tool or a broken ring, clean the piston ring grooves.
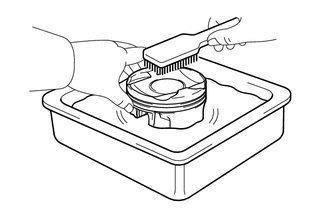
Using a brush and solvent, thoroughly clean the piston.
- NOTICE:
-
Do not use a wire brush.
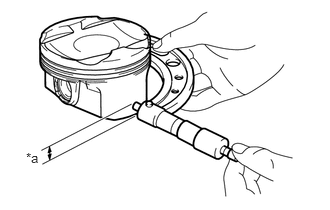
| *a | Distance |
Using a micrometer, measure the piston diameter at a right angle to the piston center line where the distance from the bottom of the piston is as specified.
- Distance:
10.5 mm (0.413 in.)
- Standard Piston Diameter (New Parts):
89.986 to 89.996 mm (3.5427 to 3.5431 in.)
- HINT:
-
If the diameter is less than the minimum, replace the piston.
4.INSPECT PISTON OIL CLEARANCE
Subtract the piston diameter measurement from the cylinder bore diameter measurement.
- Reference Oil Clearance (New Parts):
0.004 to 0.042 mm (0.000157 to 0.00165 in.)
- Maximum Oil Clearance:
0.10 mm (0.00394 in.)
- HINT:
-
If the oil clearance is more than the maximum, replace all the pistons. If necessary, replace the cylinder block sub-assembly.
5.INSPECT RING GROOVE CLEARANCE
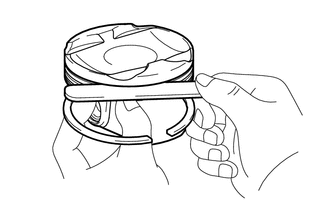
Using a feeler gauge, measure the clearance between the piston ring set and the wall of the ring groove.
- Standard Ring Groove Clearance:
Item Specified Condition No. 1 compression ring 0.020 to 0.070 mm (0.000787 to 0.00276 in.) No. 2 compression ring 0.020 to 0.060 mm (0.000787 to 0.00236 in.) Oil ring 0.060 to 0.120 mm (0.00236 to 0.00472 in.)
- HINT:
-
If the groove clearance is not as specified, replace the piston.
6.INSPECT PISTON RING END GAP
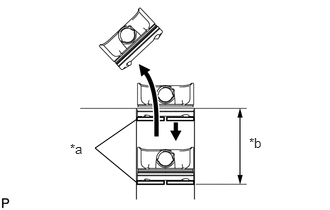
| *a | Piston Ring |
| *b | 120 mm (4.72 in.) |
Insert the piston ring into the cylinder bore.
Using a piston, push in the piston ring a little beyond the bottom of the ring travel, 120 mm (4.72 in.) from the top of the cylinder block sub-assembly.
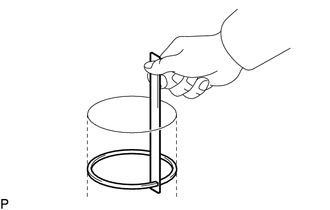
Using a feeler gauge, measure the end gap.
- Standard End Gap:
Item Specified Condition No. 1 compression ring 0.22 to 0.27 mm (0.00866 to 0.0106 in.) No. 2 compression ring 0.50 to 0.55 mm (0.0197 to 0.0217 in.) Oil ring 0.10 to 0.35 mm (0.00394 to 0.0138 in.)
- Maximum End Gap:
Item Specified Condition No. 1 compression ring 0.87 mm (0.0343 in.) No. 2 compression ring 1.15 mm (0.0453 in.) Oil ring 0.95 mm (0.0374 in.)
- HINT:
-
If the end gap is more than the maximum, replace the piston ring set. If the end gap is more than the maximum even with a new piston ring set, replace the cylinder block sub-assembly.
7.INSPECT PISTON PIN OIL CLEARANCE
Confirm each mark on the piston, piston pin and connecting rod sub-assembly.
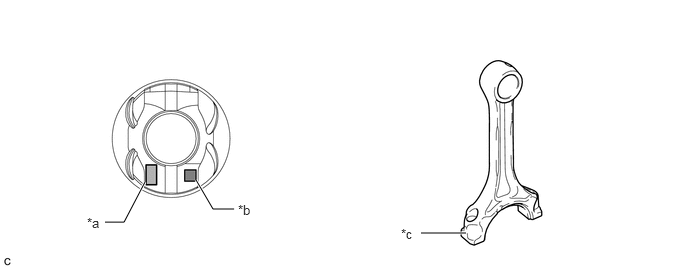
| *a | Front Mark | *b | Piston Pin Hole Inside Diameter Mark |
| *c | Connecting Rod Sub-assembly Small End Bush Inside Diameter Mark | - | - |
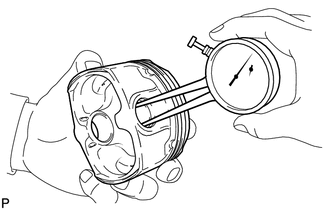
Using a caliper gauge, measure the inside diameter of the piston pin hole.
- Standard Piston Pin Hole Inside Diameter:
Mark Specified Condition A 22.001 to 22.004 mm (0.86618 to 0.86630 in.) B 22.005 to 22.007 mm (0.86634 to 0.86642 in.) C 22.008 to 22.010 mm (0.86645 to 0.86653 in.)
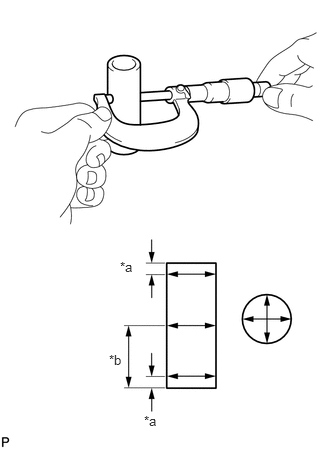
| *a | 5.0 mm (0.197 in.) |
| *b | 28 mm (1.10 in.) |
Using a micrometer, measure the piston pin diameter.
- Standard Piston Pin Diameter:
Mark Specified Condition A 21.997 to 22.000 mm (0.86602 to 0.86614 in.) B 22.001 to 22.003 mm (0.86618 to 0.86626 in.) C 22.004 to 22.006 mm (0.86630 to 0.86638 in.)
- HINT:
-
If the diameter is not as specified, replace the piston and piston pin as a set.
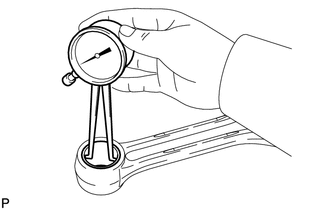
Using a caliper gauge, measure the inside diameter of the connecting rod sub-assembly small end bush.
- Standard Connecting Rod Small End Bush Inside Diameter:
Mark Specified Condition A 22.005 to 22.008 mm (0.86634 to 0.86645 in.) B 22.009 to 22.011 mm (0.86649 to 0.86657 in.) C 22.012 to 22.014 mm (0.86661 to 0.86669 in.)
- HINT:
-
If the inside diameter is not as specified, replace the connecting rod sub-assembly.
Subtract the piston pin diameter measurement from the piston pin hole inside diameter measurement.
- Standard Oil Clearance:
0.001 to 0.007 mm (0.0000394 to 0.000276 in.)
- Maximum Oil Clearance:
0.013 mm (0.000512 in.)
If the oil clearance is more than the maximum, replace the piston and piston pin as a set.
- HINT:
-
If the oil clearance is more than the maximum, replace the piston and piston pin as a set.
Subtract the piston pin diameter measurement from the connecting rod small end bush inside diameter measurement.
- Standard Oil Clearance:
0.005 to 0.011 mm (0.000197 to 0.000433 in.)
- Maximum Oil Clearance:
0.017 mm (0.000669 in.)
- HINT:
-
If the oil clearance is more than the maximum, replace the connecting rod sub-assembly. If necessary, replace the connecting rod sub-assembly and piston pin as a set.
8.INSPECT CONNECTING ROD SUB-ASSEMBLY
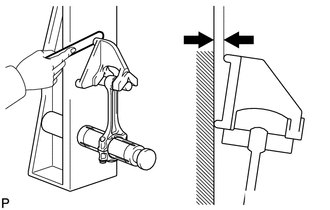
Using a connecting rod aligner and feeler gauge, check the connecting rod sub-assembly alignment.
Check for misalignment.
- Maximum Misalignment:
0.05 mm (0.00197 in.) per 100 mm (3.94 in.)
- HINT:
-
If the misalignment is more than the maximum, replace the connecting rod sub-assembly.
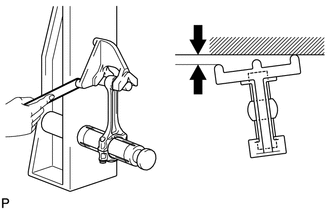
Check for twist.
- Maximum Twist:
0.15 mm (0.00591 in.) per 100 mm (3.94 in.)
- HINT:
-
If the twist is more than the maximum, replace the connecting rod sub-assembly.
13411
9.INSPECT CRANKSHAFT
Inspect for runout.
Clean the crank journal.
Place the crankshaft on V-blocks.
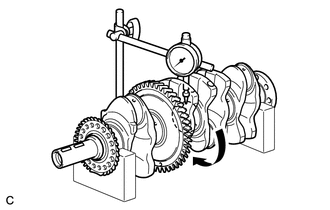
Using a dial indicator and V-blocks, measure the runout as shown in the illustration.
- Maximum Runout:
0.03 mm (0.00118 in.)
- HINT:
-
If the runout is more than the maximum, replace the crankshaft.
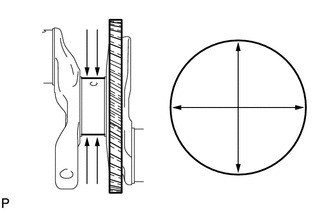
Inspect the main journals.
Using a micrometer, measure the diameter of each main journal.
- Standard Main Journal Diameter:
54.988 to 55.000 mm (2.16 to 2.17 in.)
- HINT:
-
If the diameter is not as specified, check the crankshaft oil clearance. If necessary, replace the crankshaft.
Check each main journal for taper and out-of-round as shown in the illustration.
- Maximum Taper and Out-of-round:
0.003 mm (0.000118 in.)
- HINT:
-
If the taper or out-of-round is more than the maximum, replace the crankshaft.
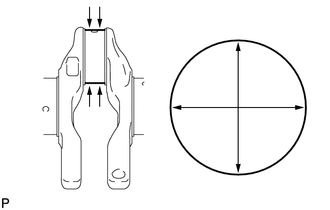
Inspect the crank pin.
Using a micrometer, measure the diameter of each crank pin.
- Standard Crank Pin Diameter:
51.492 to 51.500 mm (2.02724 to 2.02756 in.)
- HINT:
-
If the diameter is not as specified, check the connecting rod oil clearance. If necessary, replace the crankshaft.
Inspect each crank pin for taper and out-of-round as shown in the illustration.
- Maximum Taper and Out-of-round:
0.003 mm (0.000118 in.)
- HINT:
-
If the taper or out-of-round is more than the maximum, replace the crankshaft.
10.INSPECT CRANKSHAFT OIL CLEARANCE
Install the crankshaft bearings.
Click hereEngine / Hybrid System>2AR-FE (ENGINE MECHANICAL)>CYLINDER BLOCK>REASSEMBLY
Install the crankshaft thrust washers.
Click hereEngine / Hybrid System>2AR-FE (ENGINE MECHANICAL)>CYLINDER BLOCK>REASSEMBLY
Place the crankshaft on the cylinder block sub-assembly.
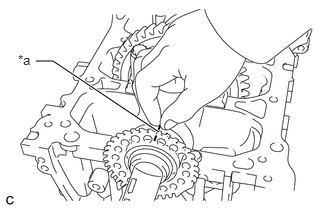
| *a | Plastigage |
Lay a strip of Plastigage across each journal.
Install the crankshaft bearing caps.
Click hereEngine / Hybrid System>2AR-FE (ENGINE MECHANICAL)>CYLINDER BLOCK>REASSEMBLY
- NOTICE:
-
Do not turn the crankshaft.
Remove the crankshaft bearing caps.
Click hereEngine / Hybrid System>2AR-FE (ENGINE MECHANICAL)>CYLINDER BLOCK>DISASSEMBLY
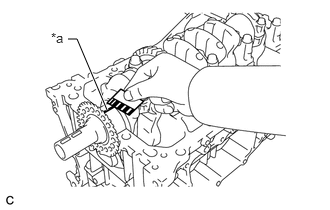
| *a | Plastigage |
Measure the Plastigage at its widest point.
- Standard Oil Clearance:
0.017 to 0.040 mm (0.000669 to 0.00157 in.)
- Maximum Oil Clearance:
0.05 mm (0.00197 in.)
- NOTICE:
-
Remove the Plastigage completely after the measurement.
- HINT:
-
If the oil clearance is more than the maximum, replace the crankshaft bearing. If necessary, replace the crankshaft.
- HINT:
-
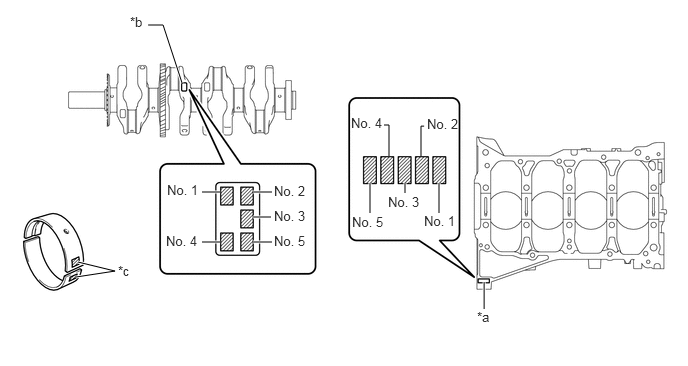
If replacing a crankshaft bearing, select a new one with the same number. If the number of the crankshaft bearing cannot be determined, calculate the correct crankshaft bearing number by adding together the numbers imprinted on the cylinder block sub-assembly and crankshaft. Then refer to the following table for the appropriate crankshaft bearing number. There are 4 sizes of standard bearings, marked "1", "2", "3" or "4" accordingly.
 1.896,0.865 1.698,0.26 1.698,0.26 1.542,0.26 true 0.813,2.729 1.198,2.823 1.198,2.823 0.792,2.885 true 3.854,1.906 3.854,2.219 true 4.573,1.906 4.573,2.219 true 4.219,1.906 4.219,2.01 true 4,1.302 4.052,1.302 4.052,1.302 4.052,1.625 true 4.417,1.313 4.385,1.313 4.385,1.313 4.385,1.625 true 2.635,2.26 2.823,2.26 true 2.635,2 2.833,2 true 2.635,2.521 2.833,2.521 true 2.104,2 2.292,2 true 2.104,2.521 2.292,2.521 true 5.042,2.938 5.042,3.219 true 1.354,0.146 1.531,0.323 0.177,0.177 10 false *b 1.229,2.74 1.406,2.917 0.177,0.177 10 false *c 4.969,3.219 5.146,3.396 0.177,0.177 10 false *a 4.417,2.219 4.771,2.385 0.354,0.167 10 false No. 1 4.042,2.021 4.396,2.188 0.354,0.167 10 false No. 3 3.667,2.229 4.021,2.396 0.354,0.167 10 false No. 5 4.448,1.208 4.802,1.375 0.354,0.167 10 false No. 2 3.656,1.198 4.01,1.365 0.354,0.167 10 false No. 4 1.74,1.896 2.094,2.063 0.354,0.167 10 false No. 1 2.854,2.167 3.208,2.333 0.354,0.167 10 false No. 3 2.854,2.427 3.208,2.594 0.354,0.167 10 false No. 5 2.854,1.906 3.208,2.073 0.354,0.167 10 false No. 2 1.729,2.427 2.083,2.594 0.354,0.167 10 false No. 4
*a Cylinder Block Number Mark (A) *b Crankshaft Number Mark (B) *c Diameter Mark - -
EXAMPLE
Cylinder block sub-assembly (A) "3" + Crankshaft (B) "4" = Total "7"
Select the crankshaft bearing marked "3".
- Crankshaft Bearing Chart:
(A) + (B) Use Crankshaft Bearing 0 to 2 1 3 to 5 2 6 to 8 3 9 to 11 4
- Standard Cylinder Block Journal Inside Diameter (A):
Mark Specified Condition 0 59.000 to 59.002 mm (2.32283 to 2.32291 in.) 1 59.003 to 59.004 mm (2.32295 to 2.32299 in.) 2 59.005 to 59.006 mm (2.32303 to 2.32307 in.) 3 59.007 to 59.009 mm (2.32311 to 2.32318 in.) 4 59.010 to 59.011 mm (2.32322 to 2.32326 in.) 5 59.012 to 59.013 mm (2.32330 to 2.32334 in.) 6 59.014 to 59.016 mm (2.32338 to 2.32346 in.)
- Standard Crankshaft Main Journal Diameter (B):
Mark Specified Condition 0 54.999 to 55.000 mm (2.16531 to 2.16535 in.) 1 54.997 to 54.998 mm (2.16523 to 2.16527 in.) 2 54.995 to 54.996 mm (2.16515 to 2.16519 in.) 3 54.993 to 54.994 mm (2.16507 to 2.16511 in.) 4 54.991 to 54.992 mm (2.16500 to 2.16504 in.) 5 54.988 to 54.990 mm (2.16488 to 2.16496 in.)
- Standard Crankshaft Bearing Center Wall Thickness:
Mark Specified Condition 1 1.992 to 1.995 mm (0.07843 to 0.07854 in.) 2 1.996 to 1.998 mm (0.07858 to 0.07866 in.) 3 1.999 to 2.001 mm (0.07870 to 0.07878 in.) 4 2.002 to 2.004 mm (0.07882 to 0.07890 in.)
Perform the inspection for each journal.
11416
11.INSPECT CRANKSHAFT BEARING CAP BOLT
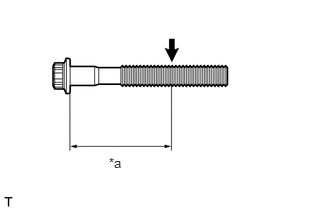
| *a | Measurement Point |
Using a vernier caliper, measure the diameter of the threads at the measurement point shown in the illustration.
- Standard Diameter:
9.77 to 9.96 mm (0.385 to 0.392 in.)
- Minimum Diameter:
9.1 mm (0.358 in.)
- Measurement Point (Distance from the Seat):
58.5 mm (2.30 in.)
- HINT:
- ·
If the diameter is less than the minimum, replace the crankshaft bearing cap bolt. Failure to do so may lead to engine damage.
·If there is any thread deformation, replace the crankshaft bearing cap bolt with a new one.
13265
12.INSPECT CONNECTING ROD BOLT
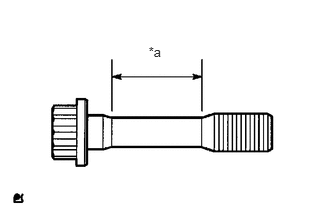
| *a | Measurement Area |
Using a vernier caliper, measure the diameter of the connecting rod bolt at several points within the area shown in the illustration.
- Standard Diameter:
8.5 to 8.6 mm (0.335 to 0.339 in.)
- Minimum Diameter:
8.3 mm (0.327 in.)
- HINT:
- ·
Diameter measurements should be done at several points.
·If the diameter is less than the minimum, replace the connecting rod bolt. Failure to do so may lead to engine damage.
·If there is any thread deformation, replace the connecting rod bolt with a new one.
15708
13.INSPECT NO. 1 OIL NOZZLE SUB-ASSEMBLY
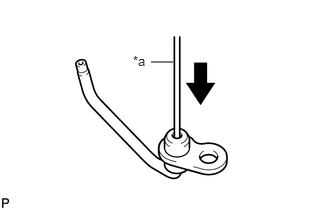
| *a | Pin |
Push the check valve with a pin to check that it is not stuck.
If the check valve is stuck, replace the No. 1 oil nozzle sub-assembly.
Push the check valve with a pin to check if it moves smoothly.
If the check valve does not move smoothly, clean or replace the No. 1 oil nozzle sub-assembly.
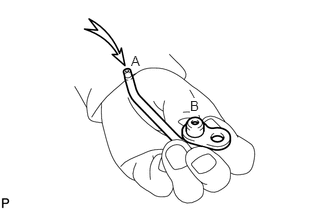
Apply air to (A). Check that air does not leak through (B).
If air leaks, clean or replace the No. 1 oil nozzle sub-assembly.
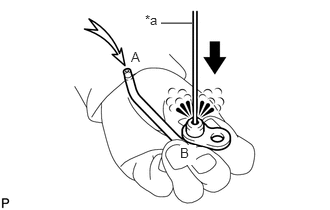
| *a | Pin |
While pushing the check valve with a pin, apply air to (A). Check that air passes through (B).
- HINT:
-
If air does not pass through (B), clean or replace the No. 1 oil nozzle sub-assembly.
15709
14.INSPECT NO. 2 OIL NOZZLE SUB-ASSEMBLY
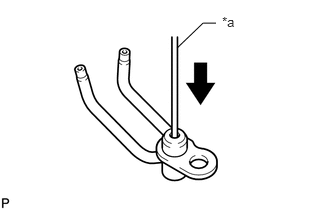
| *a | Pin |
Push the check valve with a pin to check that it is not stuck.
- HINT:
-
If the check valve is stuck, replace the No. 2 oil nozzle sub-assembly.
Push the check valve with a pin to check if it moves smoothly.
- HINT:
-
If the check valve does not move smoothly, clean or replace the No. 2 oil nozzle sub-assembly.
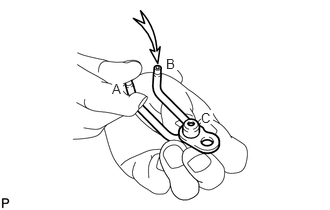
While covering (A), apply air into (B). Check that air does not leak through (C). Perform the check again while covering (B) and applying air into (A).
- HINT:
-
If air leaks, clean or replace the No. 2 oil nozzle sub-assembly.
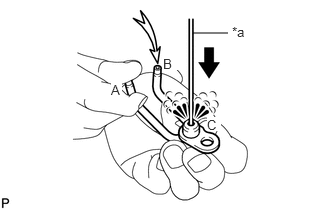
| *a | Pin |
While pushing the check valve with a pin, cover (A) and apply air to (B). Check that air passes through (C). While continuing to push the check valve with a pin, cover (B) and apply air to (A).
- HINT:
-
If air does not pass through (C), clean or replace the No. 2 oil nozzle sub-assembly.