LIGHTING (INT) LIGHTING SYSTEM Ambient Illumination Light Circuit
DESCRIPTION
The main body ECU (multiplex network body ECU) controls the instrument panel ambient illumination light (instrument panel light assembly).
WIRING DIAGRAM
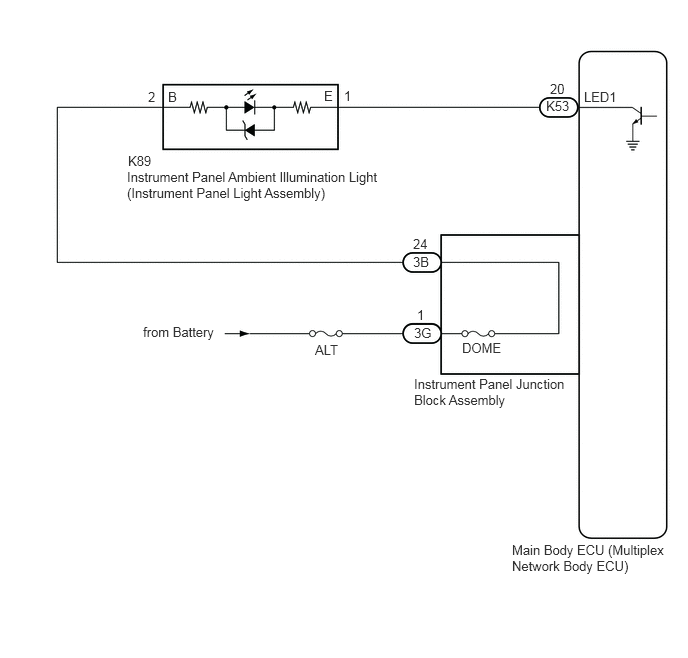
CAUTION / NOTICE / HINT
- NOTICE:
- ·
Inspect the fuses for circuits related to this system before performing the following procedure.
·Before replacing the main body ECU (multiplex network body ECU), refer to Service Bulletin.*1
·The vehicle battery supplies power to the main body ECU (multiplex network body ECU) via the door control battery. Therefore, before performing this troubleshooting procedure, make sure to perform an on-vehicle inspection to confirm that the main body ECU (multiplex network body ECU) power source circuit is normal.*2
Click hereVehicle Interior>DOOR LOCK>POWER DOOR LOCK CONTROL SYSTEM>ON-VEHICLE INSPECTION
*1: w/ Smart Entry and Start System
*2: w/ Door Control Battery
PROCEDURE
Connect the GTS to the DLC3.
Turn the ignition switch to ON.
Turn the GTS on.
Enter the following menus: Body Electrical / Main Body / Active Test.
Perform the Active Test according to the display on the GTS.
- Body Electrical > Main Body > Active Test
-
Tester Display Measurement Item Control Range Diagnostic Note Interior Illumination Light1 Instrument panel ambient illumination light (Instrument panel light assembly) OFF or ON Preconditions for using the Active Test to check dimmer controlled illumination:
·Ignition switch ON
·Shift lever is in any position other than P
- Body Electrical > Main Body > Active Test
-
Tester Display Interior Illumination Light1 - 50004 123 68
- OK:
Instrument panel ambient illumination light comes on.
- Result:
Proceed to OK NG
OK
Click hereGeneral>INTRODUCTION>HOW TO TROUBLESHOOT ECU CONTROLLED SYSTEMS>HOW TO PROCEED WITH TROUBLESHOOTING
NG
Remove the instrument panel ambient illumination light (instrument panel light assembly).
Click hereVehicle Interior>LIGHTING (INT)>AMBIENT LIGHT>REMOVAL
Inspect the instrument panel ambient illumination light (instrument panel light assembly).
Click hereVehicle Interior>LIGHTING (INT)>AMBIENT LIGHT>INSPECTION
- Result:
Proceed to OK NG
OK
NG
Disconnect the 3G instrument panel junction block assembly connector.
Measure the voltage according to the value(s) in the table below.
- Standard Voltage:
Tester Connection Condition Specified Condition 3G-1 - Body ground Always 11 to 14 V
- Result:
Proceed to OK NG
OK
NG
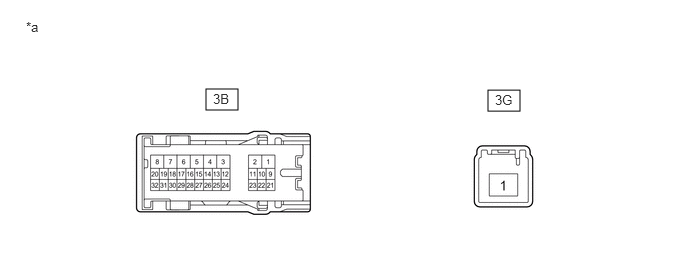
| *a | Component without harness connected
(Instrument Panel Junction Block Assembly) |
- | - |
Disconnect the 3B instrument panel junction block assembly connector.
Measure the resistance according to the value(s) in the table below.
- Standard Resistance:
Tester Connection Condition Specified Condition 3B-24 - 3G-1 Always Below 1 Ω
- Result:
Proceed to OK NG
OK
NG
Measure the resistance according to the value(s) in the table below.
- Standard Resistance:
Tester Connection Condition Specified Condition 3B-24 - K89-2 (B) Always Below 1 Ω 3B-24 or K89-2 (B) - Body ground Always 10 kΩ or higher
- Result:
Proceed to OK NG
OK
NG
Disconnect the K53 main body ECU (multiplex network body ECU) connector.
Measure the resistance according to the value(s) in the table below.
- Standard Resistance:
Tester Connection Condition Specified Condition K89-1 (E) - K53-20 (LED1) Always Below 1 Ω K89-1 (E) or K53-20 (LED1) - Body ground Always 10 kΩ or higher
- Result:
Proceed to OK NG
OK
NG