SUPPLEMENTAL RESTRAINT SYSTEMS SPIRAL CABLE INSTALLATION
PROCEDURE

 1.INSPECT SPIRAL CABLE SUB-ASSEMBLY
- NOTICE:
-
If the steering sensor is installed to a misaligned spiral cable sub-assembly, spiral cable with sensor sub-assembly malfunction DTCs will be stored and it will be impossible to clear them. If this happens, replace the spiral cable sub-assembly and steering sensor with a new one.
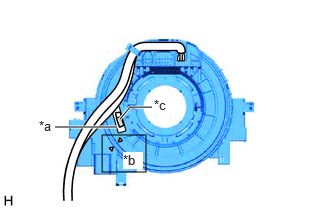
| *a | Inspection Window |
| *b | Alignment Mark |
| *c | Colored Roller |
Check if the spiral cable sub-assembly is centered.
The connector is positioned at the top.
The alignment marks are aligned correctly.
The colored roller can be seen in the inspection window.
If the spiral cable sub-assembly is not centered, center it.
- NOTICE:
-
Make sure to observe the following precautions, otherwise the spiral cable sub-assembly may be damaged.
- ·
Release the interlock before rotating the spiral cable sub-assembly.
·Do not rotate the spiral cable sub-assembly using the airbag wire harness.
·Do not rotate the spiral cable sub-assembly with excessive force.
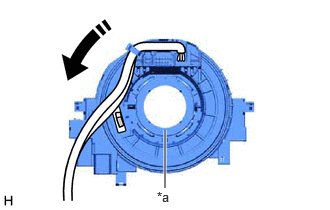
| *a | Interlock |

|
Rotation Direction |
While pushing on the interlock shown in the illustration, rotate the spiral cable sub-assembly counterclockwise slowly by hand until it stops.
- NOTICE:
-
If the spiral cable sub-assembly is rotated clockwise in this step, it may be damaged and may no longer be able to be centered. Make sure to only rotate the spiral cable sub-assembly counterclockwise.
- HINT:
-
If the interlock is engaged, the spiral cable sub-assembly will lock when the connector is near at the top or bottom of the rotation of the spiral cable sub-assembly.
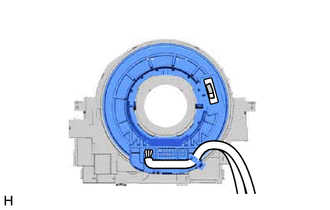
If the connector is not positioned at the bottom of the rotation of the spiral cable sub-assembly when the spiral cable sub-assembly is turned until it stops, turn the spiral cable sub-assembly clockwise until the connector is positioned at the bottom as shown in the illustration.
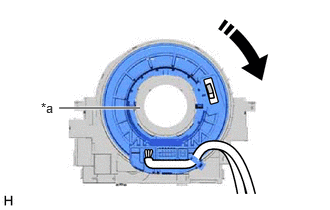
| *a | Interlock |
|
|
Rotation Direction |
While pushing on the interlock shown in the illustration, rotate the spiral cable sub-assembly clockwise approximately 2.5 times.
- NOTICE:
-
If the spiral cable sub-assembly is rotated clockwise 5 times or more from the point at which it stops and the connector is positioned at the bottom, the spiral cable sub-assembly may be damaged.
- HINT:
-
If the interlock is engaged, the spiral cable sub-assembly will lock when the connector is near at the top or bottom of the rotation of the spiral cable sub-assembly.
| *a | Inspection Window |
| *b | Alignment Mark |
| *c | Colored Roller |
Check that the spiral cable sub-assembly is centered.
The connector is positioned at the top.
The alignment marks are aligned correctly.
The colored roller can be seen in the inspection window.
2.INSTALL SPIRAL CABLE SUB-ASSEMBLY
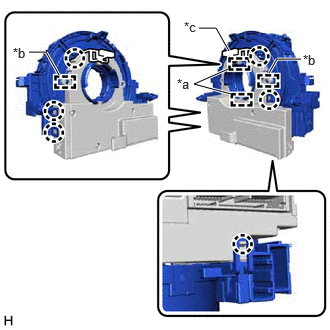
| *a | Guide |
| *b | Pin |
| *c | Lock Pin |
Align the 2 pins and 2 guides, and engage the 6 claws to install the spiral cable sub-assembly to the steering sensor.
- NOTICE:
- ·
Do not remove the lock pin before the spiral cable sub-assembly is installed to the steering sensor.
·Do not damage the pins of the spiral cable sub-assembly or guides of the steering sensor.
·The spiral cable sub-assembly can be rotated up to 30° even when the interlock is engaged. Therefore, make sure that both guides are aligned properly when installing the spiral cable sub-assembly to the steering sensor.
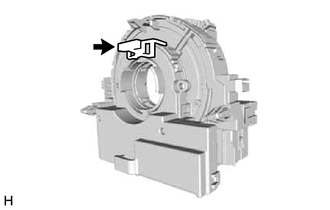
Remove the lock pin from the steering sensor.
3.INSTALL SPIRAL CABLE WITH SENSOR SUB-ASSEMBLY
- NOTICE:
- ·
Do not remove/install the spiral cable with sensor sub-assembly with the battery connected and the ignition switch ON.
·Do not rotate the spiral cable with sensor sub-assembly without the steering wheel assembly installed, with the battery connected and the ignition switch ON.
·Ensure that the steering wheel assembly is installed and aligned straight when inspecting the steering sensor.
Check that the ignition switch is off.
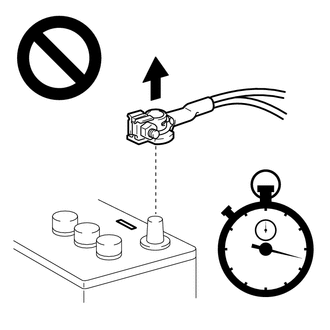
Check that the cable is disconnected from the negative (-) battery terminal.
- CAUTION:
-
-
Wait at least 90 seconds after disconnecting the cable from the negative (-) battery terminal to disable the SRS system.
Check that the front wheels are aligned facing straight ahead.
Engage the claw and 2 clips to install the spiral cable with sensor sub-assembly.
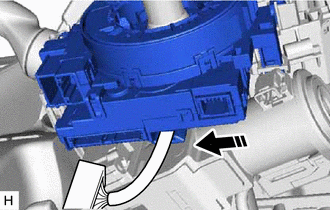
|
|
Install in this Direction |
Install the wire harness to the spiral cable with sensor sub-assembly as shown in the illustration.
Connect each connector.
45286B
4.INSTALL UPPER STEERING COLUMN COVER (for Manual Tilt and Manual Telescopic Steering Column)
45286B
5.INSTALL UPPER STEERING COLUMN COVER (for Power Tilt and Power Telescopic Steering Column)
45024
6.INSTALL LOWER STEERING COLUMN COVER SUB-ASSEMBLY (for Manual Tilt and Manual Telescopic Steering Column)
45024
7.INSTALL LOWER STEERING COLUMN COVER SUB-ASSEMBLY (for Power Tilt and Power Telescopic Steering Column)
8. ALIGN FRONT WHEELS FACING STRAIGHT AHEAD
9.INSPECT AND ADJUST SPIRAL CABLE WITH SENSOR SUB-ASSEMBLY
Check that the ignition switch is off.
Check that the cable is disconnected from the negative (-) battery terminal.
- CAUTION:
-
-
Wait at least 90 seconds after disconnecting the cable from the negative (-) battery terminal to disable the SRS system.
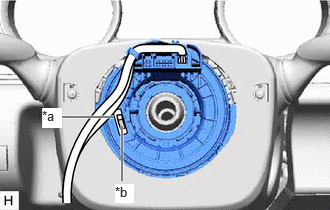
| *a | Inspection Window |
| *b | Colored Roller |
Check if the spiral cable with sensor sub-assembly is centered.
The connector is positioned at the top.
The colored roller can be seen in the inspection window.
If the spiral cable with sensor sub-assembly is not centered, center it.
- NOTICE:
-
Make sure to observe the following precautions, otherwise the spiral cable with sensor sub-assembly may be damaged.
- ·
Do not rotate the spiral cable with sensor sub-assembly with the battery connected and the ignition switch ON.
·Release the interlock before rotating the spiral cable with sensor sub-assembly.
·Do not rotate the spiral cable with sensor sub-assembly using the airbag wire harness.
·Do not rotate the spiral cable with sensor sub-assembly with excessive force.
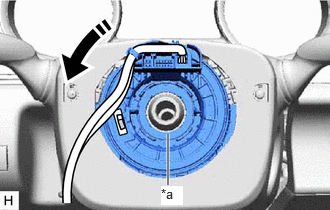
| *a | Interlock |
|
|
Rotation Direction |
While pushing on the interlock shown in the illustration, rotate the spiral cable with sensor sub-assembly counterclockwise slowly by hand until it stops.
- NOTICE:
-
If the spiral cable with sensor sub-assembly is rotated clockwise in this step, it may be damaged and may no longer be able to be centered. Make sure to only rotate the spiral cable with sensor sub-assembly counterclockwise.
- HINT:
-
If the interlock is engaged, the spiral cable with sensor sub-assembly will lock when the connector is near at the top or bottom of the rotation of the spiral cable with sensor sub-assembly.
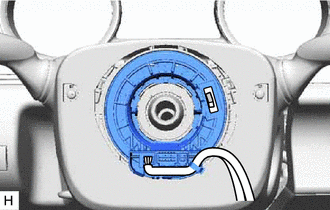
If the connector is not positioned at the bottom of the rotation of the spiral cable with sensor sub-assembly when the spiral cable with sensor sub-assembly is turned until it stops, turn the spiral cable with sensor sub-assembly clockwise until the connector is positioned at the bottom as shown in the illustration.
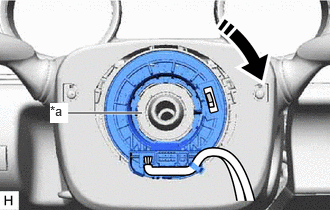
| *a | Interlock |
|
|
Rotation Direction |
While pushing on the interlock shown in the illustration, rotate the spiral cable with sensor sub-assembly clockwise approximately 2.5 times.
- NOTICE:
-
If the spiral cable with sensor sub-assembly is rotated clockwise 5 times or more from the point at which it stops and the connector is positioned at the bottom, the spiral cable with sensor sub-assembly may be damaged.
- HINT:
-
If the interlock is engaged, the spiral cable with sensor sub-assembly will lock when the connector is near at the top or bottom of the rotation of the spiral cable with sensor sub-assembly.
| *a | Inspection Window |
| *b | Colored Roller |
Check that the spiral cable with sensor sub-assembly is centered.
The connector is positioned at the top.
The colored roller can be seen in the inspection window.
- NOTICE:
-
If the spiral cable with sensor sub-assembly cannot be centered, it may be damaged. Replace the spiral cable sub-assembly and steering sensor with a new one.
45100
10.INSTALL STEERING WHEEL ASSEMBLY
11.CHECK STEERING WHEEL CENTER POINT
45130
12.INSTALL HORN BUTTON ASSEMBLY
45186
13.INSTALL LOWER NO. 2 STEERING WHEEL COVER
14.CONNECT CABLE TO NEGATIVE BATTERY TERMINAL
for 2AR-FE: Click hereGeneral>MAINTENANCE>2AR-FE BATTERY>INSTALLATION
for A25A-FKS: Click hereGeneral>MAINTENANCE>A25A-FKS BATTERY>INSTALLATION
for 2GR-FKS: Click hereGeneral>MAINTENANCE>2GR-FKS BATTERY>INSTALLATION
- NOTICE:
-
When disconnecting the cable, some systems need to be initialized after the cable is reconnected.
-
Click hereGeneral>INTRODUCTION>REPAIR INSTRUCTION>INITIALIZATION
45130
15.INSPECT HORN BUTTON ASSEMBLY
Make sure that the horn sounds.
If the horn does not sound, inspect the horn system.
Click hereVehicle Exterior>HORN>HORN SYSTEM>PROBLEM SYMPTOMS TABLE
16. PERFORM DIAGNOSTIC SYSTEM CHECK
17.INSPECT SRS WARNING LIGHT
18. CUSTOMIZE POWER TILT AND POWER TELESCOPIC STEERING COLUMN SYSTEM (for Power Tilt and Power Telescopic Steering Column)
19.PERFORM INITIALIZATION AND CALIBRATION (w/ Parking Assist Monitor System)
for Initialization: Click hereAudio / Visual / Telematics>PARK ASSIST / MONITORING>PARKING ASSIST MONITOR SYSTEM>INITIALIZATION
for Calibration: Click hereAudio / Visual / Telematics>PARK ASSIST / MONITORING>PARKING ASSIST MONITOR SYSTEM>CALIBRATION