SEAT FRONT POWER SEAT CONTROL SYSTEM(w/ Memory) One or more Power Seat Motors do not Operate
DESCRIPTION
Signals are input into the position control ECU assembly. The built-in ECU manages the signals received from the position control ECU assembly and operates each motor. If the position control ECU assembly receives 2 or more operation signals for the same motor, the motor will be stopped. Manual operation resumes when the position control ECU assembly receives only 1 signal.
WIRING DIAGRAM
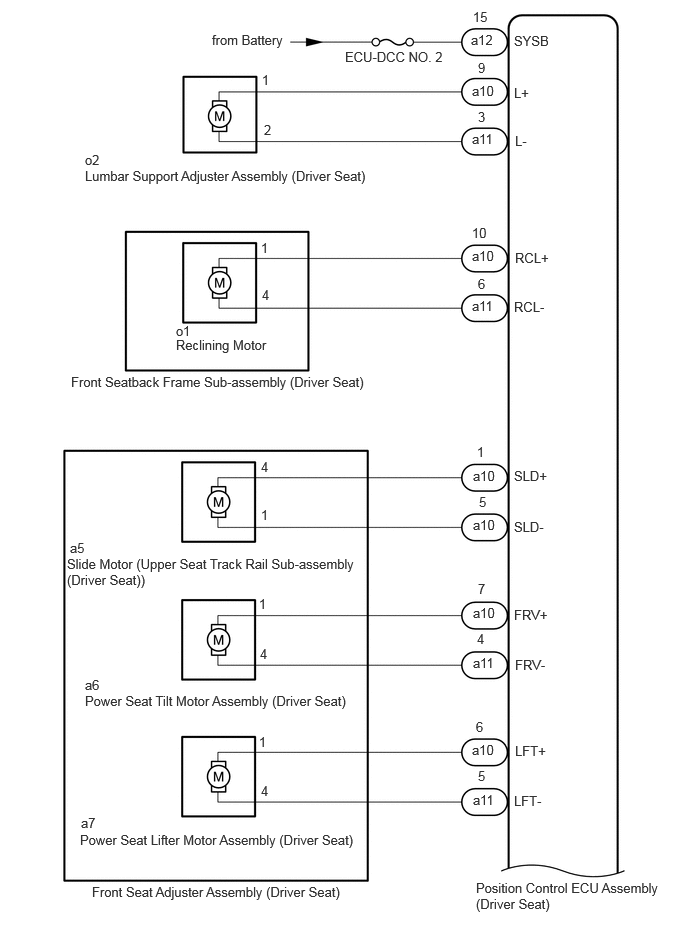
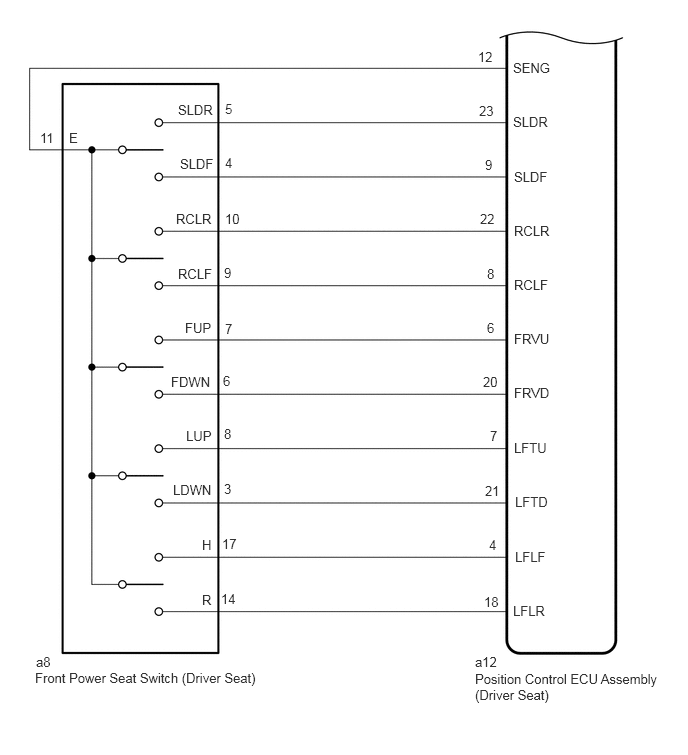
CAUTION / NOTICE / HINT
- NOTICE:
-
Inspect the fuses for circuits related to this system before performing the following procedure.
PROCEDURE
Check that each function of the power seat operates normally by using the front power seat switch (driver seat).
Click hereVehicle Interior>SEAT>FRONT POWER SEAT CONTROL SYSTEM (w/ Memory)>OPERATION CHECK
- Result:
Result Proceed to One or more power seat functions do not operate A All power seat functions do not operate B
A
B
Connect the GTS to the DLC3.
Turn the engine switch on (IG).
Turn the GTS on.
Enter the following menus: Body Electrical / Driver Seat / Data List.
Read the Data List according to the display on the GTS.
- Body Electrical > Driver Seat > Data List
-
Tester Display Measurement Item Range Normal Condition Diagnostic Note Reclining Rear Reclining switch signal (Rearward) ON or OFF ON: Reclining switch (Rearward) on
OFF: Reclining switch (Rearward) off- Reclining Front Reclining switch signal (Forward) ON or OFF ON: Reclining switch (Forward) on
OFF: Reclining switch (Forward) off- Front Vertical Down Front vertical switch signal (Downward) ON or OFF ON: Front vertical switch (Downward) on
OFF: Front vertical switch (Downward) off- Front Vertical Up Front vertical switch signal (Upward) ON or OFF ON: Front vertical switch (Upward) on
OFF: Front vertical switch (Upward) off- Lifter Switch Down Lifter switch signal (Downward) ON or OFF ON: Lifter switch (Downward) on
OFF: Lifter switch (Downward) off- Lifter Switch Up Lifter switch signal (Upward) ON or OFF ON: Lifter switch (Upward) on
OFF: Lifter switch (Upward) off- Slide Rear Slide switch signal (Rearward) ON or OFF ON: Slide switch (Rearward) on
OFF: Slide switch (Rearward) off- Slide Front Slide switch signal (Forward) ON or OFF ON: Slide switch (Forward) on
OFF: Slide switch (Forward) off- Lumbar Switch Front Lumbar support adjuster switch signal (Forward) ON or OFF ON: Lumbar support adjuster switch (Forward) on
OFF: Lumbar support adjuster switch (Forward) off- Lumbar Switch Rear Lumbar support adjuster switch signal (Rearward) ON or OFF ON: Lumbar support adjuster switch (Rearward) on
OFF: Lumbar support adjuster switch (Rearward) off-
- Body Electrical > Driver Seat > Data List
-
Tester Display Reclining Rear Reclining Front Front Vertical Down Front Vertical Up Lifter Switch Down Lifter Switch Up Slide Rear Slide Front Lumbar Switch Front Lumbar Switch Rear - 50003 162 17,18,19,20,21,22,23,24,157,158
- OK:
On the GTS screen, ON or OFF is displayed accordingly
- Result:
Proceed to OK NG
OK
NG
Enter the following menus: Body Electrical / Driver Seat / Active Test.
Perform the Active Test according to the display on the GTS.
- Body Electrical > Driver Seat > Active Test
-
Tester Display Measurement Item Control Range Diagnostic Note Seat Reclining Seat reclining operation OFF/Rear/Front - Front Vertical Operation Seat front vertical operation OFF/Down/Up - Lifter Operation Seat lifter operation OFF/Down/Up - Seat Slide Operation Seat slide operation OFF/Rear/Front - Lumbar Slide Lumbar support operation OFF/Rear/Front -
- Body Electrical > Driver Seat > Active Test
-
Tester Display Seat Reclining - 50004 162 1
- Body Electrical > Driver Seat > Active Test
-
Tester Display Front Vertical Operation - 50004 162 3
- Body Electrical > Driver Seat > Active Test
-
Tester Display Lifter Operation - 50004 162 2
- Body Electrical > Driver Seat > Active Test
-
Tester Display Seat Slide Operation - 50004 162 4
- Body Electrical > Driver Seat > Active Test
-
Tester Display Lumbar Slide - 50004 162 8
- Result:
Result Proceed to All power seat functions operate normally A Slide function does not operate normally B Front vertical function does not operate normally C Lifter function does not operate normally D Reclining function does not operate normally E Lumbar support adjustment function does not operate normally F
A
B
C
D
E
F
Remove the slide motor (front seat adjuster assembly (driver seat)).
Click hereVehicle Interior>SEAT>FRONT SEAT ASSEMBLY (for Power Seat)>DISASSEMBLY
Inspect the slide motor (front seat adjuster assembly (driver seat)).
Click hereVehicle Interior>SEAT>FRONT SEAT ASSEMBLY (for Power Seat)>INSPECTION
- Result:
Proceed to OK NG
OK
NG
Remove the power seat tilt motor assembly (driver seat).
Click hereVehicle Interior>SEAT>FRONT SEAT ASSEMBLY (for Power Seat)>DISASSEMBLY
Inspect the power seat tilt motor assembly (driver seat).
Click hereVehicle Interior>SEAT>FRONT SEAT ASSEMBLY (for Power Seat)>INSPECTION
- Result:
Proceed to OK NG
OK
NG
Remove the power seat lifter motor assembly (driver seat).
Click hereVehicle Interior>SEAT>FRONT SEAT ASSEMBLY (for Power Seat)>DISASSEMBLY
Inspect the power seat lifter motor assembly (driver seat).
Click hereVehicle Interior>SEAT>FRONT SEAT ASSEMBLY (for Power Seat)>INSPECTION
- Result:
Proceed to OK NG
OK
NG
Remove the reclining motor (front seatback frame sub-assembly (driver seat)).
Click hereVehicle Interior>SEAT>FRONT SEAT ASSEMBLY (for Power Seat)>DISASSEMBLY
Inspect the reclining motor (front seatback frame sub-assembly (driver seat)).
Click hereVehicle Interior>SEAT>FRONT SEAT ASSEMBLY (for Power Seat)>INSPECTION
- Result:
Proceed to OK NG
OK
NG
Remove the lumbar support adjuster assembly (driver seat).
Click hereVehicle Interior>SEAT>LUMBAR SUPPORT ADJUSTER ASSEMBLY(for Power Seat)>REMOVAL
Inspect the lumbar support adjuster assembly (driver seat).
Click hereVehicle Interior>SEAT>LUMBAR SUPPORT ADJUSTER ASSEMBLY(for Power Seat)>INSPECTION
- Result:
Proceed to OK NG
OK
NG
Disconnect the a10 and a11 position control ECU assembly (driver seat) connectors.
Measure the resistance according to the value(s) in the table below.
- HINT:
-
Check the wire harness and connector between the position control ECU assembly (driver seat) and applicable motor.
- Standard Resistance:
Tester Connection Condition Specified Condition a10-1 (SLD+) - a5-4 Always Below 1 Ω a10-1 (SLD+) or a5-4 - Body ground Always 10 kΩ or higher a10-5 (SLD-) - a5-1 Always Below 1 Ω a10-5 (SLD-) or a5-1 - Body ground Always 10 kΩ or higher a10-7 (FRV+) - a6-1 Always Below 1 Ω a10-7 (FRV+) or a6-1 - Body ground Always 10 kΩ or higher a11-4 (FRV-) - a6-4 Always Below 1 Ω a11-4 (FRV-) or a6-4 - Body ground Always 10 kΩ or higher a10-6 (LFT+) - a7-1 Always Below 1 Ω a10-6 (LFT+) or a7-1 - Body ground Always 10 kΩ or higher a11-5 (LFT-) - a7-4 Always Below 1 Ω a11-5 (LFT-) or a7-4 - Body ground Always 10 kΩ or higher a10-10 (RCL+) - o1-1 Always Below 1 Ω a10-10 (RCL+) or o1-1 - Body ground Always 10 kΩ or higher a11-6 (RCL-) - o1-4 Always Below 1 Ω a11-6 (RCL-) or o1-4 - Body ground Always 10 kΩ or higher
- Result:
Proceed to OK NG
OK
NG
Remove the front power seat switch (driver seat).
Click hereVehicle Interior>SEAT>POWER SEAT SWITCH(for Front Side)>REMOVAL
Inspect the front power seat switch (driver seat).
Click hereVehicle Interior>SEAT>POWER SEAT SWITCH(for Front Side)>INSPECTION
- Result:
Proceed to OK NG
OK
NG
Disconnect the a12 position control ECU assembly (driver seat) connector.
Measure the resistance according to the value(s) in the table below.
- Standard Resistance:
Tester Connection Condition Specified Condition a8-5 (SLDR) - a12-23 (SLDR) Always Below 1 Ω a8-5 (SLDR) or a12-23 (SLDR) - Body ground Always 10 kΩ or higher a8-4 (SLDF) - a12-9 (SLDF) Always Below 1 Ω a8-4 (SLDF) or a12-9 (SLDF) - Body ground Always 10 kΩ or higher a8-10 (RCLR) - a12-22 (RCLR) Always Below 1 Ω a8-10 (RCLR) or a12-22 (RCLR) - Body ground Always 10 kΩ or higher a8-9 (RCLF) - a12-8 (RCLF) Always Below 1 Ω a8-9 (RCLF) or a12-8 (RCLF) - Body ground Always 10 kΩ or higher a8-7 (FUP) - a12-6 (FRVU) Always Below 1 Ω a8-7 (FUP) or a12-6 (FRVU) - Body ground Always 10 kΩ or higher a8-6 (FDWN) - a12-20 (FRVD) Always Below 1 Ω a8-6 (FDWN) or a12-20 (FRVD) - Body ground Always 10 kΩ or higher a8-8 (LUP) - a12-7 (LFTU) Always Below 1 Ω a8-8 (LUP) or a12-7 (LFTU) - Body ground Always 10 kΩ or higher a8-3 (LDWN) - a12-21 (LFTD) Always Below 1 Ω a8-3 (LDWN) or a12-21 (LFTD) - Body ground Always 10 kΩ or higher a8-17 (H) - a12-4 (LFLF) Always Below 1 Ω a8-17 (H) or a12-4 (LFLF) - Body ground Always 10 kΩ or higher a8-14 (R) - a12-18 (LFLR) Always Below 1 Ω a8-14 (R) or a12-18 (LFLR) - Body ground Always 10 kΩ or higher a8-11 (E) - a12-12 (SENG) Always Below 1 Ω a8-11 (E) or a12-12 (SENG) - Body ground Always 10 kΩ or higher
- Result:
Proceed to OK NG
OK
NG