2AR-FE BATTERY / CHARGING GENERATOR REMOVAL
CAUTION / NOTICE / HINT
The necessary procedures (adjustment, calibration, initialization, or registration) that must be performed after parts are removed, installed, or replaced during the generator assembly removal/installation are shown below.
| Replaced Part or Performed Procedure | Necessary Procedures | Effect/Inoperative Function when Necessary Procedure not Performed | Link |
|---|---|---|---|
| Battery terminal is disconnected/reconnected | Perform steering sensor zero point calibration | Lane departure alert system (w/ Steering Control) | ( ) |
| Pre-collision system | |||
| Memorize steering angle neutral point | Parking assist monitor system | ()
|
PROCEDURE

 1. PRECAUTION
- NOTICE:
-
After turning the ignition switch off, waiting time may be required before disconnecting the cable from the negative (-) battery terminal. Therefore, make sure to read the disconnecting the cable from the negative (-) battery terminal notices before proceeding with work.
-
Click hereGeneral>INTRODUCTION>REPAIR INSTRUCTION>PRECAUTION
2.DISCONNECT CABLE FROM NEGATIVE BATTERY TERMINAL
- NOTICE:
-
When disconnecting the cable, some systems need to be initialized after the cable is reconnected.
-
Click hereGeneral>INTRODUCTION>REPAIR INSTRUCTION>INITIALIZATION
53295E
3.REMOVE COOL AIR INTAKE DUCT SEAL
17750A
4.REMOVE INLET AIR CLEANER ASSEMBLY
5.REMOVE V-RIBBED BELT
27020
6.REMOVE GENERATOR ASSEMBLY
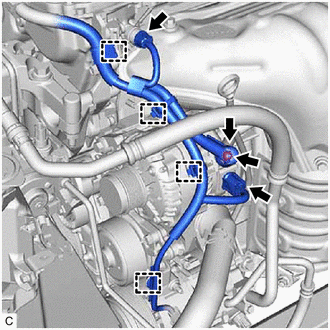
Remove the terminal cap.
Remove the nut and disconnect the wire harness from terminal B.
Disconnect the generator assembly connector.
Disconnect the engine oil pressure switch assembly connector.
Disconnect the 4 wire harness clamps.
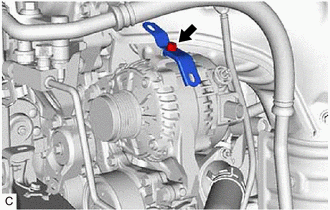
Remove the bolt and remove the wire harness clamp bracket from the generator assembly.
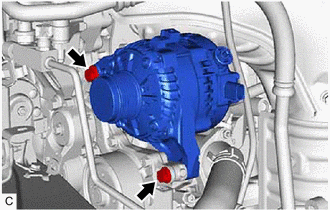
Remove the 2 bolts and generator assembly.