2AR-FE ENGINE CONTROL SFI SYSTEM Fuel Pump Control Circuit
DESCRIPTION
When the engine is cranked, the starter (ST NO. 1) relay drive signal output from the certification ECU (smart key ECU assembly) is input into the STA terminal of the ECM, and the NE signal generated by the crankshaft position sensor is also input into the NE+ terminal. The ECM interprets that the engine is cranked, and turns transistor in the ECM internal circuit on. Current flows to the C/OPEN relay by turning transistor on. Then, the fuel pump operates.
While the NE signal is input into the ECM with the engine running, the ECM turns transistor on continuously.
WIRING DIAGRAM
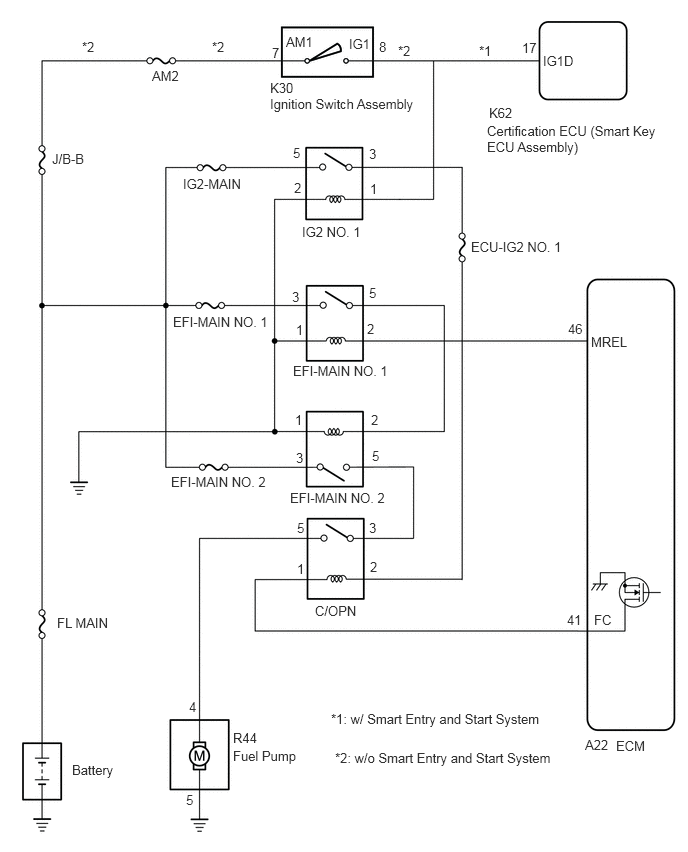
CAUTION / NOTICE / HINT
- NOTICE:
-
Inspect the fuses for circuits related to this system before performing the following procedure.
PROCEDURE
Connect the GTS to the DLC3.
Turn the ignition switch to ON.
Turn the GTS on.
Enter the following menus: Powertrain / Engine and ECT / Active Test / Control the Fuel Pump / Speed.
- Powertrain > Engine and ECT > Active Test
-
Tester Display Control the Fuel Pump / Speed - 50004 234 5
Check whether the fuel pump operating sounds occurs when performing the Active Test on the GTS.
- Result:
Result Proceed to Fuel pump operating sound does not occur A Fuel pump operating sound occurs B
A
B
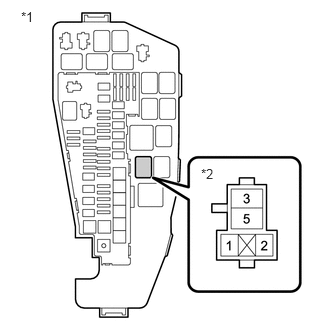
| *1 | Engine Room Relay Block and Junction Block Assembly |
| *2 | C/OPN Relay |
Remove the C/OPN relay from the engine room relay block and junction block assembly.
Turn the ignition switch to ON.
Measure the voltage according to the value(s) in the table below.
- Standard Voltage:
Tester Connection Condition Specified Condition 2 (C/OPN relay) - Body ground Ignition switch ON 11 to 14 V
- Result:
Proceed to OK NG
OK
NG
Inspect the C/OPN relay.
Click hereEngine / Hybrid System>2AR-FE (ENGINE CONTROL)>RELAY>ON-VEHICLE INSPECTION
- Result:
Proceed to OK NG
OK
NG
| *1 | Engine Room Relay Block and Junction Block Assembly |
| *2 | C/OPN Relay |
Remove the C/OPN relay from the engine room relay block and junction block assembly.
Turn the ignition switch to ON.
Measure the voltage according to the value(s) in the table below.
- Standard Voltage:
Tester Connection Condition Specified Condition 3 (C/OPN relay) - Body ground Ignition switch ON 11 to 14 V
- Result:
Proceed to OK NG
OK
NG
Remove the C/OPN relay from the engine room relay block and junction block assembly.
Disconnect the ECM connector.
Measure the resistance according to the value(s) in the table below.
- Standard Resistance:
Tester Connection Condition Specified Condition 1 (C/OPN relay) - A22-41 (FC) Always Below 1 Ω 1 (C/OPN relay) or A22-41 (FC) - Body ground and other terminals Always 10 kΩ or higher
- Result:
Proceed to OK NG
OK
NG
Remove the C/OPN relay from the engine room relay block and junction block assembly.
Disconnect the fuel pump connector.
Measure the resistance according to the value(s) in the table below.
- Standard Resistance:
Tester Connection Condition Specified Condition 5 (C/OPN relay) - R44-4 Always Below 1 Ω 5 (C/OPN relay) or R44-4 - Body ground Always 10 kΩ or higher
- Result:
Proceed to OK NG
OK
NG
Disconnect the fuel pump connector.
Measure the resistance according to the value(s) in the table below.
- Standard Resistance:
Tester Connection Condition Specified Condition R44-5 - Body ground Always Below 1 Ω
- Result:
Proceed to OK NG
OK
NG
Inspect the fuel pump.
Click hereEngine / Hybrid System>2AR-FE (FUEL)>FUEL PUMP>INSPECTION
- HINT:
-
Perform "Inspection After Repair" after replacing the fuel pump.
-
Click hereEngine / Hybrid System>2AR-FE (ENGINE CONTROL)>SFI SYSTEM>INITIALIZATION
- Result:
Proceed to OK NG
OK
NG
Inspect the EFI-MAIN NO. 2 relay.
Click hereEngine / Hybrid System>2AR-FE (ENGINE CONTROL)>RELAY>ON-VEHICLE INSPECTION
- Result:
Proceed to OK NG
OK
NG
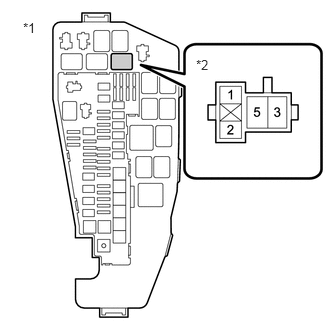
| *1 | Engine Room Relay Block and Junction Block Assembly |
| *2 | EFI-MAIN NO. 2 Relay |
Remove the EFI-MAIN NO. 2 relay from the engine room relay block and junction block assembly.
Measure the voltage according to the value(s) in the table below.
- Standard Voltage:
Tester Connection Condition Specified Condition 3 (EFI-MAIN NO. 2 relay) - Body ground Always 11 to 14 V
- Result:
Proceed to OK NG
OK
NG
Remove the EFI-MAIN NO. 2 relay from the engine room relay block and junction block assembly.
Measure the resistance according to the value(s) in the table below.
- Standard Resistance:
Tester Connection Condition Specified Condition 1 (EFI-MAIN NO. 2 relay) - Body ground Always Below 1 Ω
- Result:
Proceed to OK NG
OK
NG
Remove the EFI-MAIN NO. 2 relay and C/OPN relay from the engine room relay block and junction block assembly.
Measure the resistance according to the value(s) in the table below.
- Standard Resistance:
Tester Connection Condition Specified Condition 5 (EFI-MAIN NO. 2 relay) - 3 (C/OPN relay) Always Below 1 Ω 5 (EFI-MAIN NO. 2 relay) or 3 (C/OPN relay) - Body ground and other terminals Always 10 kΩ or higher
- Result:
Proceed to OK NG
OK
NG
Remove the IG2 NO. 1 relay and C/OPN relay from the engine room relay block and junction block assembly.
Measure the resistance according to the value(s) in the table below.
- Standard Resistance:
Tester Connection Condition Specified Condition 3 (IG2 NO. 1 relay) - 2 (C/OPN relay) Always Below 1 Ω 3 (IG2 NO. 1 relay) or 2 (C/OPN relay) - Body ground and other terminals Always 10 kΩ or higher
- Result:
Proceed to OK NG
OK
NG
Connect the GTS to the DLC3.
Turn the ignition switch to ON.
Turn the GTS on.
Enter the following menus: Powertrain / Engine and ECT / Data List / Starter Signal.
- Powertrain > Engine and ECT > Data List
-
Tester Display Starter Signal - 50003 234 118
Check the result when the ignition switch to ON and the engine starts.
- OK:
Condition Starter Signal Ignition switch ON OFF Engine started ON
- Result:
Proceed to OK NG
OK
NG
Connect the GTS to the DLC3.
Turn the ignition switch to ON.
Turn the GTS on.
Enter the following menus: Powertrain / Engine and ECT / Data List / Engine Speed.
- Powertrain > Engine and ECT > Data List
-
Tester Display Engine Speed - 50003 234 9
Read the values displayed on the GTS while cranking.
- OK:
Values are displayed continuously.
- Result:
Proceed to OK NG
OK
NG