FRONT SUSPENSION FRONT LOWER SUSPENSION ARM(for 2AR-FE LH Side) INSTALLATION
PROCEDURE

 48069
1.INSTALL FRONT LOWER NO. 1 SUSPENSION ARM SUB-ASSEMBLY LH
Install the front lower arm bushing stopper to the front lower No. 1 suspension arm sub-assembly LH.
Temporarily install the front lower No. 1 suspension arm sub-assembly LH to the front frame assembly with the 3 bolts and nut.
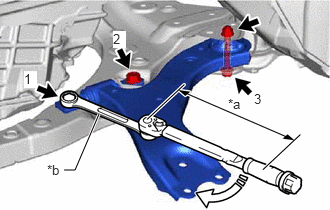
| *a | Torque Wrench Fulcrum Length |
| *b | Ball Joint Lock Nut Wrench |

|
Turn |
Using a ball joint lock nut wrench, fully tighten the bolt (1).
- Torque:
- Specified tightening torque : 200 N*m (2039 kgf*cm, 148 ft.*lbf)
- HINT:
- ·
Calculate the torque wrench reading when changing the fulcrum length of the torque wrench.
Click hereGeneral>INTRODUCTION>REPAIR INSTRUCTION>PRECAUTION
·When using a ball joint lock nut wrench (fulcrum length of 150 mm (5.91 in.)) + torque wrench (fulcrum length of 400 mm (1.31 ft.)):
145.5 N*m (1484 kgf*cm, 107 ft.*lbf)
Fully tighten the bolt (2) and then (3).
- Torque:
- Bolt (2) : 200 N*m (2039 kgf*cm, 148 ft.*lbf)
- Bolt (3) : 135 N*m (1377 kgf*cm, 100 ft.*lbf)
- NOTICE:
-
Because the nut has its own stopper, do not turn the nut. Tighten the bolt with the nut secured.
Slowly lower the engine assembly with transaxle using a jack and a wooden block.
- NOTICE:
- ·
Do not position the wooden block under the oil pan.
·Do not damage the components surrounding the engine assembly with transaxle.
·Ensure that the jack and wooden block are stable.
Connect the engine mounting insulator LH to the engine mounting bracket sub-assembly LH with the bolt and nut.
- Torque:
- 42 N*m (428 kgf*cm, 31 ft.*lbf)
12361A
2.CONNECT FRONT ENGINE MOUNTING INSULATOR
Connect the front engine mounting insulator to the front frame assembly with the 3 nuts.
- Torque:
- 72 N*m (734 kgf*cm, 53 ft.*lbf)
48069
3.CONNECT FRONT LOWER NO. 1 SUSPENSION ARM SUB-ASSEMBLY LH
Connect the front lower No. 1 suspension arm sub-assembly LH to the front lower ball joint assembly LH with the bolt and 2 nuts.
- Torque:
- 92 N*m (938 kgf*cm, 68 ft.*lbf)
74404A
4.INSTALL BATTERY CLAMP SUB-ASSEMBLY
5.INSTALL BATTERY
17700
6.INSTALL AIR CLEANER ASSEMBLY
53737B
7.INSTALL FRONT FENDER APRON SEAL LH
51441
8.INSTALL NO. 1 ENGINE UNDER COVER
53852K
9.INSTALL FRONT WHEEL OPENING EXTENSION PAD LH
53851M
10.INSTALL FRONT WHEEL OPENING EXTENSION PAD RH
11.INSTALL FRONT WHEEL
12.INSPECT AND ADJUST FRONT WHEEL ALIGNMENT
13.PERFORM INITIALIZATION
| Parking assist monitor system | ( )for Initialization ( )for Calibration
|
| Lighting System (EXT) (w/ Automatic Headlight Beam Level Control System) | ()
|