EXTERIOR PANELS / TRIM FRONT BUMPER REASSEMBLY
PROCEDURE

 52536
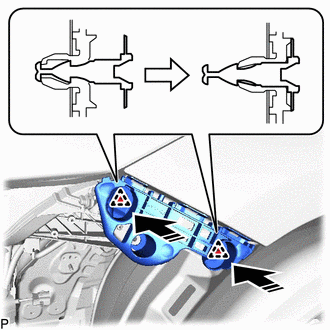
1.INSTALL FRONT BUMPER SIDE RETAINER LH

|
Install in this Direction |
Engage the 2 clips as shown in the illustration.
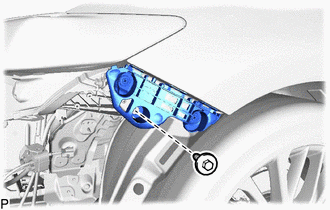
Install the front bumper side retainer LH with the bolt.
- Torque:
- 7.0 N*m (71 kgf*cm, 62 in.*lbf)
52535
2.INSTALL FRONT BUMPER SIDE RETAINER RH
- HINT:
-
Use the same procedure as for the LH side.
52131A
3.INSTALL FRONT BUMPER REINFORCEMENT
Install the front bumper reinforcement with the 6 bolts.
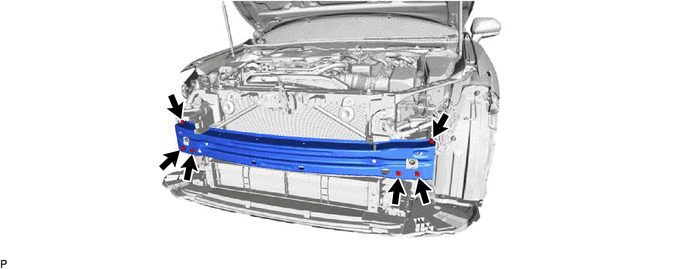
- Torque:
- 43 N*m (438 kgf*cm, 32 ft.*lbf)
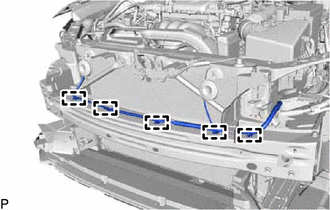
Engage the 5 clamps.
Install the headlight assembly LH.
for LED Type Turn Signal Light:
Click hereVehicle Exterior>LIGHTING (EXT)>HEADLIGHT ASSEMBLY (for LED Type Turn Signal Light)>INSTALLATION
for Bulb Type Turn Signal Light:
Click hereVehicle Exterior>LIGHTING (EXT)>HEADLIGHT ASSEMBLY (for Bulb Type Turn Signal Light)>INSTALLATION
Install the headlight assembly RH.
- HINT:
-
Use the same procedure as for the LH side.
52611
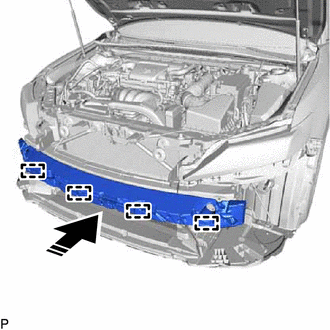
4.INSTALL FRONT BUMPER ENERGY ABSORBER
|
|
Install in this Direction |
Engage the 4 guides to install the front bumper energy absorber as shown in the illustration.
53879H
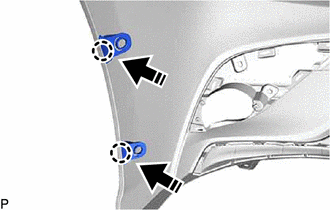
5.INSTALL FRONT FENDER LINER RETAINER
|
|
Install in this Direction |
Engage the 2 claws to install the 2 front fender liner retainers as shown in the illustration.
- HINT:
-
Use the same procedure for the RH side and LH side.
47749F
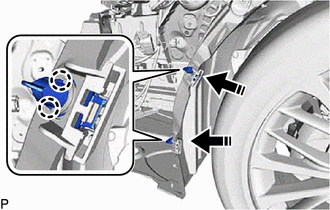
6.INSTALL PIN HOLD CLIP
|
|
Install in this Direction |
Engage the 4 claws to install the 2 pin hold clips as shown in the illustration.
- HINT:
-
Use the same procedure for the RH side and LH side.
53124B
7.INSTALL RADIATOR GRILLE SIDE MOULDING LH (for Mesh Type Radiator Grille)
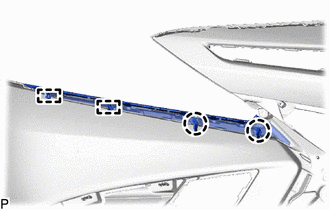
Engage the 2 guides and 2 claws.
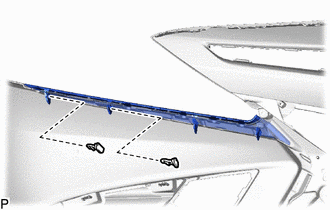
Install the radiator grille side moulding LH with the 2 clips.
53123B
8.INSTALL RADIATOR GRILLE SIDE MOULDING RH (for Mesh Type Radiator Grille)
- HINT:
-
Use the same procedure as for the LH side.
53102A
9.INSTALL LOWER RADIATOR GRILLE SUB-ASSEMBLY (for Bar Type Radiator Grille)
Engage the 23 claws.
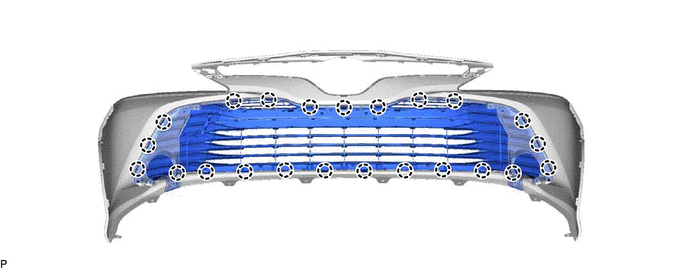
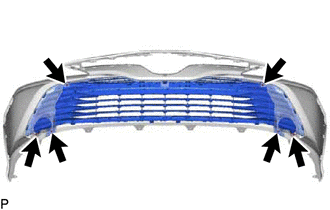
Install the lower radiator grille sub-assembly with the 6 screws.
53102A
10.INSTALL LOWER RADIATOR GRILLE SUB-ASSEMBLY (for Mesh Type Radiator Grille)
Engage the 18 claws.
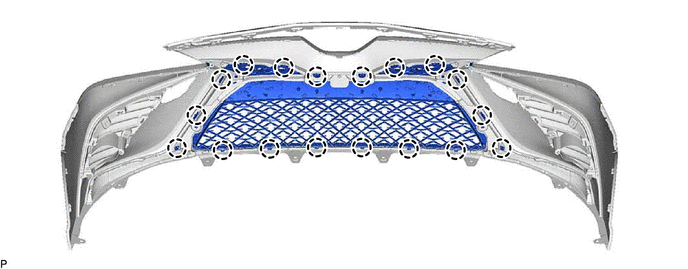
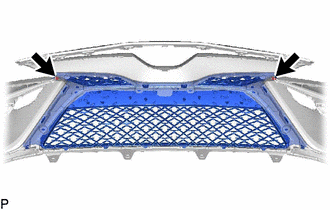
Install the lower radiator grille sub-assembly with the 2 screws.
52712A
11.INSTALL FRONT BUMPER GARNISH LH (for Bar Type Radiator Grille with Garnish)
- HINT:
-
When installing the front bumper garnish LH, heat the front bumper cover using a heat light.
- Heating Temperature:
Item Temperature Front Bumper Cover 20 to 30 °C (68 to 86 °F)
- CAUTION:
-
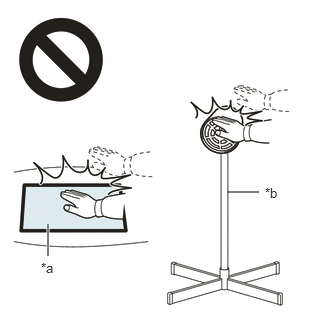 2.365,2 2.698,2 false 0.5,2.333 0.5,2.667 true 0.427,2.708 0.74,2.865 0.313,0.156 10 false *a 2.76,1.927 3.073,2.083 0.313,0.156 10 false *b
*a Heated Part *b Heat Light
- ·
Do not touch the heat light and heated parts, touching the heat light may result in burns.
·Touching heated parts for a long time may result in burns.
- NOTICE:
-
Do not heat the front bumper cover excessively.
Clean the front bumper cover surface.
Using a heat light, heat the front bumper cover surface.
Remove the double-sided tape from the front bumper cover.
Wipe off any tape adhesive residue with cleaner.
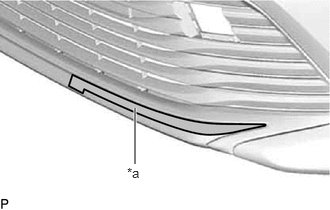
| *a | Primer |
Using a brush or felt, apply primer or equivalent to the front bumper garnish LH installation area.
Install a new front bumper garnish LH.
Using a heat light, heat the front bumper cover surface.
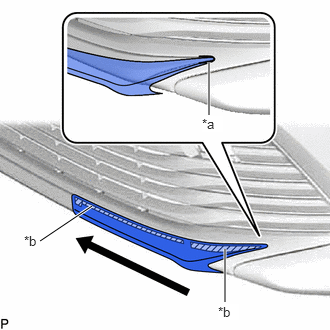
| *a | Area (A) |
| *b | Double-sided Tape |
Align the front bumper garnish LH with the area (A) shown in the illustration.
- HINT:
-
Confirm that the screw hole of the front bumper and that of the front bumper garnish LH are aligned.
Remove the release paper from the front bumper garnish LH.
- HINT:
-
After removing the release paper, keep the exposed adhesive free from foreign matter.
Attach the double-sided tape to install the front bumper garnish LH.
- HINT:
- ·
Attach the front bumper garnish LH in the direction indicated by the arrow shown in the illustration.
·Press the front bumper garnish LH firmly to install it.
52711A
12.INSTALL FRONT BUMPER GARNISH RH (for Bar Type Radiator Grille with Garnish)
- HINT:
-
Use the same procedure as for the LH side.
81482C
13.INSTALL FOG LIGHT COVER LH (for Mesh Type Radiator Grille)
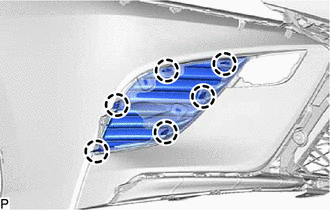
Engage the 6 claws to install the fog light cover LH.
81481E
14.INSTALL FOG LIGHT COVER RH (for Mesh Type Radiator Grille)
- HINT:
-
Use the same procedure as for the LH side.
53124D
15.INSTALL LOWER RADIATOR GRILLE MOULDING LH (for Mesh Type Radiator Grille)
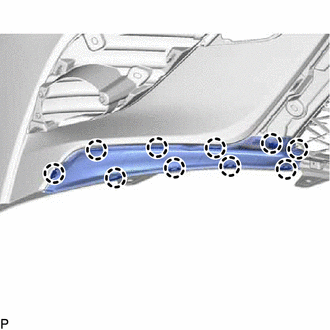
Engage the 10 claws to install the lower radiator grille moulding LH.
53123C
16.INSTALL LOWER RADIATOR GRILLE MOULDING RH (for Mesh Type Radiator Grille)
- HINT:
-
Use the same procedure as for the LH side.
53123D
17.INSTALL LOWER RADIATOR GRILLE MOULDING (for Mesh Type Radiator Grille)
Engage the 16 claws.
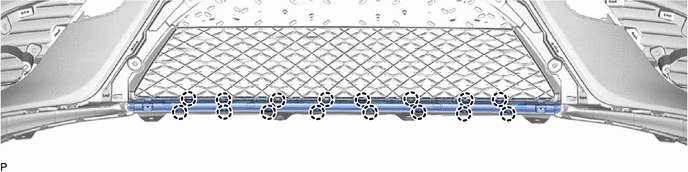
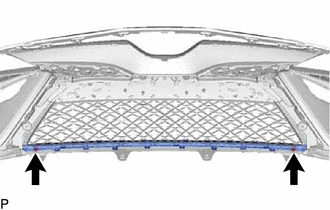
Install the lower radiator grille moulding with the 2 screws.
81220
18.INSTALL FOG LIGHT ASSEMBLY LH (w/ Fog Light)
81210A
19.INSTALL FOG LIGHT ASSEMBLY RH (w/ Fog Light)
- HINT:
-
Use the same procedure as for the LH side.
53111
20.INSTALL RADIATOR GRILLE (for Bar Type Radiator Grille)
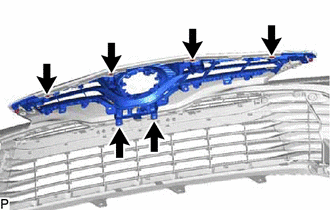
Install the 6 screws.
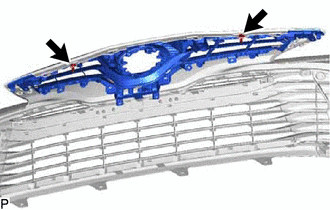
Install the radiator grille with the 2 clips.
53111
21.INSTALL RADIATOR GRILLE (for Mesh Type Radiator Grille)
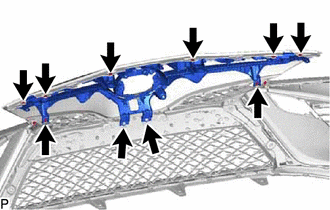
Install the 10 screws.
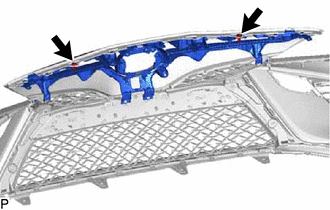
Install the radiator grille with the 2 clips.
53124B
22.INSTALL RADIATOR GRILLE SIDE MOULDING LH (for Bar Type Radiator Grille)
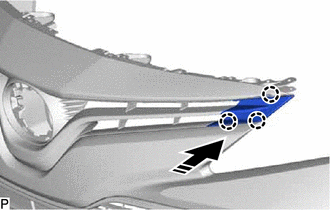
|
|
Install in this Direction |
Engage the 3 claws as shown in the illustration.
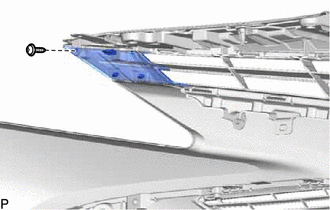
Install the radiator grille side moulding LH with the screw.
53123B
23.INSTALL RADIATOR GRILLE SIDE MOULDING RH (for Bar Type Radiator Grille)
- HINT:
-
Use the same procedure as for the LH side.
75310A
24.INSTALL RADIATOR GRILLE EMBLEM ASSEMBLY
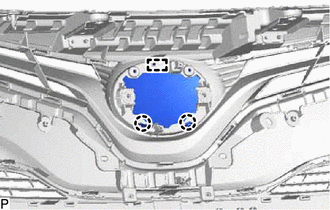
Engage the guide and 2 claws.
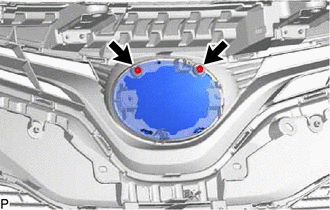
Install the radiator grille emblem assembly with the 2 screws.
53395E
25.INSTALL HOOD TO FRONT END PANEL SEAL
- HINT:
-
When installing the hood to front end panel seal, heat the front bumper cover using a heat light.
| Item | Temperature |
|---|---|
| Front Bumper Cover | 20 to 30°C (68 to 86°F) |
- CAUTION:
-
2.365,2 2.698,2 false 0.5,2.333 0.5,2.667 true 0.427,2.708 0.74,2.865 0.313,0.156 10 false *a 2.76,1.927 3.073,2.083 0.313,0.156 10 false *b
*a Heated Part *b Heat Light
- ·
Do not touch the heat light and heated parts, touching the heat light may result in burns.
·Touching heated parts for a long time may result in burns.
- NOTICE:
-
Do not heat the front bumper cover excessively.
Clean the front bumper cover surface.
Using a heat light, heat the front bumper cover surface.
Remove any remaining double-sided tape from the front bumper cover.
Wipe off any tape adhesive residue with cleaner.
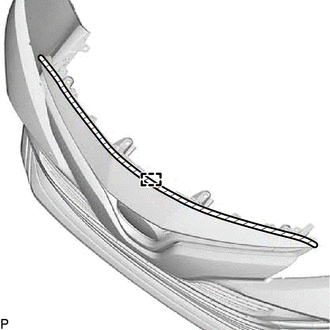

|
Double-sided Tape |
Engage the guide to attach the double-sided tape as shown in the illustration.
- HINT:
-
Press the hood to front end panel seal firmly to install it.
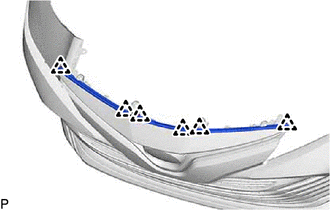
Engage the 6 clips to install a new hood to front end panel seal.
Remove the release paper from the hood to front end panel seal.
- HINT:
-
After removing the release paper, keep the exposed adhesive free from foreign matter.
52128B
26.INSTALL FRONT BUMPER HOLE COVER LH (for Bar Type Radiator Grille)
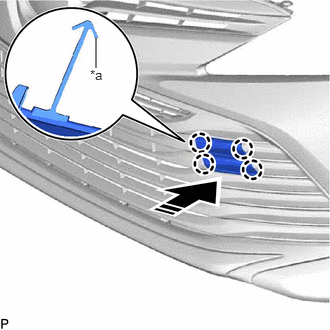
| *a | Hook |
|
|
Install in this Direction |
Engage the hook.
Engage the 4 claws to install the front bumper hole cover LH as shown in the illustration.
52128B
27.INSTALL FRONT BUMPER HOLE COVER LH (for Mesh Type Radiator Grille)
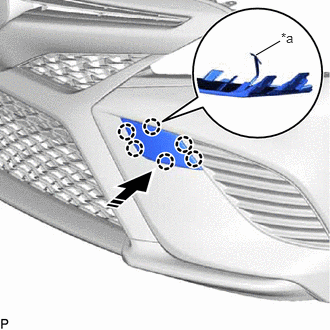
| *a | Hook |
|
|
Install in this Direction |
Engage the hook.
Engage the 6 claws to install the front bumper hole cover LH as shown in the illustration.
52127D
28.INSTALL FRONT BUMPER HOLE COVER RH (for Mesh Type Radiator Grille)
- HINT:
-
Use the same procedure as for the LH side.
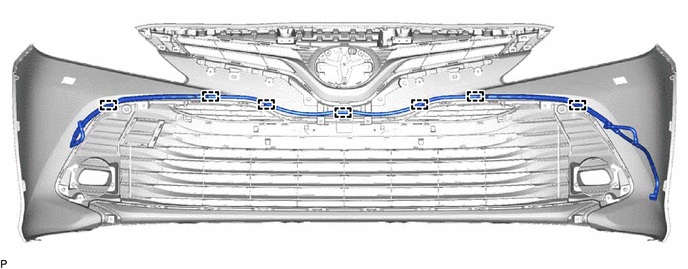
29.INSTALL HEADLIGHT CLEANER HOSE (w/ Headlight Cleaner System)
Engage the 7 clamps to install the headlight cleaner hose.
85208A
30.INSTALL HEADLIGHT WASHER ACTUATOR SUB-ASSEMBLY LH (w/ Headlight Cleaner System)
85207A
31.INSTALL HEADLIGHT WASHER ACTUATOR SUB-ASSEMBLY RH (w/ Headlight Cleaner System)
- HINT:
-
Use the same procedure as for the LH side.
85354
32.INSTALL HEADLIGHT WASHER COVER LH (w/ Headlight Cleaner System)
85353
33.INSTALL HEADLIGHT WASHER COVER RH (w/ Headlight Cleaner System)
- HINT:
-
Use the same procedure as for the LH side.
82114
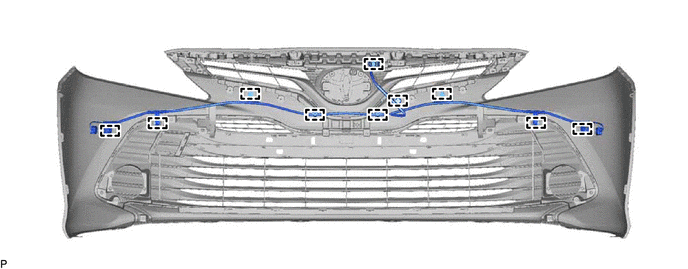
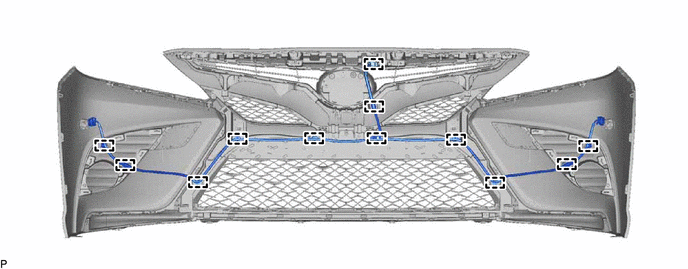
34.INSTALL NO. 4 ENGINE ROOM WIRE (w/ TOYOTA Parking Assist-sensor System)
for Bar Type Radiator Grille:
Engage the 10 clamps to install the No. 4 engine room wire.
for Mesh Type Radiator Grille:
Engage the 12 clamps to install the No. 4 engine room wire.
89347B
35.INSTALL FRONT CORNER ULTRASONIC SENSOR RETAINER (w/ TOYOTA Parking Assist-sensor System)
89341K
36.INSTALL FRONT CORNER ULTRASONIC SENSOR (w/ TOYOTA Parking Assist-sensor System)
86790B
37.INSTALL FRONT TELEVISION CAMERA ASSEMBLY (w/ Panoramic View Monitor System)
52423A
38.INSTALL FRONT BUMPER PAD LH (for Bar Type Radiator Grille)
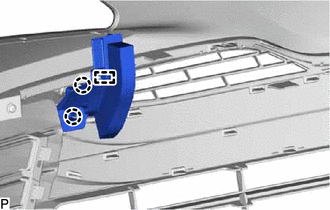
Engage the guide and 2 claws to install the front bumper pad LH.
52422A
39.INSTALL FRONT BUMPER PAD RH (for Bar Type Radiator Grille)
- HINT:
-
Use the same procedure as for the LH side.
52423A
40.INSTALL FRONT BUMPER PAD LH (for Mesh Type Radiator Grille)
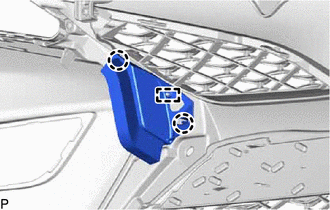
Engage the guide and 2 claws to install the front bumper pad LH.
52422A
41.INSTALL FRONT BUMPER PAD RH (for Mesh Type Radiator Grille)
- HINT:
-
Use the same procedure as for the LH side.
52114A
42.INSTALL FRONT BUMPER EXTENSION MOUNTING BRACKET (for Bar Type Radiator Grille)
w/ Bracket:
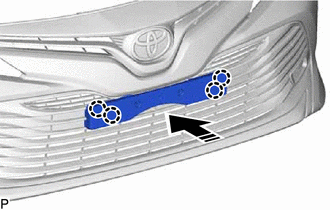
|
|
Install in this Direction |
Engage the 4 claws as shown in the illustration.
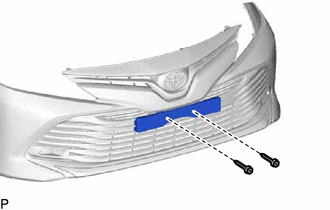
Install the front bumper extension mounting bracket with the 2 screws.
52114A
43.INSTALL FRONT BUMPER EXTENSION MOUNTING BRACKET (for Mesh Type Radiator Grille)
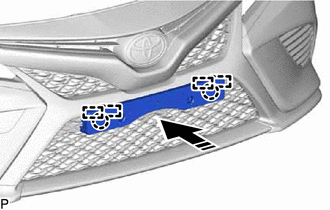
|
|
Install in this Direction |
Engage the 4 guides and 2 claws as shown in the illustration.
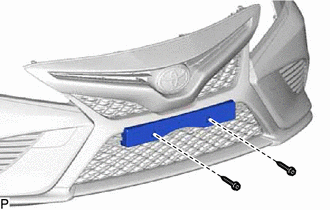
Install the front bumper extension mounting bracket with the 2 screws.
88211B
44.INSTALL MILLIMETER WAVE RADAR SENSOR ASSEMBLY (w/ Pre-collision System)