A25A-FXS FUEL FUEL TANK(w/ Canister Pump Module) INSTALLATION
PROCEDURE

 77606
1.INSTALL NO. 1 FUEL TANK PROTECTOR SUB-ASSEMBLY
Engage the 2 claws to install the No. 1 fuel tank protector sub-assembly to the fuel tank assembly.
77651A
2.INSTALL NO. 1 FUEL TANK CUSHION
Install 2 new No. 1 fuel tank cushions to the fuel tank assembly.
77209F
3.INSTALL FUEL TANK MAIN TUBE SUB-ASSEMBLY
Engage the 2 clamps to install the fuel tank main tube sub-assembly to the fuel tank assembly.
77100
4.INSTALL FUEL TANK ASSEMBLY
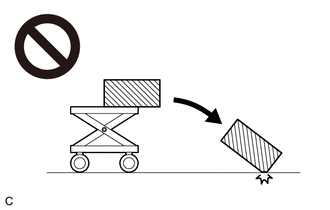
- CAUTION:
-
-
The fuel tank assembly is very heavy. Be sure to follow the procedure described in the repair manual, or the fuel tank assembly may fall off the engine lifter.
Set the fuel tank assembly on an engine lifter.
- NOTICE:
-
Using height adjustment attachments and plate lift attachments, keep the fuel tank assembly horizontal.
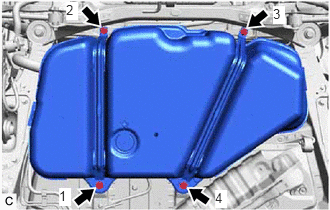
Using the engine lifter, slowly raise the fuel tank assembly, and then install the fuel tank assembly, No. 1 fuel tank band sub-assembly LH and No. 1 fuel tank band sub-assembly RH with the 4 bolts in the order shown in the illustration.
- Torque:
- 45 N*m (459 kgf*cm, 33 ft.*lbf)
- NOTICE:
- ·
Be careful not to drop the fuel tank assembly.
·When installing the fuel tank assembly, tilt it slightly to prevent it from interfering with the surrounding parts.
77213E
5.CONNECT FUEL TANK TO FILLER PIPE HOSE
Connect the fuel tank to filler pipe hose to the fuel tank assembly.
Click hereEngine / Hybrid System>A25A-FXS (FUEL)>FUEL SYSTEM>PRECAUTION
77209F
6.CONNECT FUEL TANK MAIN TUBE SUB-ASSEMBLY
Connect the fuel tank main tube sub-assembly to the fuel pipe.
Click hereEngine / Hybrid System>A25A-FXS (FUEL)>FUEL SYSTEM>PRECAUTION
77641A
7.INSTALL NO. 1 FUEL TANK PROTECTOR
Install the No. 1 fuel tank protector to the fuel tank assembly with the 3 clips.
58399D
8.INSTALL NO. 2 FLOOR UNDER COVER (w/ Cover)
17420
9.INSTALL CENTER EXHAUST PIPE ASSEMBLY
77020A
10.INSTALL FUEL SUCTION TUBE WITH PUMP AND GAUGE ASSEMBLY
11.ADD FUEL