BRAKE CONTROL / DYNAMIC CONTROL SYSTEMS ELECTRONICALLY CONTROLLED BRAKE SYSTEM Brake Hold Standby Indicator Light Circuit
DESCRIPTION
The brake hold standby indicator light turns on if brake hold control is possible when the following conditions required for operation standby are met and the brake hold switch (electric parking brake switch assembly) is turned on while the power switch is on (IG).
Conditions required for operation standby:
The driver side door is closed.
The driver side seat belt is fastened.
The system is normal.
WIRING DIAGRAM
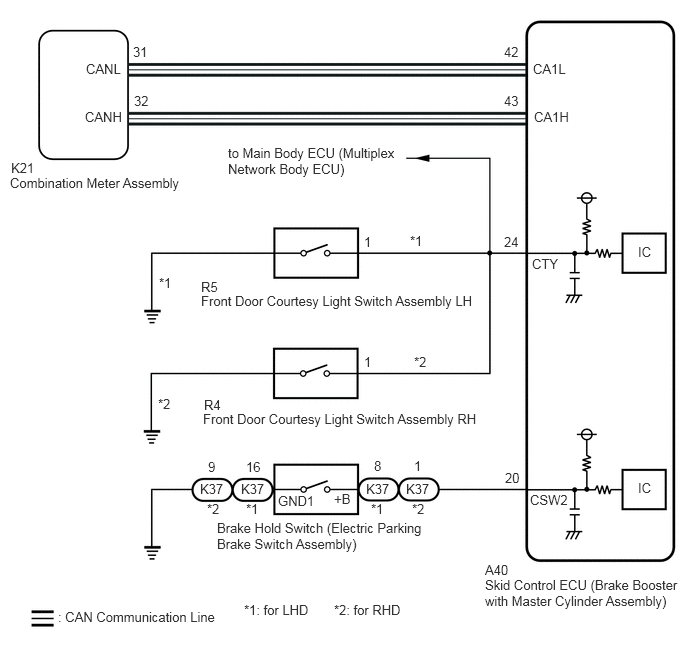
CAUTION / NOTICE / HINT
- NOTICE:
-
After replacing the skid control ECU (brake booster with master cylinder assembly), perform linear solenoid valve offset learning, ABS holding solenoid valve learning, yaw rate and acceleration sensor zero point calibration and system information memorization after performing "Reset Memory".
-
Click hereBrake>BRAKE CONTROL / DYNAMIC CONTROL SYSTEMS>ELECTRONICALLY CONTROLLED BRAKE SYSTEM>INITIALIZATION
PROCEDURE
If the brake hold standby indicator light does not illuminate even though the brake hold switch (electric parking brake switch assembly) is pushed, check that the brake hold function operation conditions are met.
The driver side door is closed.
The driver side seat belt is fastened.
The system is normal.
- HINT:
-
If a malfunction occurs in one of the following systems, the brake hold operated indicator light will blink. If this occurs, perform troubleshooting on the malfunctioning system.
- ·
Brake system
·Electric parking brake system
·Hybrid control system
- Result:
Proceed to NEXT
NEXT
Check if CAN communication system DTCs are output.
Click herePower Source / Network>NETWORKING>CAN COMMUNICATION SYSTEM>HOW TO PROCEED WITH TROUBLESHOOTING
- Result:
Result Proceed to DTCs are not output. A DTCs are output. B
A
B
Click herePower Source / Network>NETWORKING>CAN COMMUNICATION SYSTEM>HOW TO PROCEED WITH TROUBLESHOOTING
Check if the skid control ECU (brake booster with master cylinder assembly) connector is securely connected.
- OK:
The connector is securely connected.
- Result:
Proceed to OK NG
OK
NG
Turn the power switch off.
Perform the Active Test of the combination meter assembly (meter CPU) using the GTS.
Click hereVehicle Interior>METER / GAUGE / DISPLAY>METER / GAUGE SYSTEM>DATA LIST / ACTIVE TEST
- Body Electrical > Combination Meter > Active Test
-
Tester Display Brake Hold Indicator - 50004 409 117
Check the combination meter assembly.
- OK:
The brake hold standby indicator light turns on or off in accordance with GTS operation.
- Result:
Proceed to OK NG
OK
NG
Click hereVehicle Interior>METER / GAUGE / DISPLAY>METER / GAUGE SYSTEM>HOW TO PROCEED WITH TROUBLESHOOTING
Select the Active Test on the GTS.
- Chassis > ABS/VSC/TRC > Active Test
-
Tester Display Measurement Item Control Range Diagnostic Note BH Standby Light Brake hold standby indicator light Indicator light ON/OFF Observe combination meter assembly
- Chassis > ABS/VSC/TRC > Data List
-
Tester Display Measurement Item Range Normal Condition Diagnostic Note BH Standby Light Brake hold standby indicator light ON or OFF ON: Indicator light on
OFF: Indicator light off-
- Chassis > ABS/VSC/TRC > Active Test
-
Active Test Display BH Standby Light -
Data List Display BH Standby Light - 50004 105 73 280
Check the operating condition of the brake hold standby indicator light when operating it using the GTS.
- Result:
Result Proceed to Brake hold standby indicator light in the Data List does not change using the Active Test. A Brake hold standby indicator light in the Data List turns ON/OFF using the Active Test. B
A
for LHD: Click hereBrake>BRAKE SYSTEM (OTHER)>BRAKE BOOSTER (for LHD)>REMOVAL
for RHD: Click hereBrake>BRAKE SYSTEM (OTHER)>BRAKE BOOSTER (for RHD)>REMOVAL
B
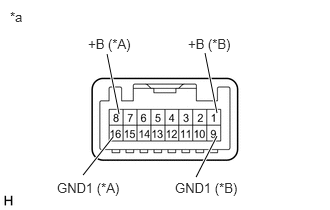
| *A | for LHD |
| *B | for RHD |
| *a | Component without harness connected
(Brake Hold Switch (Electric Parking Brake Switch Assembly)) |
Turn the power switch off.
Make sure that there is no looseness at the locking part and the connecting part of the connector.
- OK:
The connector is securely connected.
Disconnect the K37 brake hold switch (electric parking brake switch assembly) connector.
Check both the connector case and the terminals for deformation and corrosion.
- OK:
No deformation or corrosion.
Measure the resistance according to the value(s) in the table below.
- Standard Resistance:
for LHD Tester Connection Condition Specified Condition 8 (+B) - 16 (GND1) Switch pushed Below 1 Ω 8 (+B) - 16 (GND1) Switch not pushed 10 kΩ or higher
for RHD Tester Connection Condition Specified Condition 1 (+B) - 9 (GND1) Switch pushed Below 1 Ω 1 (+B) - 9 (GND1) Switch not pushed 10 kΩ or higher
- Result:
Proceed to OK NG
OK
NG
Make sure that there is no looseness at the locking part and the connecting part of the connector.
- OK:
The connector is securely connected.
Disconnect the A40 skid control ECU (brake booster with master cylinder assembly) connector.
Check both the connector case and the terminals for deformation and corrosion.
- OK:
No deformation or corrosion.
Measure the resistance according to the value(s) in the table below.
- Standard Resistance:
for LHD Tester Connection Condition Specified Condition A40-20 (CSW2) - K37-8 (+B) Always Below 1 Ω A40-20 (CSW2) or K37-8 (+B) - Body ground Always 10 kΩ or higher K37-16 (GND1) - Body ground Always Below 1 Ω
for RHD Tester Connection Condition Specified Condition A40-20 (CSW2) - K37-1 (+B) Always Below 1 Ω A40-20 (CSW2) or K37-1 (+B) - Body ground Always 10 kΩ or higher K37-9 (GND1) - Body ground Always Below 1 Ω
- Result:
Proceed to OK NG
OK
NG
Turn on the interior lights and check that they illuminate, and then set the switch so that the lights illuminate when the door is opened.
Check that the lights illuminate when the driver side door is opened.
- OK:
The interior lights illuminate when the driver side door is opened.
- Result:
Proceed to OK NG
OK
NG
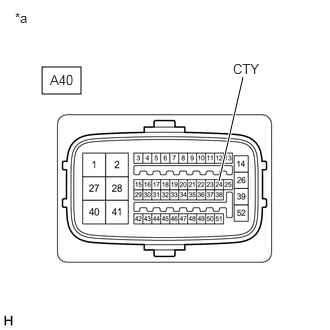
| *a | Front view of wire harness connector
(to Skid Control ECU (Brake Booster with Master Cylinder Assembly)) |
Measure the voltage according to the value(s) in the table below.
- Standard Voltage:
Tester Connection Condition Specified Condition A40-24 (CTY) - Body ground Driver door open Below 1.5 V A40-24 (CTY) - Body ground Driver door closed 11 to 14 V
- Result:
Proceed to OK NG
OK
for LHD: Click hereBrake>BRAKE SYSTEM (OTHER)>BRAKE BOOSTER (for LHD)>REMOVAL
for RHD: Click hereBrake>BRAKE SYSTEM (OTHER)>BRAKE BOOSTER (for RHD)>REMOVAL
NG