SEAT FRONT POWER SEAT CONTROL SYSTEM(w/ Memory) Power Seat Position is not Memorized
DESCRIPTION
The main body ECU (multiplex network body ECU) receives seat memory switch signals from the outer mirror control ECU assembly via CAN communication. If the SET switch is being pressed when one of the M1 or M2 switches is pressed, or if one of the M1 or M2 switches is pressed within 3 seconds of pressing the SET switch, the main body ECU (multiplex network body ECU) sends a memory request signal to the position control ECU assembly. After receiving the request signal, the position control ECU assembly memorizes the location data of each motor.
WIRING DIAGRAM
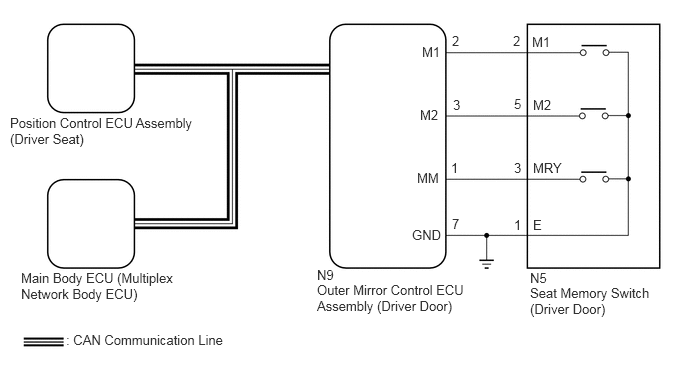
CAUTION / NOTICE / HINT
- NOTICE:
- ·
The seat position will not be stored if the SET switch and 2 or more of the seat memory switches (for example, M1 switch and M2 switch) are pressed simultaneously.
If a memorizing operation has failed, release all of the switches. The seat memory function will not operate unless the switches are released.
·The seat will not return to the memorized position if 2 or more of the seat memory switches (for example, M1 switch and M2 switch) are pressed simultaneously.
If a restoring operation has failed, release all of the switches. The seat memory restoring function will not operate unless the switches are released.
·The front power seat control system (w/ Memory) uses the CAN communication system. First, confirm that there are no malfunctions in the CAN communication system. Refer to How to Proceed with Troubleshooting.
·Before replacing the main body ECU (multiplex network body ECU), refer to Service Bulletin.
PROCEDURE
Check that each function of the power seat operates normally by using the front power seat switch (driver seat).
Click hereVehicle Interior>SEAT>FRONT POWER SEAT CONTROL SYSTEM (w/ Memory)>OPERATION CHECK
- OK:
Each function of the power seat operates normally using the front power seat switch (driver seat).
- Result:
Proceed to OK NG
OK
NG
Connect the GTS to the DLC3.
Turn the power switch on (IG).
Turn the GTS on.
Enter the following menus: Body Electrical / Mirror R / Data List.
Read the Data List according to the display on the GTS.
- Body Electrical > Mirror R > Data List
-
Tester Display Measurement Item Range Normal Condition Diagnostic Note Seat Memory Switch1 M1 switch ON or OFF ON: M1 switch on
OFF: M1 switch off- Seat Memory Switch2 M2 switch ON or OFF ON: M2 switch on
OFF: M2 switch off- Seat Memory Set SW SET switch ON or OFF ON: SET switch on
OFF: SET switch off-
- Body Electrical > Mirror R > Data List
-
Tester Display Seat Memory Switch1 Seat Memory Switch2 Seat Memory Set SW - 50003 224 1,2,4
- OK:
On the GTS screen, ON or OFF is displayed accordingly.
- Result:
Proceed to OK NG
OK
NG
Connect the GTS to the DLC3.
Turn the power switch on (IG).
Turn the GTS on.
Enter the following menus: Body Electrical / Driver Seat / Active Test.
Perform the Active Test according to the display on the GTS.
- Body Electrical > Driver Seat > Active Test
-
Tester Display Measurement Item Control Range Diagnostic Note Buzzer Buzzer operation OFF/ON -
- Body Electrical > Driver Seat > Active Test
-
Tester Display Buzzer - 50004 162 5
- OK:
Buzzer sounds normally.
- Result:
Proceed to OK NG
OK
NG
Replace the outer mirror control ECU assembly (driver door) with a new or known good one.
Click hereVehicle Exterior>MIRROR (EXT)>OUTER MIRROR CONTROL ECU>REMOVAL
- Result:
Proceed to NEXT
NEXT
Check the seat position memory and restoring functions.
Click hereVehicle Interior>SEAT>FRONT POWER SEAT CONTROL SYSTEM (w/ Memory)>OPERATION CHECK
- OK:
Seat position memory and restoring functions operate normally.
- Result:
Proceed to OK NG
OK
NG
Replace the position control ECU assembly (driver seat) with a new or known good one.
Click hereVehicle Interior>SEAT>POWER SEAT CONTROL ECU>REMOVAL
- Result:
Proceed to NEXT
NEXT
Check the seat position memory and restoring functions.
Click hereVehicle Interior>SEAT>FRONT POWER SEAT CONTROL SYSTEM (w/ Memory)>OPERATION CHECK
- OK:
Seat position memory and restoring functions operate normally.
- Result:
Proceed to OK NG
OK
NG
Remove the seat memory switch (driver door).
Inspect the seat memory switch (driver door).
Click hereVehicle Interior>SEAT>SEAT MEMORY SWITCH>INSPECTION
- Result:
Proceed to OK NG
OK
NG
Disconnect the N9 outer mirror control ECU assembly (driver door) connector.
Measure the resistance according to the value(s) in the table below.
- Standard Resistance:
Tester Connection Condition Specified Condition N9-1 (MM) - N5-3 (MRY) Always Below 1 Ω N9-1 (MM) or N5-3 (MRY) - Body ground Always 10 kΩ or higher N9-2 (M1) - N5-2 (M1) Always Below 1 Ω N9-2 (M1) or N5-2 (M1) - Body ground Always 10 kΩ or higher N9-3 (M2) - N5-5 (M2) Always Below 1 Ω N9-3 (M2) or N5-5 (M2) - Body ground Always 10 kΩ or higher N9-7 (GND) - Body ground Always Below 1 Ω N5-1 (E) - Body ground Always Below 1 Ω
- Result:
Proceed to OK NG
OK
NG