SLIDING ROOF / CONVERTIBLE PANORAMIC MOON ROOF SYSTEM Panoramic Moon Roof System does not Operate
DESCRIPTION
The sliding roof ECU (sliding roof drive gear assembly) and roof sunshade ECU (sliding roof drive gear assembly) receive each other's position information from the main body ECU (multiplex network body ECU) via LIN communication.
The sliding roof ECU (sliding roof drive gear assembly) and roof sunshade ECU (sliding roof drive gear assembly) receive signals from each switch, and operate their built-in motors.
For the linked functions of the sliding roof and roof sunshade refer to Operation Check.
Click hereVehicle Exterior>SLIDING ROOF / CONVERTIBLE>PANORAMIC MOON ROOF SYSTEM>OPERATION CHECK
WIRING DIAGRAM
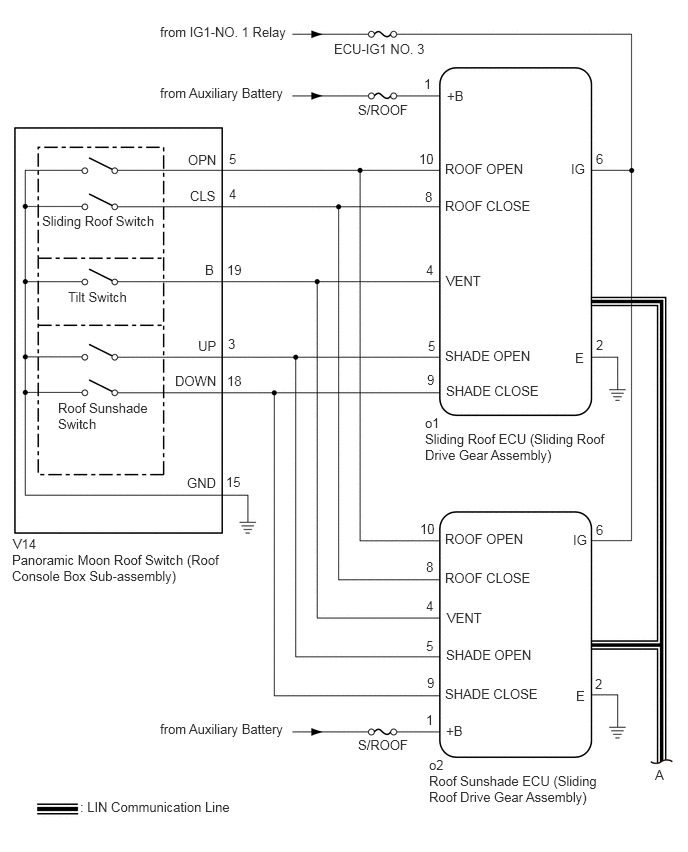
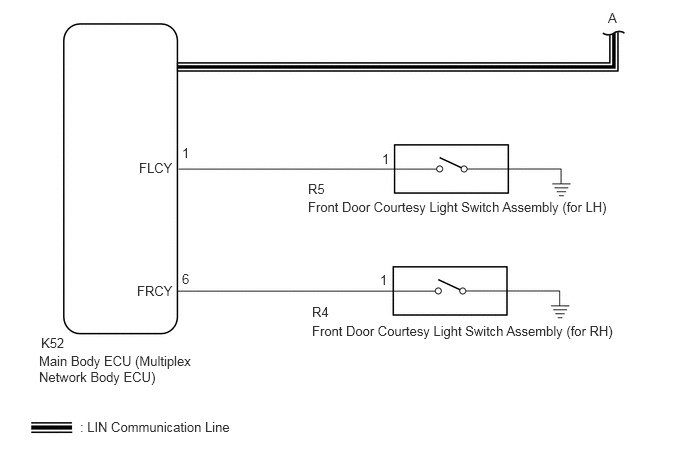
CAUTION / NOTICE / HINT
- NOTICE:
- ·
Inspect the fuses for circuits related to this system before performing the following procedure.
·The sliding roof auto operation function can be customized. Make sure that the function is set to ON.
Click hereVehicle Exterior>SLIDING ROOF / CONVERTIBLE>PANORAMIC MOON ROOF SYSTEM>CUSTOMIZE PARAMETERS
·If the sliding roof ECU (sliding roof drive gear assembly) or roof sunshade ECU (sliding roof drive gear assembly) is removed and reinstalled or replaced, the sliding roof ECU (sliding roof drive gear assembly) or roof sunshade ECU (sliding roof drive gear assembly) must be initialized.
Click hereVehicle Exterior>SLIDING ROOF / CONVERTIBLE>PANORAMIC MOON ROOF SYSTEM>INITIALIZATION
·The panoramic moon roof system uses the CAN and LIN communication systems. First, confirm that there are no malfunctions in the CAN and LIN communication systems. Refer to How to Proceed with Troubleshooting.
·If a sliding roof ECU (sliding roof drive gear assembly) or roof sunshade ECU (sliding roof drive gear assembly) DTC is output,perform troubleshooting for the DTC first.
Click hereVehicle Exterior>SLIDING ROOF / CONVERTIBLE>PANORAMIC MOON ROOF SYSTEM>DTC CHECK / CLEAR
PROCEDURE
Clear the DTCs.
- Body Electrical > Main Body > Clear DTCs
- 50002 123
Check for DTCs.
- Body Electrical > Main Body > Trouble Codes
- 50001 123
- OK:
DTCs B1273 and B2329 are not output.
- Result:
Proceed to OK NG
OK
NG
Click herePower Source / Network>NETWORKING>LIN COMMUNICATION SYSTEM>HOW TO PROCEED WITH TROUBLESHOOTING
Clear the DTCs.
- Body Electrical > Sliding Roof > Clear DTCs
- 50002 147
- Body Electrical > Sliding Sunshade > Clear DTCs
- 50002 370
Check for DTCs.
- Body Electrical > Sliding Roof > Trouble Codes
- 50001 147
- Body Electrical > Sliding Sunshade > Trouble Codes
- 50001 370
- OK:
DTCs B2341 and B2344 are not output.
- Result:
Proceed to OK NG
OK
NG
Click hereVehicle Exterior>SLIDING ROOF / CONVERTIBLE>PANORAMIC MOON ROOF SYSTEM>DIAGNOSTIC TROUBLE CODE CHART
Check the power window control system operates normally.
Click hereVehicle Exterior>WINDOW / GLASS>POWER WINDOW CONTROL SYSTEM>OPERATION CHECK
- OK:
The power window control system operates normally.
- Result:
Proceed to OK NG
OK
NG
Click hereVehicle Exterior>WINDOW / GLASS>POWER WINDOW CONTROL SYSTEM>HOW TO PROCEED WITH TROUBLESHOOTING
Connect the GTS to the DLC3.
Turn the power switch on (IG).
Turn the GTS on.
Enter the following menus: Body Electrical / Sliding Roof / Active Test.
Perform the Active Test according to the display on the GTS.
- Body Electrical > Sliding Roof > Active Test
-
Tester Display Measurement Item Control Range Diagnostic Note Slide Roof Operate sliding roof motor OFF / Opn/Dwn / Clos/Up -
- Body Electrical > Sliding Roof > Active Test
-
Tester Display Slide Roof - 50004 147 1
- OK:
Slide roof is operated using GTS.
- Result:
Proceed to OK NG
OK
NG
Connect the GTS to the DLC3.
Turn the power switch on (IG).
Turn the GTS on.
Enter the following menus: Body Electrical / Sliding Roof / Data List.
Read the Data List according to the display on the GTS.
- Body Electrical > Sliding Roof > Data List
-
Tester Display Measurement Item Range Normal Condition Diagnostic Note Vent Switch Tilt switch signal OFF or ON OFF: Tilt switch not pressed
ON: Tilt switch pressed- Roof Open Switch Sliding roof open switch signal OFF or ON OFF: Sliding roof switch not slid backward
ON: Sliding roof switch slid backward- Roof Close Switch Sliding roof close switch signal OFF or ON OFF: Sliding roof switch not slid forward
ON: Sliding roof switch slid forward- Shade Close Switch Roof sunshade close switch signal OFF or ON OFF: Roof sunshade switch not slid forward
ON: Roof sunshade switch slid forward- Shade Open Switch Roof sunshade open switch signal OFF or ON OFF: Roof sunshade switch not slid backward
ON: Roof sunshade switch slid backward-
- Body Electrical > Sliding Roof > Data List
-
Tester Display Vent Switch Roof Open Switch Roof Close Switch Shade Close Switch Shade Open Switch - 50003 147 44,45,46,47,48
- OK:
The GTS display changes according to switch operation as shown in the table.
- Result:
Proceed to OK NG
OK
NG
Connect the GTS to the DLC3.
Turn the power switch on (IG).
Turn the GTS on.
Enter the following menus: Body Electrical / Sliding Sunshade / Active Test.
Perform the Active Test according to the display on the GTS.
- Body Electrical > Sliding Sunshade > Active Test
-
Tester Display Measurement Item Control Range Diagnostic Note Sliding Sunshade Operate roof sunshade motor OFF / Open / Close -
- Body Electrical > Sliding Sunshade > Active Test
-
Tester Display Sliding Sunshade - 50004 370 1
- OK:
Roof sunshade is operated using GTS.
- Result:
Proceed to OK NG
OK
NG
Connect the GTS to the DLC3.
Turn the power switch on (IG).
Turn the GTS on.
Enter the following menus: Body Electrical / Sliding Sunshade / Data List.
Read the Data List according to the display on the GTS.
- Body Electrical > Sliding Sunshade > Data List
-
Tester Display Measurement Item Range Normal Condition Diagnostic Note Vent Switch Tilt switch signal OFF or ON OFF: Tilt switch not pressed
ON: Tilt switch pressed- Roof Open Switch Sliding roof open switch signal OFF or ON OFF: Sliding roof switch not slid backward
ON: Sliding roof switch slid backward- Roof Close Switch Sliding roof close switch signal OFF or ON OFF: Sliding roof switch not slid forward
ON: Sliding roof switch slid forward- Shade Close Switch Roof sunshade close switch signal OFF or ON OFF: Roof sunshade switch not slid forward
ON: Roof sunshade switch slid forward- Shade Open Switch Roof sunshade open switch signal OFF or ON OFF: Roof sunshade switch not slid backward
ON: Roof sunshade switch slid backward-
- Body Electrical > Sliding Sunshade > Data List
-
Tester Display Vent Switch Roof Open Switch Roof Close Switch Shade Close Switch Shade Open Switch - 50003 370 8,9,10,11,12
- OK:
The GTS display changes according to switch operation as shown in the table.
- Result:
Proceed to OK NG
OK
Click hereGeneral>INTRODUCTION>HOW TO TROUBLESHOOT ECU CONTROLLED SYSTEMS>HOW TO PROCEED WITH TROUBLESHOOTING
NG
Remove the panoramic moon roof switch (roof console box sub-assembly).
Click hereVehicle Exterior>SLIDING ROOF / CONVERTIBLE>SLIDING ROOF SWITCH ASSEMBLY>REMOVAL
Inspect the panoramic moon roof switch (roof console box sub-assembly).
Click hereVehicle Exterior>SLIDING ROOF / CONVERTIBLE>SLIDING ROOF SWITCH ASSEMBLY>INSPECTION
- Result:
Proceed to OK NG
OK
NG
Disconnect the o2 roof sunshade ECU (sliding roof drive gear assembly) connector.
Disconnect the o1 sliding roof ECU (sliding roof drive gear assembly) connector.
Disconnect the V14 panoramic moon roof switch (roof console box sub-assembly) connector.
Measure the resistance according to the value(s) in the table below.
- Standard Resistance:
Tester Connection Condition Specified Condition o2-10 (ROOF OPEN) - V14-5 (OPN) Always Below 1 Ω o2-10 (ROOF OPEN) or V14-5 (OPN) - Body ground Always 10 kΩ or higher o2-8 (ROOF CLOSE) - V14-4 (CLS) Always Below 1 Ω o2-8 (ROOF CLOSE) or V14-4 (CLS) - Body ground Always 10 kΩ or higher o2-4 (VENT) - V14-19 (B) Always Below 1 Ω o2-4 (VENT) or V14-19 (B) - Body ground Always 10 kΩ or higher o2-5 (SHADE OPEN) - V14-3 (UP) Always Below 1 Ω o2-5 (SHADE OPEN) or V14-3 (UP) - Body ground Always 10 kΩ or higher o2-9 (SHADE CLOSE) - V14-18 (DOWN) Always Below 1 Ω o2-9 (SHADE CLOSE) or V14-18 (DOWN) - Body ground Always 10 kΩ or higher o2-2 (E) - Body ground Always Below 1 Ω V14-15 (GND) - Body ground Always Below 1 Ω
- Result:
Proceed to OK NG
OK
NG
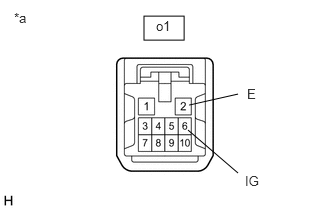
| *a | Front view of wire harness connector
(to sliding roof ECU (sliding roof drive gear assembly)) |
Disconnect the o1 sliding roof ECU (sliding roof drive gear assembly) connector.
Measure the voltage according to the value(s) in the table below.
- Standard Voltage:
Tester Connection Condition Specified Condition o1-6 (IG) - Body ground Power switch on (IG) 11 to 14 V o1-6 (IG) - Body ground Power switch off Below 1 V
Measure the resistance according to the value(s) in the table below.
- Standard Resistance:
Tester Connection Condition Specified Condition o1-2 (E) - Body ground Always Below 1 Ω
- Result:
Proceed to OK NG
OK
NG
Remove the panoramic moon roof switch (roof console box sub-assembly).
Click hereVehicle Exterior>SLIDING ROOF / CONVERTIBLE>SLIDING ROOF SWITCH ASSEMBLY>REMOVAL
Inspect the panoramic moon roof switch (roof console box sub-assembly).
Click hereVehicle Exterior>SLIDING ROOF / CONVERTIBLE>SLIDING ROOF SWITCH ASSEMBLY>INSPECTION
- Result:
Proceed to OK NG
OK
NG
Disconnect the o2 roof sunshade ECU (sliding roof drive gear assembly) connector.
Disconnect the o1 sliding roof ECU (sliding roof drive gear assembly) connector.
Disconnect the V14 panoramic moon roof switch (roof console box sub-assembly) connector.
Measure the resistance according to the value(s) in the table below.
- Standard Resistance:
Tester Connection Condition Specified Condition o1-10 (ROOF OPEN) - V14-5 (OPN) Always Below 1 Ω o1-10 (ROOF OPEN) or V14-5 (OPN) - Body ground Always 10 kΩ or higher o1-8 (ROOF CLOSE) - V14-4 (CLS) Always Below 1 Ω o1-8 (ROOF CLOSE) or V14-4 (CLS) - Body ground Always 10 kΩ or higher o1-4 (VENT) - V14-19 (B) Always Below 1 Ω o1-4 (VENT) or V14-19 (B) - Body ground Always 10 kΩ or higher o1-5 (SHADE OPEN) - V14-3 (UP) Always Below 1 Ω o1-5 (SHADE OPEN) or V14-3 (UP) - Body ground Always 10 kΩ or higher o1-9 (SHADE CLOSE) - V14-18 (DOWN) Always Below 1 Ω o1-9 (SHADE CLOSE) or V14-18 (DOWN) - Body ground Always 10 kΩ or higher o1-2 (E) - Body ground Always Below 1 Ω V14-15(GND) - Body ground Always Below 1 Ω
- Result:
Proceed to OK NG
OK
NG
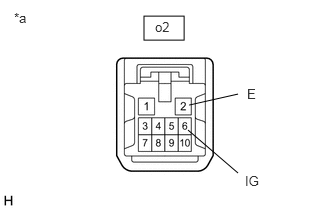
| *a | Front view of wire harness connector
(to roof sunshade ECU (sliding roof drive gear assembly)) |
Disconnect the o2 roof sunshade ECU (sliding roof drive gear assembly) connector.
Measure the voltage according to the value(s) in the table below.
- Standard Voltage:
Tester Connection Condition Specified Condition o2-6 (IG) - Body ground Power switch on (IG) 11 to 14 V o2-6 (IG) - Body ground Power switch off Below 1 V
Measure the resistance according to the value(s) in the table below.
- Standard Resistance:
Tester Connection Condition Specified Condition o2-2 (E) - Body ground Always Below 1 Ω
- Result:
Proceed to OK NG
OK
NG