NAVIGATION / MULTI INFO DISPLAY NAVIGATION SYSTEM B1324 Lost Communication with Meter B1325 Lost Communication with HUD
DESCRIPTION
These DTCs are stored when communication between the radio and display receiver assembly and combination meter assembly or headup display (meter mirror sub-assembly) is not possible.
| DTC No. | Detection Item | DTC Detection Condition | Trouble Area |
|---|---|---|---|
| B1324 | Lost Communication with Meter | CAN reception error | ·
Local bus communication line ·
Combination meter power source circuit ·
Combination meter assembly ·
Radio and display receiver assembly ·
Harness or connector ·
No. 17 junction connector |
| B1325 | Lost Communication with HUD | CAN reception error | ·
Local bus communication line ·
Headup display (meter mirror sub-assembly) power source circuit ·
Headup display (meter mirror sub-assembly) ·
Radio and display receiver assembly ·
Harness or connector ·
No. 17 junction connector |
- HINT:
-
The radio and display receiver assembly is the master unit.
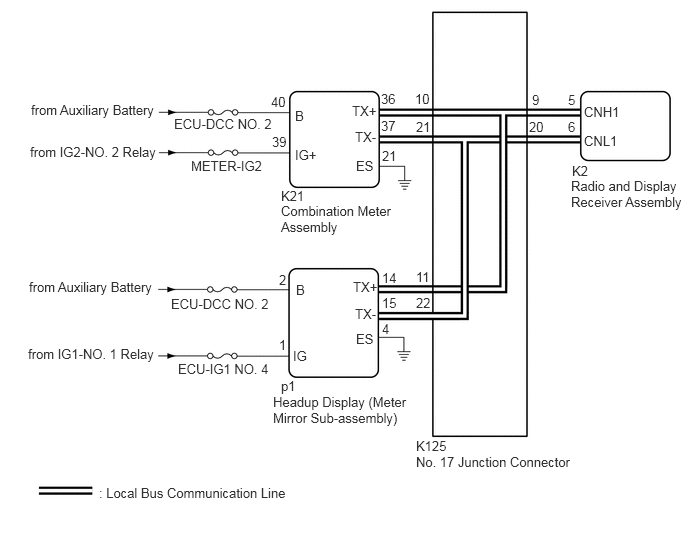
WIRING DIAGRAM
CAUTION / NOTICE / HINT
- NOTICE:
- ·
Depending on the parts that are replaced during vehicle inspection or maintenance, performing initialization, registration or calibration may be needed. Refer to Precaution for Navigation System.
·When replacing the radio and display receiver assembly, always replace it with a new one. If a radio and display receiver assembly which was installed to another vehicle is used, the following may occur:
-A communication malfunction DTC may be stored.
-The radio and display receiver assembly may not operate normally.
·Inspect the fuses for circuits related to this system before performing the following procedure.
PROCEDURE
Check for DTCs and check that no DTCs are output.
- Body Electrical > Navigation System > Trouble Codes
- 50001 212
- Result:
Result Proceed to DTC B1324 and B1325 are not output A DTC B1324 and B1325 are output B DTC B1324 is output C DTC B1325 is output D
A
Click hereGeneral>INTRODUCTION>HOW TO TROUBLESHOOT ECU CONTROLLED SYSTEMS>HOW TO PROCEED WITH TROUBLESHOOTING
B
C
D
Disconnect the cable from the negative (-) auxiliary battery terminal.
Measure the resistance according to the value(s) in the table below.
- Standard Resistance:
Tester Connection Condition Specified Condition K125-9 - K125-20 Cable disconnected from negative (-) auxiliary battery terminal 54 to 69 Ω
- Result:
Result Proceed to OK A NG (Below 54 Ω) B NG (70 Ω or higher) C
A
Click hereGeneral>INTRODUCTION>HOW TO TROUBLESHOOT ECU CONTROLLED SYSTEMS>HOW TO PROCEED WITH TROUBLESHOOTING
B
C
Disconnect the cable from the negative (-) auxiliary battery terminal.
Disconnect the K125 No. 17 junction connector.
Measure the resistance according to the value(s) in the table below.
- Standard Resistance:
Tester Connection Condition Specified Condition K125-9 - K125-20 Cable disconnected from negative (-) auxiliary battery terminal 108 to 132 Ω
- Result:
Proceed to OK NG
OK
NG
Disconnect the cable from the negative (-) auxiliary battery terminal.
Disconnect the K125 No. 17 junction connector.
Measure the resistance according to the value(s) in the table below.
- Standard Resistance:
Tester Connection Condition Specified Condition K125-10 - K125-21 Cable disconnected from negative (-) auxiliary battery terminal 108 to 132 Ω
- Result:
Proceed to OK NG
OK
NG
Disconnect the cable from the negative (-) auxiliary battery terminal.
Disconnect the K125 No. 17 junction connector.
Measure the resistance according to the value(s) in the table below.
- Standard Resistance:
Tester Connection Condition Specified Condition K125-11 - K125-22 Cable disconnected from negative (-) auxiliary battery terminal 200 Ω or higher
- Result:
Proceed to OK NG
OK
NG
Disconnect the cable from the negative (-) auxiliary battery terminal.
Disconnect the p1 headup display (meter mirror sub-assembly) connector.
Connect the K125 No. 17 junction connector.
Measure the resistance according to the value(s) in the table below.
- Standard Resistance:
Tester Connection Condition Specified Condition p1-14 (TX+) - p1-15 (TX-) Cable disconnected from negative (-) auxiliary battery terminal 54 to 69 Ω
- Result:
Proceed to OK NG
OK
NG
Disconnect the cable from the negative (-) auxiliary battery terminal.
Disconnect the K21 combination meter assembly connector.
Connect the K125 No. 17 junction connector.
Measure the resistance according to the value(s) in the table below.
- Standard Resistance:
Tester Connection Condition Specified Condition K21-36 (TX+) - K21-37 (TX-) Cable disconnected from negative (-) auxiliary battery terminal 108 to 132 Ω
- Result:
Proceed to OK NG
OK
NG
Disconnect the cable from the negative (-) auxiliary battery terminal.
Disconnect the K2 radio and display receiver assembly connector.
Connect the K125 No. 17 junction connector.
Measure the resistance according to the value(s) in the table below.
- Standard Resistance:
Tester Connection Condition Specified Condition K2-5 (CNH1) - K2-6 (CNL1) Cable disconnected from negative (-) auxiliary battery terminal 108 to 132 Ω
- Result:
Proceed to OK NG
OK
NG
Disconnect the cable from the negative (-) auxiliary battery terminal.
Disconnect the K2 radio and display receiver assembly connector.
Measure the resistance according to the value(s) in the table below.
- Standard Resistance:
Tester Connection Condition Specified Condition K2-5 (CNH1) - K2-6 (CNL1) Cable disconnected from negative (-) auxiliary battery terminal 108 to 132 Ω
- Result:
Proceed to OK NG
OK
NG
Disconnect the cable from the negative (-) auxiliary battery terminal.
Disconnect the K125 No. 17 junction connector.
Connect the K2 radio and display receiver assembly connector.
Measure the resistance according to the value(s) in the table below.
- Standard Resistance:
Tester Connection Condition Specified Condition K125-9 - K125-20 Cable disconnected from negative (-) auxiliary battery terminal 108 to 132 Ω
- Result:
Proceed to OK NG
OK
NG
Disconnect the K21 combination meter assembly connector.
Measure the resistance according to the value(s) in the table below.
- Standard Resistance:
Tester Connection Condition Specified Condition K21-21 (ES) - Body ground Always Below 1 Ω
Measure the voltage according to the value(s) in the table below.
- Standard Voltage:
Tester Connection Condition Specified Condition K21-40 (B) - Body ground Power switch off 11 to 14 V K21-39 (IG+) - Body ground Power switch on (IG) 11 to 14 V
- Result:
Proceed to OK NG
OK
NG
Disconnect the cable from the negative (-) auxiliary battery terminal.
Disconnect the K125 No. 17 junction connector.
Connect the K21 combination meter assembly connector.
Measure the resistance according to the value(s) in the table below.
- Standard Resistance:
Tester Connection Condition Specified Condition K125-10 - K125-21 Cable disconnected from negative (-) auxiliary battery terminal 108 to 132 Ω
- Result:
Proceed to OK NG
OK
NG
Disconnect the cable from the negative (-) auxiliary battery terminal.
Disconnect the K125 No. 17 junction connector.
Measure the resistance according to the value(s) in the table below.
- Standard Resistance:
Tester Connection Condition Specified Condition K125-9 - K125-20 Cable disconnected from negative (-) auxiliary battery terminal 108 to 132 Ω
- Result:
Proceed to OK NG
OK
NG
Disconnect the cable from the negative (-) auxiliary battery terminal.
Disconnect the K2 radio and display receiver assembly connector.
Connect the K125 No. 17 junction connector.
Measure the resistance according to the value(s) in the table below.
- Standard Resistance:
Tester Connection Condition Specified Condition K2-5 (CNH1) - K2-6 (CNL1) Cable disconnected from negative (-) auxiliary battery terminal 108 to 132 Ω
- Result:
Proceed to OK NG
OK
NG
Disconnect the cable from the negative (-) auxiliary battery terminal.
Disconnect the K21 combination meter assembly connector.
Connect the K125 No. 17 junction connector.
Measure the resistance according to the value(s) in the table below.
- Standard Resistance:
Tester Connection Condition Specified Condition K21-36 (TX+) - K21-37 (TX-) Cable disconnected from negative (-) auxiliary battery terminal 108 to 132 Ω
- Result:
Proceed to OK NG
OK
NG
Disconnect the p1 headup display (meter mirror sub-assembly) connector.
Measure the resistance according to the value(s) in the table below.
- Standard Resistance:
Tester Connection Condition Specified Condition p1-15 (TX-) - Body ground Always Below 1 Ω
Measure the voltage according to the value(s) in the table below.
- Standard Voltage:
Tester Connection Condition Specified Condition p1-2 (B) - Body ground Power switch off 11 to 14 V p1-1 (IG) - Body ground Power switch on (IG) 11 to 14 V
- Result:
Proceed to OK NG
OK
NG
Disconnect the cable from the negative (-) auxiliary battery terminal.
Disconnect the K125 No. 17 junction connector.
Connect the p1 headup display (meter mirror sub-assembly) connector.
Measure the resistance according to the value(s) in the table below.
- Standard Resistance:
Tester Connection Condition Specified Condition K125-11 - K125-22 Cable disconnected from negative (-) auxiliary battery terminal 200 Ω or higher
- Result:
Proceed to OK NG
OK
NG
Disconnect the cable from the negative (-) auxiliary battery terminal.
Disconnect the K125 No. 17 junction connector.
Measure the resistance according to the value(s) in the table below.
- Standard Resistance:
Tester Connection Condition Specified Condition K125-9 - K125-20 Cable disconnected from negative (-) auxiliary battery terminal 108 to 132 Ω
- Result:
Proceed to OK NG
OK
NG
Disconnect the cable from the negative (-) auxiliary battery terminal.
Disconnect the K2 radio and display receiver assembly connector.
Connect the K125 No. 17 junction connector.
Measure the resistance according to the value(s) in the table below.
- Standard Resistance:
Tester Connection Condition Specified Condition K2-5 (CNH1) - K2-6 (CNL1) Cable disconnected from negative (-) auxiliary battery terminal 108 to 132 Ω
- Result:
Proceed to OK NG
OK
NG
Disconnect the cable from the negative (-) auxiliary battery terminal.
Disconnect the p1 headup display (meter mirror sub-assembly) connector.
Connect the K125 No. 17 junction connector.
Measure the resistance according to the value(s) in the table below.
- Standard Resistance:
Tester Connection Condition Specified Condition p1-14 (TX+) - p1-15 (TX-) Cable disconnected from negative (-) auxiliary battery terminal 54 to 69 Ω
- Result:
Proceed to OK NG
OK
NG