P710 HYBRID TRANSMISSION / TRANSAXLE TRANSMISSION CONTROL CABLE INSTALLATION
PROCEDURE

 33820B
1.INSTALL TRANSMISSION CONTROL CABLE ASSEMBLY
- NOTICE:
-
Before adjusting the transmission control cable assembly, check that the shift lever position sensor and shift lever are in N.
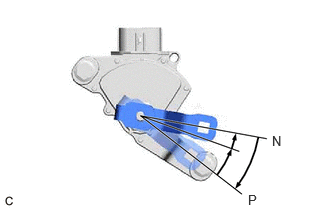
Turn the control shaft lever clockwise until it stops, then turn it counterclockwise 2 notches.
Engage the 2 claws to install a new clip to the transmission control cable assembly.
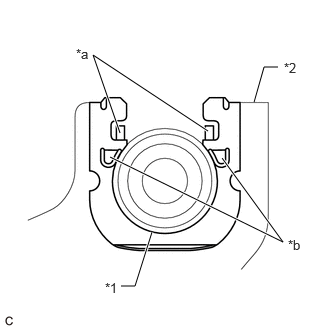
| *1 | Transmission Control Cable Assembly |
| *2 | No. 1 Transmission Control Cable Bracket |
| *a | Claw (A) |
| *b | Claw (B) |
Using a screwdriver, engage the 4 claws and install the transmission control cable assembly to the No. 1 transmission control cable bracket.
- NOTICE:
- ·
Make sure that the claws (A) of the clip are securely engaged in the grooves of the bracket.
·Make sure that the transmission control cable assembly is securely installed inside of the claws (B) of the clip.
Connect the transmission control cable assembly to the control shaft lever with the nut.
- Torque:
- 12 N*m (122 kgf*cm, 9 ft.*lbf)
Connect the transmission control cable assembly to the inverter with converter assembly with the 3 bolts.
- Torque:
- 12 N*m (122 kgf*cm, 9 ft.*lbf)
Connect the transmission control cable assembly to the vehicle body with the 2 nuts.
- Torque:
- 6.0 N*m (61 kgf*cm, 53 in.*lbf)
Pass the transmission control cable assembly into the vehicle and install the transmission control cable assembly to the vehicle body with the 2 nuts.
- Torque:
- 6.0 N*m (61 kgf*cm, 53 in.*lbf)
82111
2.CONNECT ENGINE ROOM MAIN WIRE
58861B
3.INSTALL NO. 1 CONSOLE BOX DUCT
Install the No. 1 console box duct.
4.INSTALL TRANSMISSION FLOOR SHIFT ASSEMBLY
58152A
5.INSTALL FRONT LOWER NO. 1 FLOOR HEAT INSULATOR
Install the front lower No. 1 floor heat insulator to the vehicle body with the 2 nuts.
- Torque:
- 4.9 N*m (50 kgf*cm, 43 in.*lbf)
17410
6.INSTALL FRONT EXHAUST PIPE ASSEMBLY
7.INSTALL AIR CLEANER ASSEMBLY WITH AIR CLEANER HOSE
12601B
8.INSTALL NO. 1 ENGINE COVER SUB-ASSEMBLY
17750A
9.INSTALL INLET AIR CLEANER ASSEMBLY
53295E
10.INSTALL COOL AIR INTAKE DUCT SEAL
11.INSPECT SHIFT LEVER POSITION
12.ADJUST SHIFT LEVER POSITION