HYBRID / BATTERY CONTROL HYBRID BATTERY SYSTEM(for LITHIUM-ION BATTERY) P1AC49E Hybrid/EV Battery Stack 1 Current Interrupt Device Stuck On P1AC59E Hybrid/EV Battery Stack 2 Current Interrupt Device Stuck On
DESCRIPTION
Refer to the description for DTC P1AC413.
| DTC No. | Detection Item | DTC Detection Condition | Trouble Area | MIL | Warning Indicate |
|---|---|---|---|---|---|
| P1AC49E | Hybrid/EV Battery Stack 1 Current Interrupt Device Stuck On | Conductivity returns after high voltage circuit disconnected by CID operation.
(1 trip detection logic) |
·
No. 1 HV supply stack sub-assembly ·
Battery ECU assembly |
Comes on | Master Warning Light:
Comes on |
| P1AC59E | Hybrid/EV Battery Stack 2 Current Interrupt Device Stuck On | Conductivity returns after high voltage circuit disconnected by CID operation.
(1 trip detection logic) |
·
No. 2 HV supply stack sub-assembly ·
Battery ECU assembly |
Comes on | Master Warning Light:
Comes on |
| DTC No. | Data List |
|---|---|
| P1AC49E | ·
Hybrid/EV Battery Cell 1 to 70 Voltage ·
Hybrid/EV Battery Cell 1 to 70 Internal Resistance |
| P1AC59E |
CONFIRMATION DRIVING PATTERN
- HINT:
-
After repair has been completed, clear the DTC and then check that the vehicle has returned to normal by performing the following All Readiness check procedure.
Connect the GTS to the DLC3.
Turn the power switch on (IG) and turn the GTS on.
Clear the DTCs (even if no DTCs are stored, perform the clear DTC procedure).
Turn the power switch off and wait for 2 minutes or more.
Drive the vehicle on urban roads for approximately 10 minutes.
Enter the following menus: Powertrain / HV Battery / Utility / All Readiness.
Check the DTC judgment result.
- HINT:
- ·
If the judgment result shows NORMAL, the system is normal.
·If the judgment result shows ABNORMAL, the system has a malfunction.
·If the judgment result shows INCOMPLETE or N/A, perform driving pattern again.
WIRING DIAGRAM
Refer to the wiring diagram for DTC P1A001C.
CAUTION / NOTICE / HINT
- CAUTION:
- ·
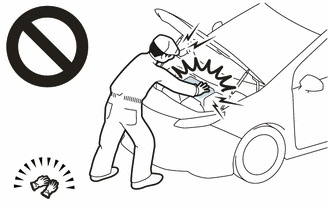
Before the following operations are conducted, take precautions to prevent electric shock by turning the power switch off, wearing insulated gloves, and removing the service plug grip from HV battery.
-Inspecting the high-voltage system
-Disconnecting the low voltage connector of the inverter with converter assembly
-Disconnecting the low voltage connector of the HV battery
·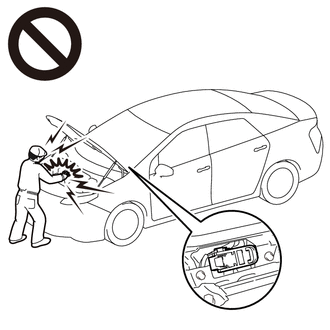
To prevent electric shock, make sure to remove the service plug grip to cut off the high voltage circuit before servicing the vehicle.
·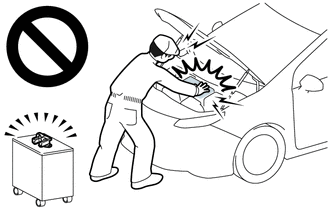
After removing the service plug grip from the HV battery, put it in your pocket to prevent other technicians from accidentally reconnecting it while you are working on the high-voltage system.
·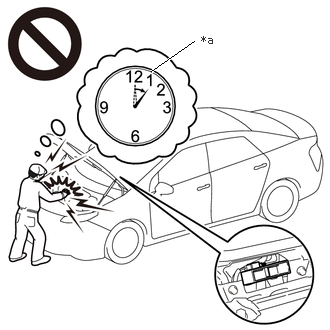 1.573,0.74 2.021,0.427 true 2.094,0.344 2.354,0.51 0.26,0.167 10 false *a
*a Without waiting for 10 minutes
After removing the service plug grip, wait for at least 10 minutes before touching any of the high-voltage connectors or terminals. After waiting for 10 minutes, check the voltage at the terminals in the inspection point in the inverter with converter assembly. The voltage should be 0 V before beginning work.
- HINT:
-
Waiting for at least 10 minutes is required to discharge the high-voltage capacitor inside the inverter with converter assembly.
·Make sure to insulate the high-voltage connectors and terminals of the HV battery with insulating tape after removing it.
If the HV battery stored without insulating the connectors and terminals, electric shock or fire may result.
·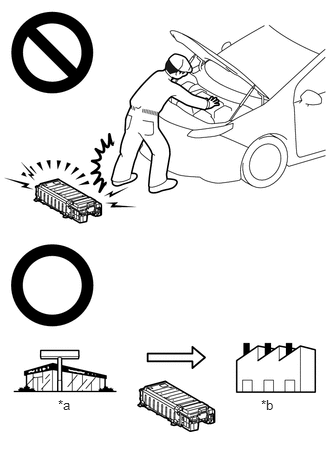 0.604,4.135 0.917,4.333 0.313,0.198 10 false *a 2.719,4.135 3.031,4.333 0.313,0.198 10 false *b
*a Dealer *b Battery Collection Agent
When disposing of an HV battery, make sure to return it through an authorized collection agent who is capable of handling it safely. If the HV battery is returned via the manufacturer specified route, it will be returned properly and in a safe manner by an authorized collection agent.
-Accidents such as electric shock may result if the HV battery is disposed of improperly or abandoned. Therefore, make sure to return all HV batteries through an authorized collection agent.
·Before returning the HV battery, make sure to perform a recovery inspection.
·Before returning the HV supply stack sub-assembly, make sure to perform a recovery inspection.
·Make a note of the output DTCs as some of them may be necessary for recovery inspection of the HV battery and HV supply stack sub-assemblies.
·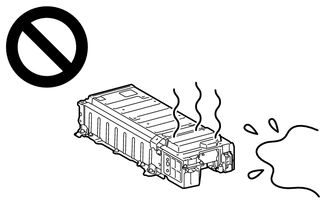
After removing the HV battery, keep it away from water. Exposure to water may cause the HV battery to produce heat, resulting in a fire.
- NOTICE:
-
After turning the power switch off, waiting time may be required before disconnecting the cable from the negative (-) auxiliary battery terminal. Therefore, make sure to read the disconnecting the cable from the negative (-) auxiliary battery terminal notices before proceeding with work.
-
Click hereGeneral>INTRODUCTION>REPAIR INSTRUCTION>PRECAUTION
PROCEDURE
Connect the GTS to the DLC3.
Turn the power switch on (IG).
Enter the following menus: Powertrain / HV Battery and Hybrid Control / Trouble Codes.
Check for DTCs.
- Powertrain > HV Battery > Trouble Codes
- 50001 398
- Powertrain > Hybrid Control > Trouble Codes
- 50001 397
- Result:
Result Proceed to "P1AC49E or P1AC59E" only is output, or DTCs except the ones in the table below are also output. A DTCs of hybrid battery system in the table below are output. B DTCs of hybrid control system in the table below are output. C
| System | Relevant DTC | |
|---|---|---|
| Hybrid battery system | P060A47 | Hybrid/EV Battery Energy Control Module Monitoring Processor Watchdog / Safety MCU Failure |
| P060B49 | Hybrid/EV Battery Energy Control Module A/D Processing Internal Electronic Failure | |
| P060687 | Hybrid/EV Battery Energy Control Module Processor to Monitoring Processor Missing Message | |
| Hybrid control system | P0A1F94 | Hybrid/EV Battery Energy Control Module Unexpected Operation |
Turn the power switch off.
A
B
C
Check the DTCs that were output when the vehicle was brought to the workshop.
- Result:
Result Proceed to "P1AC49E" is also output. A "P1AC59E" is also output. B
A
B
- CAUTION:
-
Be sure to wear insulated gloves and protective goggles.
Check that the service plug grip is not installed.
- NOTICE:
-
After removing the service plug grip, do not turn the power switch on (READY), unless instructed by the repair manual because this may cause a malfunction.
Remove the No. 1 HV battery hose.
Click hereEngine / Hybrid System>HYBRID / BATTERY CONTROL>BATTERY ECU (for LITHIUM-ION BATTERY)>REMOVAL
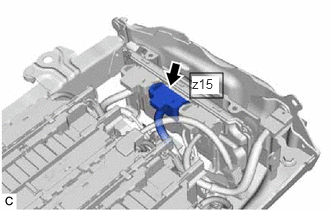
Check the connector connections and contact pressure of the relevant terminals for the battery ECU assembly.
- OK:
The connector is connected securely and there are no contact problems.
- Result:
Result Proceed to OK A Not connected securely The terminals are not damaged or corroded B Not connected securely The terminals are damaged or corroded C
Install the No. 1 HV battery hose.
A
B
C
Click hereEngine / Hybrid System>HYBRID / BATTERY CONTROL>HV BATTERY STACK (for LITHIUM-ION BATTERY)>REMOVAL
- NOTICE:
-
Make sure to use tester probes with a diameter of approximately 0.5 mm (0.0197 in.) when measuring the voltage.
Remove the battery ECU assembly.
Click hereEngine / Hybrid System>HYBRID / BATTERY CONTROL>BATTERY ECU (for LITHIUM-ION BATTERY)>REMOVAL
Measure the voltage according to the value(s) in the table below.
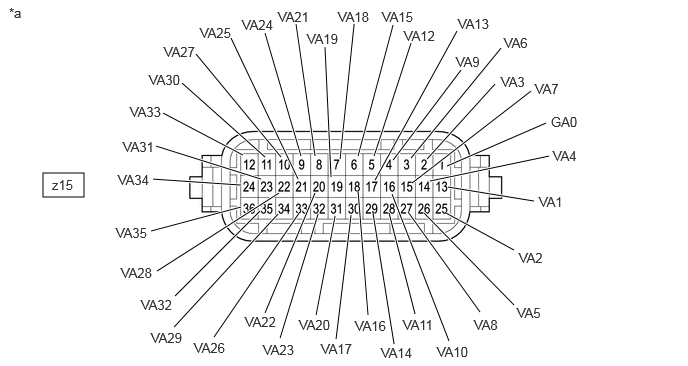
| *a | Component without harness connected
(Battery ECU Assembly) |
- | - |
- Standard Voltage:
HV Battery Cell Tester Connection
(Tester Probe Polarity)Condition Specified Condition 1 z15-1 (GA0) (+) - z15-13 (VA1) (-) Always 0.3 to 1.0 V 2 z15-13 (VA1) (+) - z15-25 (VA2) (-) Always 0.3 to 1.0 V 3 z15-25 (VA2) (+) - z15-2 (VA3) (-) Always 0.3 to 1.0 V 4 z15-2 (VA3) (+) - z15-14 (VA4) (-) Always 0.3 to 1.0 V 5 z15-14 (VA4) (+) - z15-26 (VA5) (-) Always 0.3 to 1.0 V 6 z15-26 (VA5) (+) - z15-3 (VA6) (-) Always 0.3 to 1.0 V 7 z15-3 (VA6) (+) - z15-15 (VA7) (-) Always 0.3 to 1.0 V 8 z15-15 (VA7) (+) - z15-27 (VA8) (-) Always 0.3 to 1.0 V 9 z15-27 (VA8) (+) - z15-4 (VA9) (-) Always 0.3 to 1.0 V 10 z15-4 (VA9) (+) - z15-16 (VA10) (-) Always 0.3 to 1.0 V 11 z15-16 (VA10) (+) - z15-28 (VA11) (-) Always 0.3 to 1.0 V 12 z15-28 (VA11) (+) - z15-5 (VA12) (-) Always 0.3 to 1.0 V 13 z15-5 (VA12) (+) - z15-17 (VA13) (-) Always 0.3 to 1.0 V 14 z15-17 (VA13) (+) - z15-29 (VA14) (-) Always 0.3 to 1.0 V 15 z15-29 (VA14) (+) - z15-6 (VA15) (-) Always 0.3 to 1.0 V 16 z15-6 (VA15) (+) - z15-18 (VA16) (-) Always 0.3 to 1.0 V 17 z15-18 (VA16) (+) - z15-30 (VA17) (-) Always 0.3 to 1.0 V 18 z15-30 (VA17) (+) - z15-7 (VA18) (-) Always 0.3 to 1.0 V 19 z15-7 (VA18) (+) - z15-19 (VA19) (-) Always 0.3 to 1.0 V 20 z15-19 (VA19) (+) - z15-31 (VA20) (-) Always 0.3 to 1.0 V 21 z15-31 (VA20) (+) - z15-8 (VA21) (-) Always 0.3 to 1.0 V 22 z15-8 (VA21) (+) - z15-20 (VA22) (-) Always 0.3 to 1.0 V 23 z15-20 (VA22) (+) - z15-32 (VA23) (-) Always 0.3 to 1.0 V 24 z15-32 (VA23) (+) - z15-9 (VA24) (-) Always 0.3 to 1.0 V 25 z15-9 (VA24) (+) - z15-21 (VA25) (-) Always 0.3 to 1.0 V 26 z15-21 (VA25) (+) - z15-33 (VA26) (-) Always 0.3 to 1.0 V 27 z15-33 (VA26) (+) - z15-10 (VA27) (-) Always 0.3 to 1.0 V 28 z15-10 (VA27) (+) - z15-22 (VA28) (-) Always 0.3 to 1.0 V 29 z15-22 (VA28) (+) - z15-34 (VA29) (-) Always 0.3 to 1.0 V 30 z15-34 (VA29) (+) - z15-11 (VA30) (-) Always 0.3 to 1.0 V 31 z15-11 (VA30) (+) - z15-23 (VA31) (-) Always 0.3 to 1.0 V 32 z15-23 (VA31) (+) - z15-35 (VA32) (-) Always 0.3 to 1.0 V 33 z15-35 (VA32) (+) - z15-12 (VA33) (-) Always 0.3 to 1.0 V 34 z15-12 (VA33) (+) - z15-24 (VA34) (-) Always 0.3 to 1.0 V 35 z15-24 (VA34) (+) - z15-36 (VA35) (-) Always 0.3 to 1.0 V
- NOTICE:
- ·
Make sure to check the polarity of each terminal (positive (+) or negative (-)) before connecting a tester.
·Be sure to set the toyota electrical tester to diode range when performing this test.
·Read the voltage after the value has stabilized.
·In order to avoid damaging the terminals of the battery ECU assembly, make sure to use tester probes with a diameter of approximately 0.5 mm (0.0197 in.) when measuring the voltage of the battery ECU assembly.
- Result:
Result Proceed to The voltage between the terminals is 0.3 to 1.0 V. A Other than above B
Install the battery ECU assembly.
A
Click hereEngine / Hybrid System>HYBRID / BATTERY CONTROL>HV BATTERY STACK (for LITHIUM-ION BATTERY)>REMOVAL
B
Click hereEngine / Hybrid System>HYBRID / BATTERY CONTROL>HV BATTERY STACK (for LITHIUM-ION BATTERY)>REMOVAL
- Result:
Proceed to NEXT
NEXT
Click hereEngine / Hybrid System>HYBRID / BATTERY CONTROL>BATTERY ECU (for LITHIUM-ION BATTERY)>REMOVAL
- CAUTION:
-
Be sure to wear insulated gloves and protective goggles.
Check that the service plug grip is not installed.
- NOTICE:
-
After removing the service plug grip, do not turn the power switch on (READY), unless instructed by the repair manual because this may cause a malfunction.
Remove the No. 1 HV battery hose.
Click hereEngine / Hybrid System>HYBRID / BATTERY CONTROL>BATTERY ECU (for LITHIUM-ION BATTERY)>REMOVAL
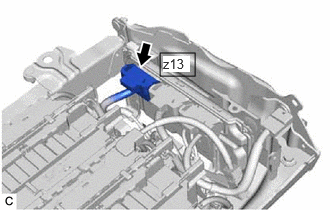
Check the connector connections and contact pressure of the relevant terminals for the battery ECU assembly.
- OK:
The connector is connected securely and there are no contact problems.
- Result:
Result Proceed to OK A Not connected securely The terminals are not damaged or corroded B Not connected securely The terminals are damaged or corroded C
Install the No. 1 HV battery hose.
A
B
C
Click hereEngine / Hybrid System>HYBRID / BATTERY CONTROL>HV BATTERY STACK (for LITHIUM-ION BATTERY)>REMOVAL
- NOTICE:
-
Make sure to use tester probes with a diameter of approximately 0.5 mm (0.0197 in.) when measuring the voltage.
Remove the battery ECU assembly.
Click hereEngine / Hybrid System>HYBRID / BATTERY CONTROL>BATTERY ECU (for LITHIUM-ION BATTERY)>REMOVAL
Measure the voltage according to the value(s) in the table below.
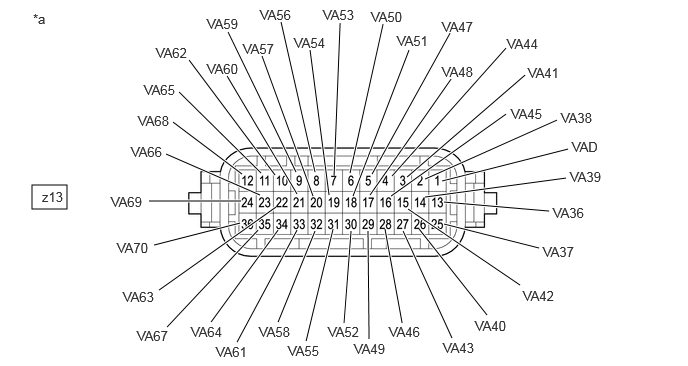
| *a | Component without harness connected
(Battery ECU Assembly) |
- | - |
- Standard Voltage:
HV Battery Cell Tester Connection
(Tester Probe Polarity)Condition Specified Condition 36 z13-1 (VAD) (+) - z13-13 (VA36) (-) Always 0.3 to 1.0 V 37 z13-13 (VA36) (+) - z13-25 (VA37) (-) Always 0.3 to 1.0 V 38 z13-25 (VA37) (+) - z13-2 (VA38) (-) Always 0.3 to 1.0 V 39 z13-2 (VA38) (+) - z13-14 (VA39) (-) Always 0.3 to 1.0 V 40 z13-14 (VA39) (+) - z13-26 (VA40) (-) Always 0.3 to 1.0 V 41 z13-26 (VA40) (+) - z13-3 (VA41) (-) Always 0.3 to 1.0 V 42 z13-3 (VA41) (+) - z13-15 (VA42) (-) Always 0.3 to 1.0 V 43 z13-15 (VA42) (+) - z13-27 (VA43) (-) Always 0.3 to 1.0 V 44 z13-27 (VA43) (+) - z13-4 (VA44) (-) Always 0.3 to 1.0 V 45 z13-4 (VA44) (+) - z13-16 (VA45) (-) Always 0.3 to 1.0 V 46 z13-16 (VA45) (+) - z13-28 (VA46) (-) Always 0.3 to 1.0 V 47 z13-28 (VA46) (+) - z13-5 (VA47) (-) Always 0.3 to 1.0 V 48 z13-5 (VA47) (+) - z13-17 (VA48) (-) Always 0.3 to 1.0 V 49 z13-17 (VA48) (+) - z13-29 (VA49) (-) Always 0.3 to 1.0 V 50 z13-29 (VA49) (+) - z13-6 (VA50) (-) Always 0.3 to 1.0 V 51 z13-6 (VA50) (+) - z13-18 (VA51) (-) Always 0.3 to 1.0 V 52 z13-18 (VA51) (+) - z13-30 (VA52) (-) Always 0.3 to 1.0 V 53 z13-30 (VA52) (+) - z13-7 (VA53) (-) Always 0.3 to 1.0 V 54 z13-7 (VA53) (+) - z13-19 (VA54) (-) Always 0.3 to 1.0 V 55 z13-19 (VA54) (+) - z13-31 (VA55) (-) Always 0.3 to 1.0 V 56 z13-31 (VA55) (+) - z13-8 (VA56) (-) Always 0.3 to 1.0 V 57 z13-8 (VA56) (+) - z13-20 (VA57) (-) Always 0.3 to 1.0 V 58 z13-20 (VA57) (+) - z13-32 (VA58) (-) Always 0.3 to 1.0 V 59 z13-32 (VA58) (+) - z13-9 (VA59) (-) Always 0.3 to 1.0 V 60 z13-9 (VA59) (+) - z13-21 (VA60) (-) Always 0.3 to 1.0 V 61 z13-21 (VA60) (+) - z13-33 (VA61) (-) Always 0.3 to 1.0 V 62 z13-33 (VA61) (+) - z13-10 (VA62) (-) Always 0.3 to 1.0 V 63 z13-10 (VA62) (+) - z13-22 (VA63) (-) Always 0.3 to 1.0 V 64 z13-22 (VA63) (+) - z13-34 (VA64) (-) Always 0.3 to 1.0 V 65 z13-34 (VA64) (+) - z13-11 (VA65) (-) Always 0.3 to 1.0 V 66 z13-11 (VA65) (+) - z13-23 (VA66) (-) Always 0.3 to 1.0 V 67 z13-23 (VA66) (+) - z13-35 (VA67) (-) Always 0.3 to 1.0 V 68 z13-35 (VA67) (+) - z13-12 (VA68) (-) Always 0.3 to 1.0 V 69 z13-12 (VA68) (+) - z13-24 (VA69) (-) Always 0.3 to 1.0 V 70 z13-24 (VA69) (+) - z13-36 (VA70) (-) Always 0.3 to 1.0 V
- NOTICE:
- ·
Make sure to check the polarity of each terminal (positive (+) or negative (-)) before connecting a tester.
·Be sure to set the toyota electrical tester to diode range when performing this test.
·Read the voltage after the value has stabilized.
·In order to avoid damaging the terminals of the battery ECU assembly, make sure to use tester probes with a diameter of approximately 0.5 mm (0.0197 in.) when measuring the voltage of the battery ECU assembly.
- Result:
Result Proceed to The voltage between the terminals is 0.3 to 1.0 V. A Other than above B
Install the battery ECU assembly.
A
Click hereEngine / Hybrid System>HYBRID / BATTERY CONTROL>HV BATTERY STACK (for LITHIUM-ION BATTERY)>REMOVAL
B
Click hereEngine / Hybrid System>HYBRID / BATTERY CONTROL>HV BATTERY STACK (for LITHIUM-ION BATTERY)>REMOVAL
- Result:
Proceed to NEXT
NEXT
Click hereEngine / Hybrid System>HYBRID / BATTERY CONTROL>BATTERY ECU (for LITHIUM-ION BATTERY)>REMOVAL