FRONT SUSPENSION FRONT SUSPENSION MEMBER REMOVAL
CAUTION / NOTICE / HINT
The necessary procedures (adjustment, calibration, initialization, or registration) that must be performed after parts are removed and installed, or replaced during front frame assembly removal/installation are shown below.
| Replaced Part or Performed Procedure | Necessary Procedure | Effect/Inoperative Function when Necessary Procedure not Performed | Link |
|---|---|---|---|
|
*: When performing learning using the GTS Click here( |
|||
| Auxiliary battery terminal is disconnected/reconnected | Perform steering sensor zero point calibration | Lane Departure Alert System (w/ Steering Control) | ( ) |
| Parking Support Brake System* | |||
| Pre-collision System | |||
| Memorize steering angle neutral point | Parking Assist Monitor System | ()
|
|
| Replacement of ECM | Vehicle Identification Number (VIN) or frame number registration | MIL illuminates | w/ Canister Pump Module:()
w/o Canister Pump Module:( )
|
·
Replacement of engine assembly ·
Gas leak from exhaust system is repaired ·
Replacement of air fuel ratio sensor (sensor 2) |
Inspection after repair | ·
Poor idle, etc. ·
Engine start function, etc. |
w/ Canister Pump Module:()
w/o Canister Pump Module: ( )
|
| Replacement of inverter with converter assembly | Resolver learning | ·
DTCs are stored ·
Slight vibration at a vehicle speed of 5 km/h (3 mph) or less ·
Shock or vibration during acceleration |
()for Nickel Metal Hydride Battery
( )for Lithium-ion Battery
|
| Replacement of hybrid vehicle transaxle assembly | ·
Resolver learning ·
Initialize resolver |
||
| Suspension, tires, etc.
(The vehicle height changes because of suspension or tire replacement) |
Rear television camera assembly optical axis (Back camera position setting) | Parking Assist Monitor System | ()
|
·
Suspension, tires, etc. (The vehicle height changes because of suspension or tire replacement) ·
Replacement of front bumper assembly |
·
Measure ultrasonic sensor detection angle ·
Ultrasonic sensor detection angle registration |
Parking Support Brake System | ()
|
| Replacement of headlight ECU sub-assembly LH | ·
Synchronize the vehicle information ·
Perform headlight ECU sub-assembly LH initialization |
Lighting System (EXT) (w/ Automatic Headlight Beam Level Control System) | ()
|
| Suspension, tires, etc.
(The vehicle height changes because of suspension or tire replacement) |
Perform headlight ECU sub-assembly LH initialization | ||
| Front wheel alignment adjustment | 1.
Clear zero point calibration data. 2.
Perform yaw rate and acceleration sensor zero point calibration. |
·
DTCs are stored ·
ABS warning light illuminates ·
Brake warning light / yellow (minor malfunction) illuminates ·
Slip indicator light illuminates ·
VSC disabled or malfunctions |
()
|
| Rack and pinion power steering gear assembly | ·
Perform torque sensor zero point calibration ·
Assist Map Writing |
·
DTCs are output ·
Steering effort different between turning steering wheel left and right ·
EPS warning light illuminates |
()
|
PROCEDURE

 1.REMOVE ENGINE ASSEMBLY WITH TRANSAXLE
23825
2.REMOVE FUEL DELIVERY GUARD
3.INSTALL ENGINE HANGER
45319
4.REMOVE STEERING GEAR HEAT INSULATOR (for LHD)
5.DISCONNECT WIRE HARNESS
for LHD: Click hereSteering>STEERING GEAR / LINKAGE>STEERING GEAR>REMOVAL
for RHD: Click hereSteering>STEERING GEAR / LINKAGE>STEERING GEAR>REMOVAL
6.REMOVE FRONT FRAME ASSEMBLY
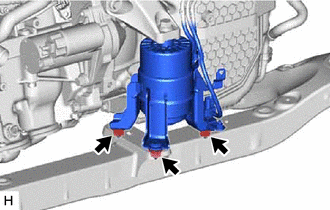
Remove the 3 nuts and separate the front engine mounting insulator from the front frame assembly.
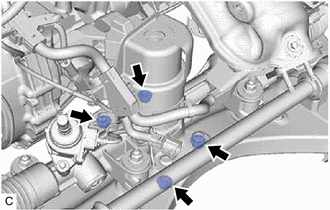
Remove the 4 nuts and separate the rear engine mounting insulator from the front frame assembly.
7.REMOVE FRONT STABILIZER BAR WITH BRACKET
44250
8.REMOVE RACK AND PINION POWER STEERING GEAR ASSEMBLY
48069
9.REMOVE FRONT LOWER NO. 1 SUSPENSION ARM SUB-ASSEMBLY LH
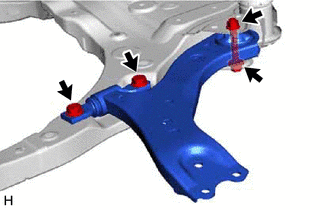
Remove the 3 bolts, nut and front lower No. 1 suspension arm sub-assembly LH from the front frame assembly.
- NOTICE:
-
Because the nut has its own stopper, do not turn the nut. Loosen the bolt with the nut secured.
Remove the front lower arm bushing stopper from the front lower No. 1 suspension arm sub-assembly LH.
48068
10.REMOVE FRONT LOWER NO. 1 SUSPENSION ARM SUB-ASSEMBLY RH
- HINT:
-
Perform the same procedure as for the LH side.
17572B
11.REMOVE NO. 2 EXHAUST PIPE SUPPORT BRACKET
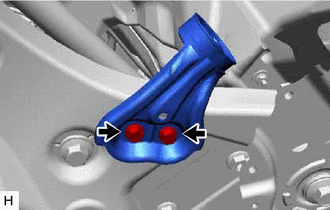
Remove the 2 bolts and No. 2 exhaust pipe support bracket from the front frame assembly.
52213A
12.REMOVE FRONT SUSPENSION MEMBER BODY MOUNTING FRONT STOPPER
Remove the 2 front suspension member body mounting front stoppers from the front frame assembly.
52216B
13.REMOVE FRONT SUSPENSION MEMBER BODY MOUNTING REAR STOPPER
Remove the 2 front suspension member body mounting rear stoppers from the front frame assembly.
52211J
14.REMOVE FRONT SUSPENSION MEMBER BODY MOUNTING FRONT CUSHION (for LH Side)
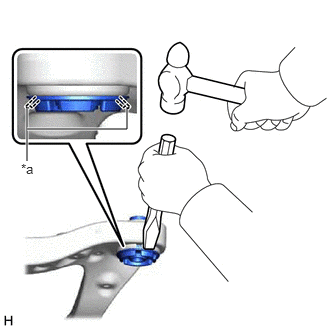
| *a | Flange |
Using a chisel and hammer, kink the flange of the front suspension member body mounting front cushion as shown in the illustration.
Apply lubricant to the contact surfaces of the front suspension member body mounting front cushion.
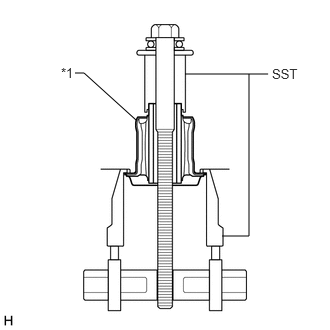
| *1 | Front Suspension Member Body Mounting Front Cushion |
Install SST as shown in the illustration.
- SST
- 09830-10010 (09830-01010, 09830-01040, 09830-01050)
09950-40011 (09951-04020, 09952-04010, 09954-04010, 09955-04011, 09958-04011)
- NOTICE:
-
Apply molybdenum grease to the threads and tip of the SST center bolt before use.
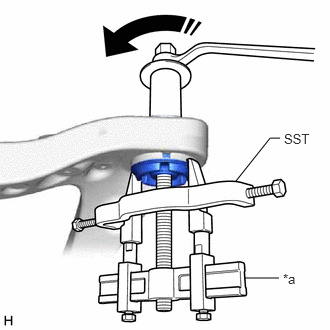
| *a | Hold |

|
Turn |
Turn the SST center bolt as shown in the illustration to create a clearance between the front suspension member body mounting front cushion and the front frame assembly.
While applying lubricant to the front suspension member body mounting front cushion through the clearance, gradually remove the front suspension member body mounting front cushion.
- NOTICE:
- ·
Tighten SST slowly and evenly.
·Be careful as the mounting cushion may fly out.
·The mounting cushion cannot be reused.
52211J
15.REMOVE FRONT SUSPENSION MEMBER BODY MOUNTING FRONT CUSHION (for RH Side)
- HINT:
-
Perform the same procedure as for the LH side.
52217E
16.REMOVE FRONT SUSPENSION MEMBER BODY MOUNTING REAR CUSHION LH
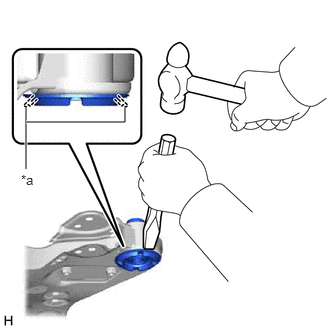
| *a | Flange |
Using a chisel and hammer, kink the flange of the front suspension member body mounting rear cushion LH as shown in the illustration.
Apply lubricant to the contact surfaces of the front suspension member body mounting rear cushion LH.
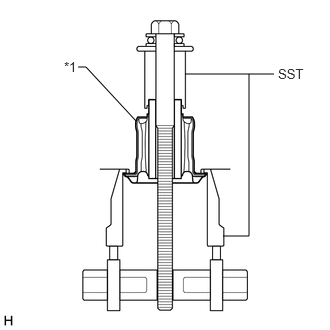
| *1 | Front Suspension Member Body Mounting Rear Cushion LH |
Install SST as shown in the illustration.
- SST
- 09830-10010 (09830-01010, 09830-01040, 09830-01050)
09950-40011 (09951-04020, 09952-04010, 09954-04010, 09955-04011, 09958-04011)
- NOTICE:
-
Apply molybdenum grease to the threads and tip of the SST center bolt before use.
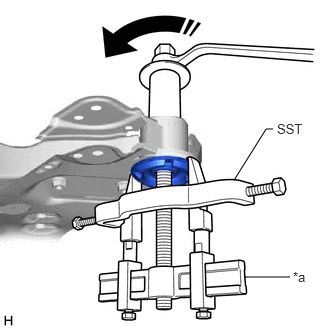
| *a | Hold |
|
|
Turn |
Turn the SST center bolt as shown in the illustration to create a clearance between the front suspension member body mounting rear cushion LH and the front frame assembly.
While applying lubricant to the front suspension member body mounting rear cushion LH through the clearance, gradually remove the front suspension member body mounting rear cushion LH.
- NOTICE:
- ·
Tighten SST slowly and evenly.
·Be careful as the mounting cushion may fly out.
·The mounting cushion cannot be reused.
52215
17.REMOVE FRONT SUSPENSION MEMBER BODY MOUNTING REAR CUSHION
- HINT:
-
Perform the same procedure as for the front suspension member body mounting rear cushion LH.
18.REMOVE HOLE PLUG
Remove the 7 hole plugs from the front frame assembly.
- HINT:
-
There are 2 different shapes of hole plug.
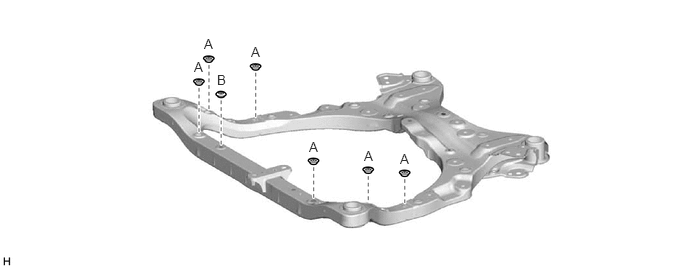
19.REMOVE BOLT
Remove the 2 bolts from the front frame assembly.