1HZ FUEL FUEL INJECTION PUMP ADJUSTMENT
PROCEDURE

 22100
1.REMOVE INJECTION PUMP
2.REMOVE FUEL PIPES
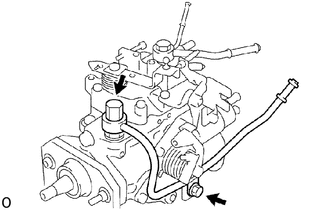
Remove the cap nut, bolt, fuel inlet pipe and 2 gaskets.
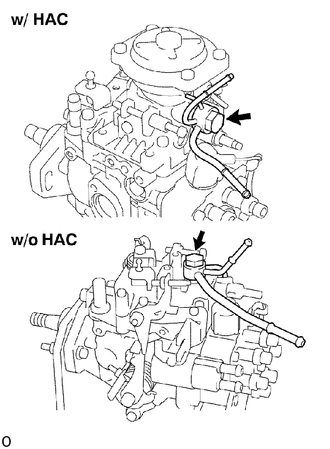
Remove the union bolt, nozzle leakage pipe No.2 and 2 gaskets.
3.REMOVE THROTTLE POSITION SENSOR AND BRACKET ASSEMBLY (A/T)
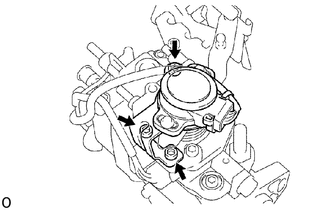
Using a 5 mm hexagon wrench, remove the 3 bolts and throttle position sensor and bracket assembly.
4. PRE-TEST CHECK AND PREPARATION
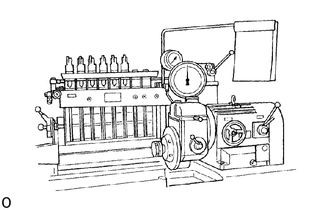
The specifications for test nozzle and nozzle holders are as follows.
- Test nozzle:
DN12SD12 (DENSO)
- Test nozzle opening pressure:
14,220 - 15,200 kPa (145 - 155 kgf/cm2, 2,062 - 2,205 psi)
Check the accuracy of the tachometer.
- Allowable error:
+/- 40 rpm
Install the angle gauge stand.
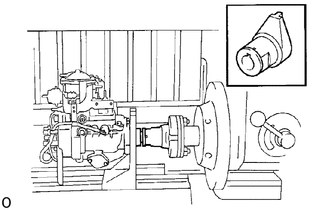
Mount the injection pump body on the pump tester.
- HINT:
-
Place the mark on the key groove portion of the coupling.
- NOTICE:
-
To prevent vibration or dislocation of the injection pump, fix in place the distributive head of the injection pump.
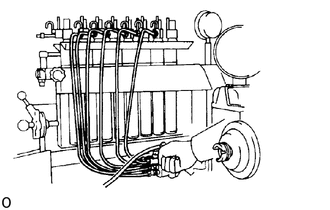
Install an injection pipe with the following specifications.
| Outer diameter | 6.0 mm (0.236 in.) |
| Inner diameter | 2.0 mm (0.079 in.) |
| Length | 840 mm (33.07 in.) |
| Minimum bending radius | 25 mm (0.98 in.) or more |
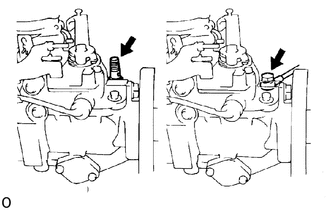
Remove the fuel inlet hollow screw.
Connect the fuel inlet pipe with an adapter.
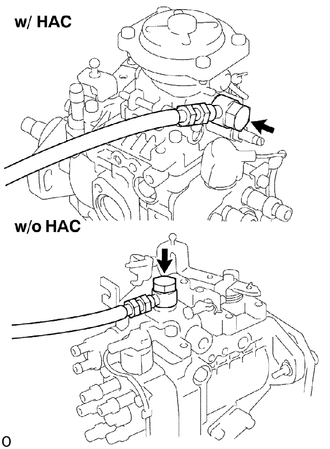
Install an overflow hose with 2 gaskets and union bolts.
- HINT:
-
Always use the overflow screw installed on the pump to be adjusted.
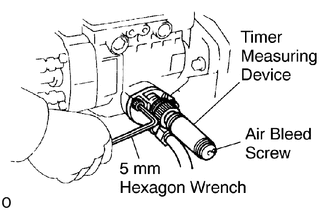
Using 5 mm hexagon wrench, remove the 2 bolts and RH timer cover.
Install the inner pressure gauge with the timer measuring device.
Part No. 95095-10231 and 95095-10480 (DENSO)
- HINT:
-
Bleed the air by the air bleed screw.
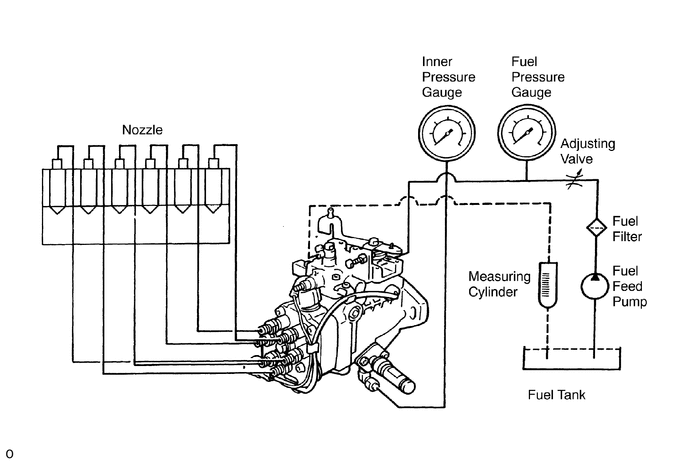
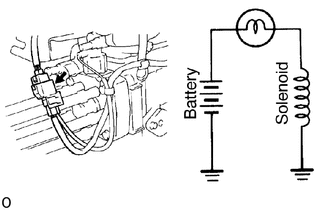
12 V type:
Apply about 6 volts of DC power to the fuel cut solenoid.
24 V type:
Apply about 14 volts of DC power to the fuel cut solenoid.
- HINT:
- ·
When applying voltage to the solenoid, position the battery as far away from the solenoid as possible so that a spark does not occur.
·When connecting the battery cable, connect the solenoi dside first.
The pressure for feeding fuel to the injection pump should be 20 kPa (0.2 kgf/cm2, 2.8 psi). The fuel temperature for pump testing should be 40 - 45 °C (104 - 113 °F).
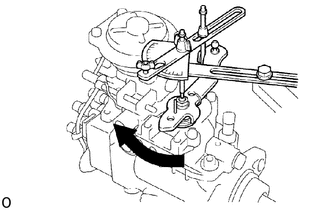
Install an angle gauge to the stand and set it to the adjusting lever.
Part No. 95095-10360 (Stand w/ angle gauge)
Secure the adjusting lever fully on the maximum speed side.
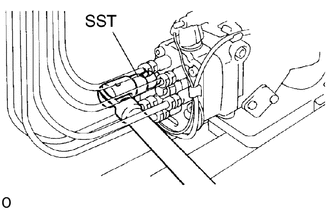
Check the installation direction of the camplate as follows:
Disconnect the injection pipe from the position marked "C" on the distributive head.
Using SST, remove the delivery valve holder assembly and gasket.
- SST
- 09260-54012 (09269-54020)
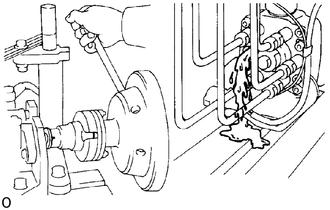
Check that fuel is flowing out when the mark is in the position shown in the illustration.
If not, it is improperly assembled.
Disassemble and change the camplate position 180° in the opposite direction.
- HINT:
-
At this time, disconnect the fuel cut solenoid wire harness.
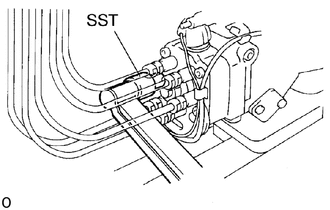
Using SST, install a new gasket and the delivery valve holder assembly.
- SST
- 09260-54012 (09269-54020)
- Torque:
59 N*m (600 kgf*cm, 43 ft*lbf)
Connect the injection pipe.
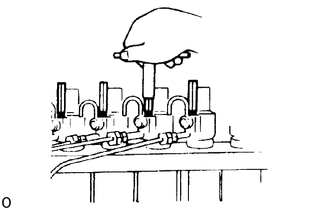
Bleed the air from the injection pipes.
Measure the injection volume.
| Pump
rpm |
No. of measuring
stroke |
Each injection volume
cc (cu in.) |
|---|---|---|
| 1,200 | 200 | 11.84 - 12.24
(0.72 - 0.75) |
Race the injection pump for 5 minutes at 1,200 rpm.
- NOTICE:
-
Check that there is no fuel leakage or abnormal noise.
- HINT:
- ·
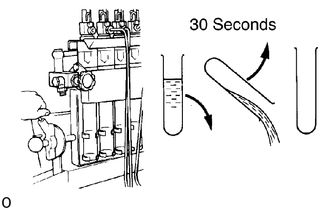
Measure the volume of each injection cylinder with a measuring cylinder.
·Before measuring the injection volume, first hold the cylinder tilted for at least 30 seconds to discard all the fuel.
5.PRE-SET FULL LOAD INJECTION VOLUME
Set the adjusting lever to maximum position.
w/ HAC:
Apply 101.3 +/- 0.2 kPa (760 +/- 1.5 mmHg, 29.92 +/- 0.06 in.Hg) absolute pressure.
Measure the injection volume.
| Item | Pump rpm | No. of measuring strokes | Each injection volume cc (cu in.) |
|---|---|---|---|
| w/HAC | 1,200 | 200 | 11.50 - 11.90 (0.70 - 0.73) |
| w/o HAC | 11.84 - 12.24 (0.72 - 0.75) |
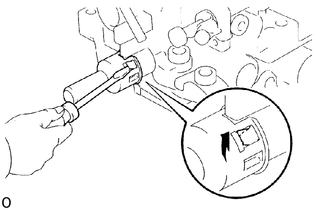
Remove the seal cap.
Using a small screwdriver, pry the claws.
Remove the cap seal.
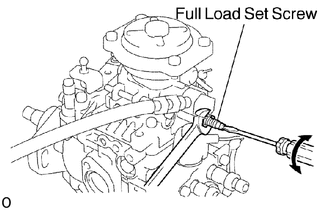
Adjust by turning the full load set screw.
- HINT:
-
The injection volume will increase about 3 cc (0.18 cu in.) with each 1/2 turn of the screw.
6. PRE-SETTING OF LOAD SENSING TIMER
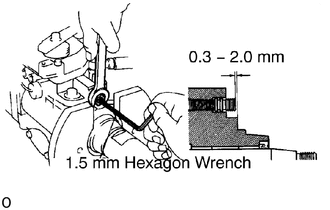
Using a 5mmhexagon wrench, adjust the protrusion of the governorshaft.
- Protrusion:
0.3 - 2.0 mm (0.020 - 0.079 in.)
7.PRE-SET MAXIMUM SPEED
Set the adjusting lever to maximum position.
w/ HAC:
Apply 101.3 +/- 0.2 kPa (760 +/- 1.5 mmHg, 29.92 +/- 0.06 in.Hg) absolute pressure.
Measure the injection volume.
| Pump rpm | No. of measuring strokes | Injection volume
cc (cu in.) |
|---|---|---|
| 2,300 | 200 | 4.6 - 6.6 (0.28 - 0.40) |
Cut off the seal wire.
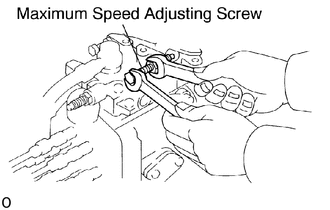
Adjust the injection volume with the maximum speed adjusting screw.
8.ADJUST PUMP INNER PRESSURE
Measure the pump inner pressure at the below listed rpm.
| Pump rpm | Inner pressure kg/cm2 (psi, kPa) |
|---|---|
| 500 | 373 (3.8, 54) |
| 1,900 | 794 (8.1, 115) |
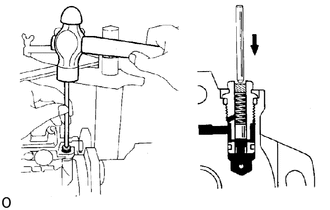
If the pressure is low, adjust by lightly tapping the regulator valve piston while watching the pressure gauge.
- HINT:
-
If the pressure is too high or if the regulator valve was tapped in too far, the regulator valve must be replaced.
9.CHECK OVERFLOW VOLUME
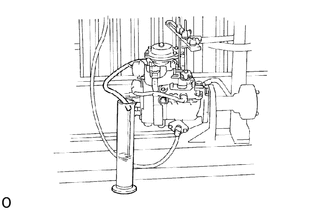
Measure the overflow volume at the below listed rpm.
| Pump rpm | Overflow volume cc/min. (cc in./min.) |
|---|---|
| 2,000 | 367 - 800 (22.4 - 48.8) |
- HINT:
-
Always use the overflow screw installed on the pump to be adjusted.
10.RELEASE COLD STARTING SYSTEM FOR NEXT INSPECTIONS (w/ ACSD)
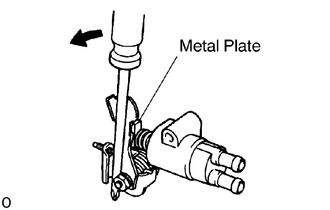
Using a screwdriver, turn the cold starting lever counter clockwise approx. 20°.
Put a metal plate (thickness of 5.0 - 8.0 mm (0.21 - 0.31 in.)) between the cold starting lever and thermo wax plunger.
- HINT:
-
Keep the cold starting system released until all measurements and adjustments are finished.
11.ADJUST TIMER
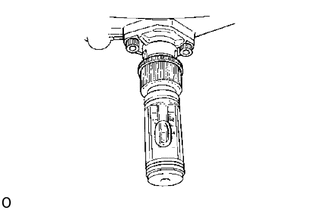
Set the timer measuring device at 0.
Measure the timer piston at the below listed rpm.
| Pump
rpm |
Timer piston stroke mm (in.) |
|---|---|
| 800 | 1.84 - 2.84 (0.0724 - 0.1118) |
| 1,200 | 3.70 - 4.70 (0.1457 - 0.1850) |
| 1,520 | 5.18 - 6.18 (0.2039 - 0.2433) |
| 1,900 | 7.05 - 7.65 (0.2775 - 0.3011) |
| Pump
rpm |
Timer piston stroke mm (in.) |
|---|---|
| 800 | 0.61 - 1.61 (0.0372 - 0.0982) |
| 1,200 | 2.47 - 3.47 (0.1507 - 0.2118) |
| 1,520 | 3.95 - 4.95 (0.2410 - 0.3020) |
| 1,900 | 5.72 - 6.72 (0.3490 - 0.4100) |
- HINT:
-
Check that the hysteresis is within 0.3 mm (0.012 in.)
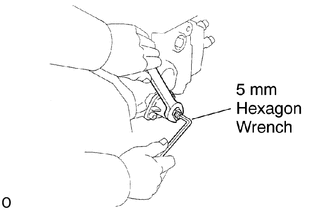
Using a 5mmhexagon wrench, adjust by turning the timer adjusting screw.
- HINT:
-
Turn clockwise to reduce the stroke, turn counter clockwise to increase the stroke.
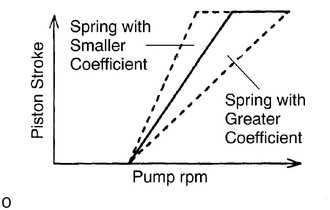
Check the timer stroke for characteristic tendency.
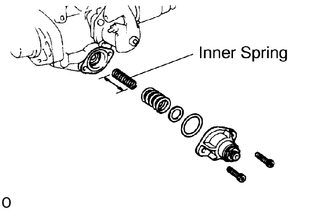
If tendency is not as specified, select and replace the inner spring.
- Timer inner spring with coefficient (K):
w/ ACSD 1.86 (0.19) 1.77 (0.18) 1.67 (0.17) 1.57 (0.16) 1.96 (0.20) -
w/o ACSD 1.96 (0.20) 1.86 (0.19) 1.77 (0.18) 1.67 (0.17) 1.57 (0.16) -
- HINT:
-
The timer stroke will increase with a long spring and decrease with a short spring.
12.ADJUST FULL LOAD INJECTION VOLUME
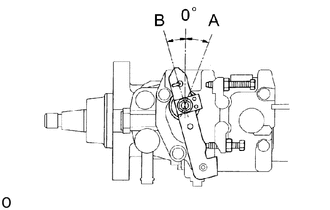
The adjusting lever angle for the adjustment below should be as shown in the illustration.
- Adjusting lever angle:
A (Maximum speed side) B (Idle speed side) Plus 21 - 31° Minus 12 - 22°
w/ HAC:
Apply 101.3 +/- 0.2 kPa (760 +/- 1.5 mmHg, 29.92 +/- 0.06 in.Hg) absolute pressure.
Measure the injection volume.
| Item | Adjusting lever angle | Pump rpm | No. of measuring strokes | Injection volume cc (cc in.) |
|---|---|---|---|---|
| w/HAC | Plus 21 - 31° | 1,200 | 200 | 11.50 - 11.70 (0.70 - 0.71) |
| w/o HAC | 11.84 - 12.24 (0.72 - 0.75) |
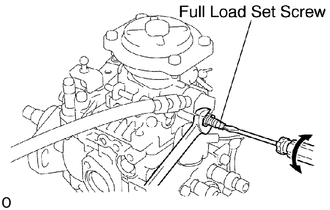
Adjust by turning the full load set screw.
- HINT:
-
The injection volume will increase about 3 cc (0.18 cu in.) with each 1/2 turn of the screw.
13.ADJUST MAXIMUM SPEED
w/ HAC:
Apply 101.3 +/- 0.2 kPa (760 +/- 1.5 mmHg, 29.92 +/- 0.06 in.Hg) absolute pressure.
Measure the injection volume.
| Adjusting lever angle | Pump rpm | No. of measuring strokes | Injection volume cc (cc in.) | Remarks |
|---|---|---|---|---|
| Plus 21 - 31° | 2,300 | 200 | 4.6 - 6.6 (0.28 - 0.40) | Adjust |
| Minus 12 - 22° | 2.0 (0.12) or less | - |
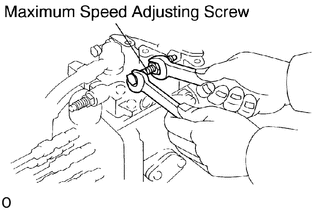
Adjust by turning the maximum speed adjusting screw.
14.CHECK INJECTION VOLUME
Measure the injection volume at each pump rpm and absolute pressure.
| Item | Adjusting lever angle | Pump rpm | Absolute pressure kPa (mmHg, in.Hg) | No. of measuring strokes | Each injection volume cc (cu in.) | Variation limit cc (cu in.) | Remarks |
|---|---|---|---|---|---|---|---|
| w/ HAC | Plus 21 - 31° | 1,200 | 101.3(760,29.92) | 200 | 11.62 - 12.30 (0.71 - 0.75) | 0.5 (0.03) | Basic full-load injection volume |
| 84.0(630,24.80) | 10.52 - 10.84 (0.64 - 0.66) | - | - | ||||
| 70.7(530,20.88) | 9.40 - 10.00 (0.57 - 0.61) | - | - | ||||
| 100 | 101.3(760,29.92) | 10.00 - 14.00 (0.61 - 0.86) | 1.4 (0.09) | Volume during starting | |||
| 500 | 10.26 - 11.54 (0.63 - 0.69) | 0.6 (0.04) | - | ||||
| 1,500 | 11.14 - 12.62 (0.68 - 0.77) | - | - | ||||
| 1,900 | 10.18 - 11.66 (0.62 - 0.71) | 0.6 (0.04) | - | ||||
| w/oHAC | Plus 21 - 31° | 1,200 | - | 200 | 11.84 - 12.24 (0.72 - 0.75) | 0.5 (0.03) | Basic full-load injection volume |
| 100 | 10.00 - 14.00 (0.61 - 0.86) | 1.4 (0.09) | Volume during starting | ||||
| 500 | 10.48 - 11.48 (0.64 - 0.70) | 0.6 (0.04) | - | ||||
| 1,500 | 11.38 - 12.58 (0.69 - 0.77) | - | - | ||||
| 1,900 | 10.42 - 11.62 (0.64 - 0.71) | 0.6 (0.04) | - |
If the injection volume at 100 rpm is not as specified, replace the governor sleeve plug as follows:
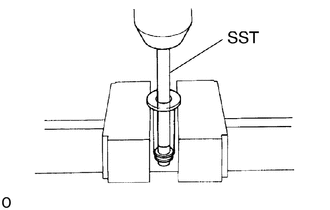
Using SST, and a press, out the sleeve plug assembly from the governor sleeve.
- SST
- 09236-00101 (09237-00070)
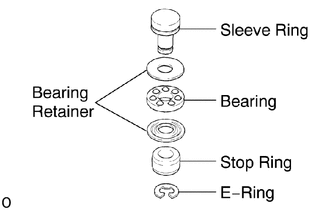
Remove the E-ring, stop ring, bearing and 2 bearing retainers from the sleeve plug.
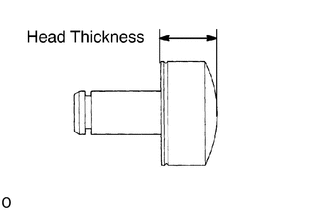
Measure the head thickness of the sleeve plug, and select a new sleeve plug.
| 3.0 (0.118) | 3.5 (0.138) | 4.0 (0.158) |
| 3.1 (0.122) | 3.6 (0.142) | 4.1 (0.161) |
| 3.2 (0.126) | 3.7 (0.146) | 4.2 (0.165) |
| 3.3 (0.130) | 3.8 (0.150) | - |
| 3.4 (0.134) | 3.9 (0.154) | - |
- HINT:
-
Lengthening the plug by 0.1 mm (0.004 in.) will decrease injection volume by 0.6 cc (0.04 cu in.).
-
If the variation limit is greater than specified, replace the delivery valve.
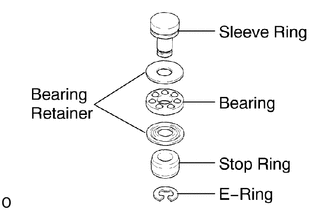
Install the bearing, 2 bearing retainer and stop ring to the new sleeve plug with a new E-ring.
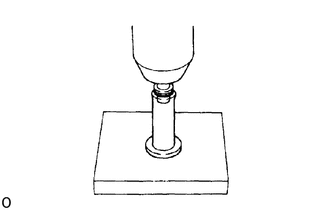
Using a press, press in the sleeve plug assembly to the governor sleeve.
15.ADJUST LOAD SENSING TIMER
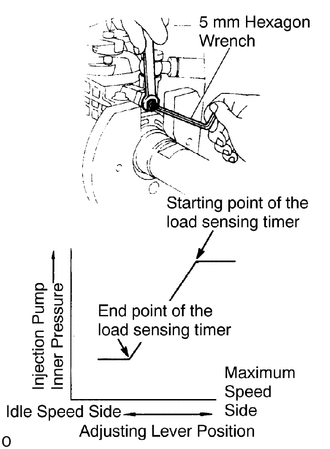
Using a 5 mm hexagon wrench, adjust the starting and end points of the load sensing timer by turning the governor shaft.
Set the adjusting lever to maximum position.
Apply 101.3 +/- 0.2 kPa (760 +/- 1.5 mmHg, 29.92 +/- 0.06 in.Hg) absolute pressure.
Measure the injection volume.
| Adjusting lever position | Pump rpm | No. of measuring stroke |
|---|---|---|
| Maximum speed side | 1,520 | 200 |
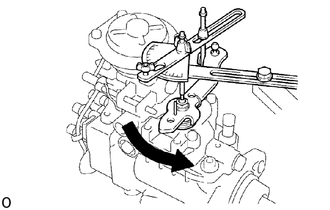
Slowly move the adjusting lever from the maximum speed side to the idle speed side, and secure it at the point where the pump inner pressure begins to drop.
Measure the injection volume at the drop point (starting point).
| Pump rpm | No. of measuring strokes | Injection volume
cc (cu in.) |
|---|---|---|
| 1,520 | 200 | Measure value at step (f) minus 1.4 (0.09) +/- 0.4 (0.02) |
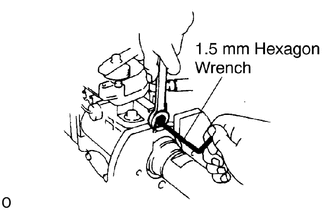
Using a 5 mm hexagon wrench, adjust the load sensing timer by turning the governor shaft, and to the measurement again as specified.
- HINT:
-
The injection volume will increase approx. 3 cc (0.2 cu in.) with each 1/2 turn of the governor shaft.
Check the end point injection volume by slowly moving the adjusting lever from the maximum speed side to the idle speed side, and secure it a the point where the pump inner pressure stops dropping.
| Item | Pump rpm | No. of measuring strokes | Each injection volume cc (cu in.) |
|---|---|---|---|
| w/HAC | 1,520 | 200 | 7.5 (0.45) or more |
| w/o HAC | 7.6 (0.46) or more |
When the adjusting lever is moved slowly from the maximum speed side to the idle speed side.
| Item | Pump rpm | Timer piston fluctuation mm (in.) |
|---|---|---|
| w/HAC | 1,520 | 3.86 - 4.66 (0.1520 - 0.1835) |
| w/o HAC | 2.63 - 3.43 (0.1035 - 0.1350) |
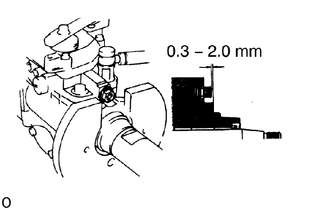
Check the protrusion of the governor shaft.
- Protrusion:
0.3 - 2.0 mm (0.020 - 0.079 in.)
16.ADJUST IDLE SPEED
Measure the injection volume for each pump rpm.
| Adjusting lever angle | Pump rpm | No.of measuring stroke | Eachinjection volume cc (cu in.) | Variation limit cc (cu. in.) | Remarks |
|---|---|---|---|---|---|
| Minus 12 - 22° | 375 | 200 | q = 2.30 - 3.30 (0.14 - 0.20) | - | Pre-set |
| 350 | More than q plus 0.5 (0.03) | - | - | ||
| 450 | q Minus 1.2 - 2.4 (0.07 - 0.15) | - | |||
| 325 | 3.36 - 4.36(0.21 - 0.27) | 0.5 (0.03) | Adjust |
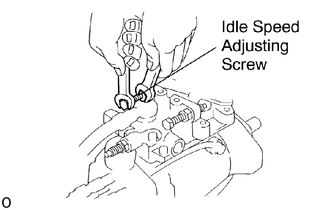
Adjust injection volume by turning the idle speed adjusting screw.
17.ADJUST COLD STARTING SYSTEM (w/ ACSD)
Remove the overflow screw and check the fuel temperature in the fuel pump.
- Fuel temperature:
24 - 26 °C (75 - 79 °F)
Check that the cam part of the camplate is not on top of the roller ring.
Set the scale of the timer measuring device to 0.
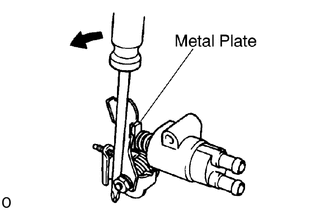
Remove the metal plate between cold starting lever and thermo wax plunger.
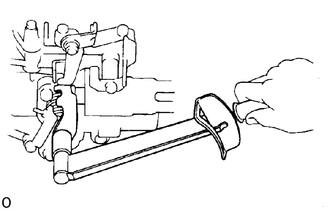
Torque the cold starting lever clockwise to approx. and keep the lever tightened for about 10 seconds. Then release the torque.
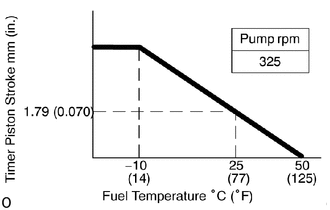
Measure the timer piston stroke.
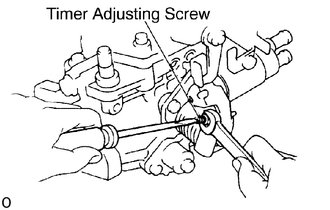
Adjust by turning the timer adjusting screw.
- HINT:
-
Screw in for stroke decrease.
18.ADJUST FAST IDLE (w/ ACSD)
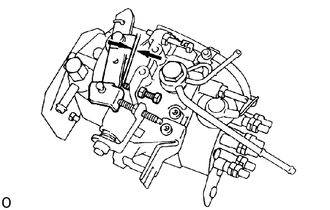
Measure the clearance between adjusting lever and idle speed adjusting screw.
| Fuel temperature °C (°F) | Clearance mm (in.) |
|---|---|
| 25 (77) | 0.71 (0.028) |
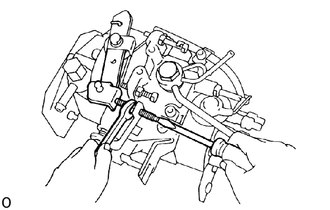
Adjust by turning the fast idle adjusting screw.
19. POST ADJUSTMENT CHECK
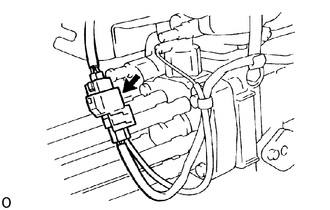
Check that injection stops when the fuel cut solenoid harness is removed.
- Pump revolution:
100 rpm
q = 1.5 cc (0.09 cu in.) or less
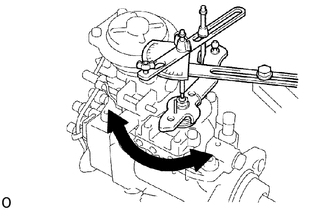
Check the adjusting lever movement.
- Adjusting lever angle:
38 - 48°
20.INSTALL THROTTLE POSITION SENSOR AND BRACKET ASSEMBLY (A/T)
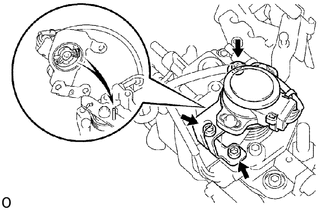
Attach the portion of the throttle position sensor and adjusting lever.
Using a 5mmhexagon wrench, install the throttle position sensor with the 3 bolts.
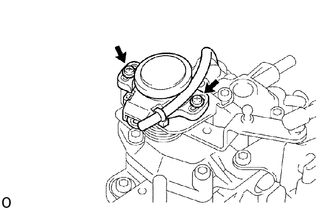
Loosen the 2 screws holding the throttle position sensor to the bracket.
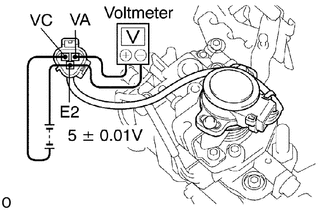
Apply 5 +/- 0.01 V across terminals VC and E2.
Connect the tester probes of a voltmeter to terminals VA and E2 of the throttle position sensor.
Secure the adjusting lever fully on the maximum speed side so that its output will be 0.6 +/- 0.025 V.
Tighten the 2 screws holding the throttle position sensor to the bracket.
21. SEAL PARTS
Seal the full load set screw with new cap.
Seal the maximum speed adjusting screw with new lead seal.
22.INSTALL FUEL PIPES
Install the nozzle leakage pipe No.2 and 2 new gaskets with the union bolt.
- Torque:
22.1 N*m (225 kgf*cm, 16 ft*lbf)
Install the fuel inlet pipe and 2 new gaskets with the cap nut and bolt.
- Torque:
24.55 N*m (250 kgf*cm, 18 ft*lbf)
22100
23.INSTALL INJECTION PUMP