M15# MANUAL TRANSMISSION / TRANSAXLE MANUAL TRANSMISSION ASSEMBLY(for M152) REMOVAL
CAUTION / NOTICE / HINT
- NOTICE:
-
After turning the ignition switch off, waiting time may be required before disconnecting the cable from the battery terminal. Therefore, make sure to read the disconnecting the cable from the battery terminal notice before proceeding with work (Click hereGeneral>INTRODUCTION>REPAIR INSTRUCTION>PRECAUTION).
PROCEDURE

 1.DISCONNECT CABLE FROM NEGATIVE BATTERY TERMINAL
2.DRAIN MANUAL TRANSMISSION OIL
Remove the drain plug and gasket, and then drain the manual transmission oil.
Install a new gasket and the drain plug.
- Torque:
37 N*m (379 kgf*cm, 27 ft.*lbf)
37110F
3.REMOVE PROPELLER SHAFT WITH CENTER BEARING ASSEMBLY
17571
4.REMOVE NO. 1 EXHAUST PIPE SUPPORT BRACKET
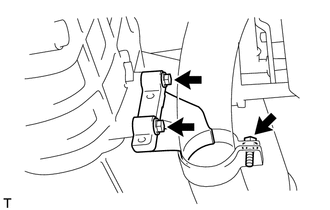
Loosen the clamp bolt.
Remove the 2 bolts and the No. 1 exhaust pipe support bracket from the manual transmission assembly.
17410
5.REMOVE FRONT EXHAUST PIPE ASSEMBLY
w/o Exhaust Brake:
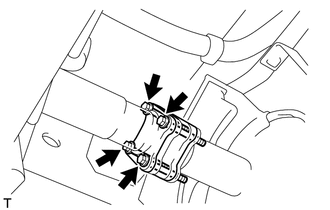
Remove the 4 bolts, 2 gaskets and the front exhaust pipe spacer from the exhaust pipe.
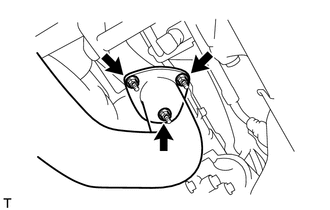
Remove the 3 nuts and the front exhaust pipe assembly from the exhaust manifold.
Remove the gasket.
w/ Exhaust Brake:
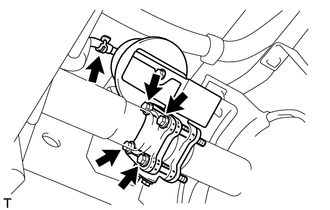
Disconnect the vacuum hose from the exhaust retarder assembly.
Remove the 4 bolts, 2 gaskets and the exhaust retarder assembly from the exhaust pipe.
Remove the 3 nuts and the front exhaust pipe assembly from the exhaust manifold.
Remove the gasket.
46501
6.REMOVE PARKING BRAKE DRUM SUB-ASSEMBLY
46503C
7.SEPARATE PARKING BRAKE PLATE SUB-ASSEMBLY
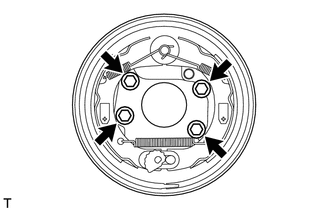
Remove the 4 bolts and separate the parking brake plate sub-assembly from the manual transmission assembly.
- HINT:
-
Using a piece of rope, hang the parking brake plate sub-assembly to the vehicle.
33820B
8.DISCONNECT SHIFT AND SELECT TRANSMISSION CONTROL CABLE (for LHD)
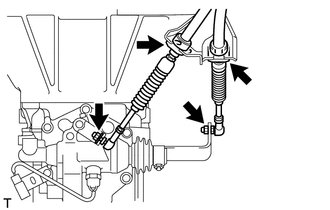
Remove the 2 nuts and 2 clips, and disconnect the shift and select transmission control cables from the manual transmission assembly.
33709F
9.REMOVE FLOOR SHIFT CROSS SHAFT SUB-ASSEMBLY (for RHD)
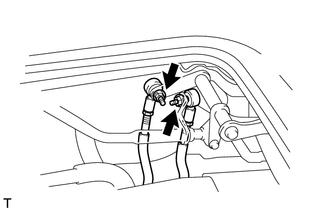
Remove the 2 nuts and disconnect the shift lever side of the shift and select transmission control links.
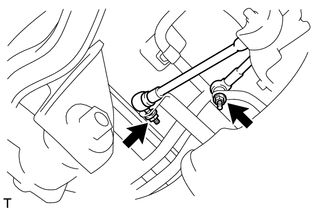
Remove the 2 nuts and disconnect the transmission side of the shift and select transmission control links.
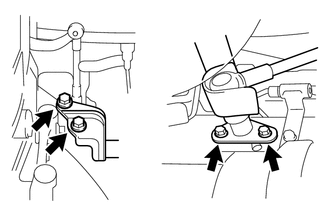
Remove the 4 bolts and the floor shift cross shaft sub-assembly from the manual transmission assembly.
31470
10.SEPARATE CLUTCH RELEASE CYLINDER ASSEMBLY
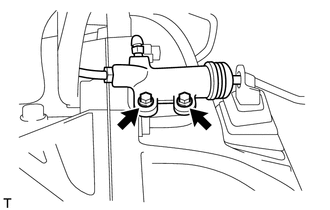
Remove the 2 bolts and separate the clutch release cylinder assembly.
- HINT:
-
Using a piece of rope, hang the clutch release cylinder assembly to the vehicle.
28100
11.REMOVE STARTER ASSEMBLY
Remove the nut and disconnect the starter wire from the terminal 30.
Disconnect the terminal 50 connector from the starter assembly.
Remove the bolt, nut, 2 washers and the starter assembly from the manual transmission assembly.
12.DISCONNECT CONNECTOR
Disconnect the connectors and wire harness clamps from the manual transmission assembly.
33119
13.REMOVE STIFFENER PLATE LH
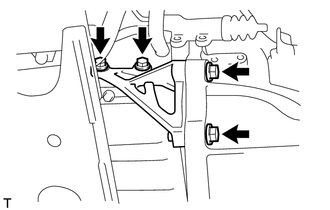
Remove the 4 bolts and the stiffener plate LH from the manual transmission assembly.
33118
14.REMOVE STIFFENER PLATE RH
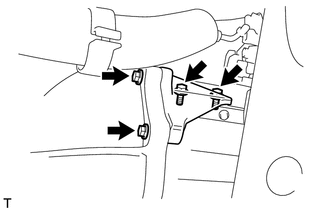
Remove the 4 bolts and the stiffener plate RH from the manual transmission assembly.
33110
15.SUPPORT MANUAL TRANSMISSION ASSEMBLY
Support the manual transmission assembly with a transmission jack.
51204
16.REMOVE NO. 3 FRAME CROSSMEMBER SUB-ASSEMBLY
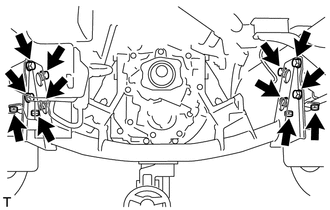
Remove the 12 bolts and separate the No. 3 frame crossmember sub-assembly from the frame.
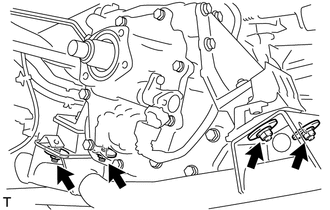
Remove the 4 nuts, 4 washers and the No. 3 frame crossmember sub-assembly from the engine mounting brackets.
11000
17.SUPPORT ENGINE ASSEMBLY
Support the engine assembly with a transmission jack.
- NOTICE:
- ·
Make sure to support the engine assembly securely to prevent it from tilting when the manual transmission assembly has been removed.
·Do not tilt the engine assembly and the manual transmission assembly more than necessary.
33110
18.REMOVE MANUAL TRANSMISSION ASSEMBLY (for LHD)
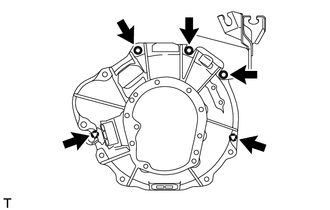
Remove the 5 bolts and the No. 1 transmission control cable bracket.
Remove the manual transmission assembly.
- NOTICE:
- ·
To avoid damage to the knock pins, do not pry between the manual transmission assembly and the engine assembly.
·To avoid damage to the input shaft, do not forcefully shake the manual transmission assembly.
33110
19.REMOVE MANUAL TRANSMISSION ASSEMBLY (for RHD)
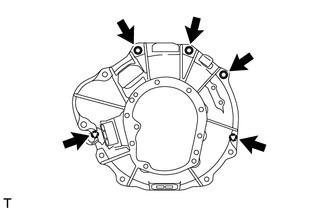
Remove the 5 bolts.
Remove the manual transmission assembly.
- NOTICE:
- ·
To avoid damage to the knock pins, do not pry between the manual transmission assembly and the engine assembly.
·To avoid damage to the input shaft, do not forcefully shake the manual transmission assembly.
12325
20.REMOVE NO. 3 ENGINE MOUNTING BRACKET
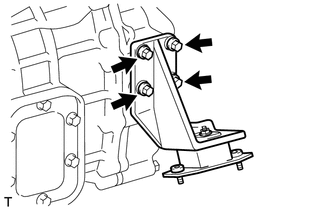
Remove the 4 bolts and the No. 3 engine mounting bracket from the manual transmission assembly.
12321
21.REMOVE NO. 1 ENGINE MOUNTING BRACKET
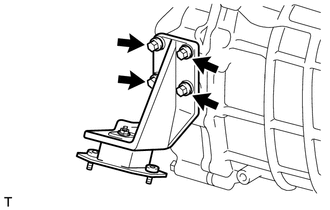
Remove the 4 bolts and the No. 1 engine mounting bracket from the manual transmission assembly.
31230
22.REMOVE CLUTCH RELEASE BEARING ASSEMBLY
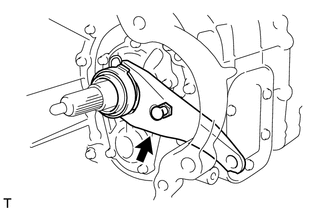
Separate the clutch release fork sub-assembly from the release fork support.
Remove the clutch release bearing assembly with the clutch release fork sub-assembly from the manual transmission assembly.
31204
23.REMOVE CLUTCH RELEASE FORK SUB-ASSEMBLY
Disengage the release bearing hub clip and remove the clutch release fork sub-assembly from the clutch release bearing assembly.
31126
24.REMOVE CLUTCH RELEASE FORK BOOT
Remove the clutch release fork boot from the manual transmission assembly.
31236B
25.REMOVE RELEASE FORK SUPPORT
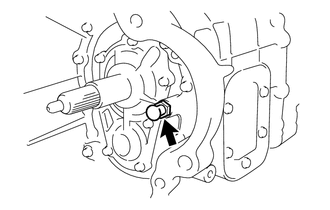
Remove the release fork support from the manual transmission assembly.
31111
26.REMOVE CLUTCH HOUSING
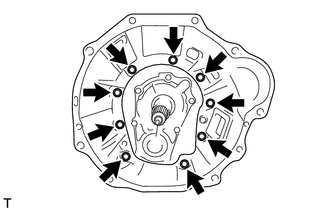
Remove the 9 bolts and the clutch housing from the manual transmission assembly.