WIPER / WASHER FRONT WIPER MOTOR INSTALLATION
CAUTION / NOTICE / HINT
- HINT:
- ·
Use the same procedure for RHD and LHD vehicles.
·The procedure listed below are for RHD vehicles.
PROCEDURE

 85070
1.INSTALL FRONT WIPER MOTOR AND BRACKET ASSEMBLY
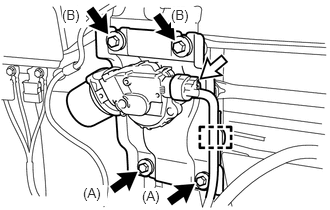
Tighten the 2 bolts (B) and install the front wiper motor and bracket assembly.
- Torque:
7.5 N*m (76 kgf*cm, 66 in.*lbf)
Install the 2 bolts (A).
- Torque:
7.5 N*m (76 kgf*cm, 66 in.*lbf)
Connect the connector and attach the clamp.

|
Bolt |

|
Connector |
85150B
2.INSTALL WIPER LINK ASSEMBLY
Apply MP grease to the sliding parts of the wiper link assembly.
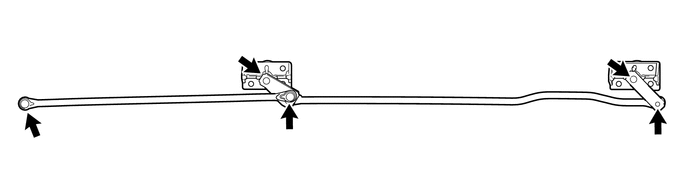
Install the 8 bolts and wiper link assembly.
- Torque:
27 N*m (275 kgf*cm, 20 ft.*lbf)
- NOTICE:
-
Be careful not to damage the vehicle body and wiper link assembly when installing the wiper link assembly.
Connect the crank arm pivot.
85169
3.INSTALL NO.1 WINDSHIELD WIPER LINK PIVOT WASHER
for RHD:
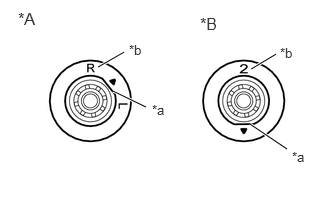
for Driver Side:
Align the No. 1 windshield wiper link pivot washer with the cutout and install it as shown in the illustration.
- HINT:
-
Check that the "R" identification mark faces the top of the vehicle.
for Passenger Side:
Align the No. 1 windshield wiper link pivot washer with the cutout and install it as shown in the illustration.
- HINT:
-
Check that the "2" identification mark faces the top of the vehicle.
| *A | for Driver Side |
| *B | for Passenger Side |
| *a | Alignment Spot |
| *b | Identification Symbol |
for LHD:
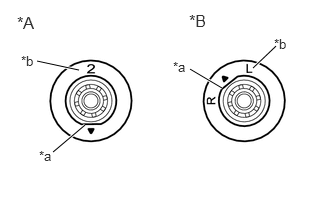
for Driver Side:
Align the No. 1 windshield wiper link pivot washer with the cutout and install it as shown in the illustration.
- HINT:
-
Check that the "L" identification mark faces the top of the vehicle.
for Passenger Side:
Align the No. 1 windshield wiper link pivot washer with the cutout and install it as shown in the illustration.
- HINT:
-
Check that the "2" identification mark faces the top of the vehicle.
| *A | for Passenger Side |
| *B | for Driver Side |
| *a | Alignment Spot |
| *b | Identification Symbol |
Using a 34 mm socket wrench, install the front wiper nut.
- Torque:
11 N*m (112 kgf*cm, 8 ft.*lbf)
4.INSTALL WINDSHIELD WIPER ARM AND BLADE ASSEMBLY LH
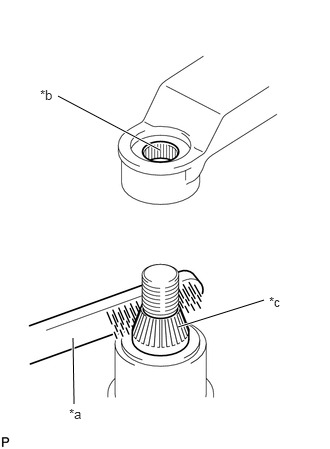
When reinstalling:
Clean the wiper arm serrations to remove any burrs, dirt, etc.
- NOTICE:
-
Do not grind down the wiper arm serrations.
Clean the wiper pivot serrations.
| *a | Wire Brush |
| *b | Wiper Arm Serrations |
| *c | Wiper Pivot Serrations |
Turn the ignition switch to ON.
Operate the wiper switch and stop the front wiper motor at the automatic stop (park) position.
Turn the ignition switch off.
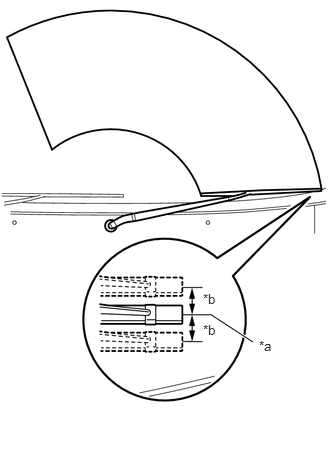
Align the front wiper arm and blade assembly LH as shown in the illustration and install it with the nut.
- Torque:
26 N*m (265 kgf*cm, 19 ft.*lbf)
| *a | Ceramic Line |
| *b | 10 mm (0.394 in.) |
- HINT:
-
Hold the arm hinge by hand when tightening the nut.
Operate the front wipers while spraying washer fluid on the glass. Make sure that the front wipers function properly and the wipers do not come into contact with the vehicle body.
Raise the wiper arm 2 times and check that the tip of the front wiper blade is at the position shown in the illustration.
5.INSTALL WINDSHIELD WIPER ARM AND BLADE ASSEMBLY RH
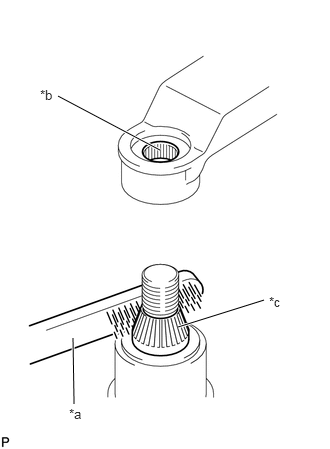
When reinstalling:
Clean the wiper arm serrations to remove any burrs, dirt, etc.
- NOTICE:
-
Do not grind down the wiper arm serrations.
Clean the wiper pivot serrations.
| *a | Wire Brush |
| *b | Wiper Arm Serrations |
| *c | Wiper Pivot Serrations |
Turn the ignition switch to ON.
Operate the wiper switch and stop the front wiper motor at the automatic stop (park) position.
Turn the ignition switch off.
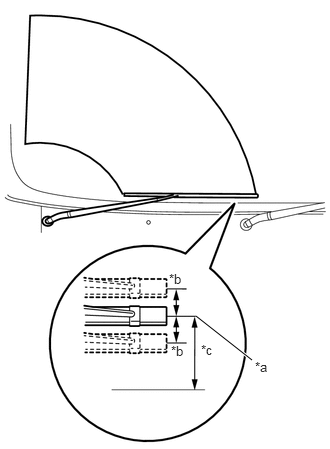
Align the front wiper arm and blade assembly RH as shown in the illustration and install it with the nut.
- Torque:
26 N*m (265 kgf*cm, 19 ft.*lbf)
| *a | Marking |
| *b | 10 mm (0.394 in.) |
| *c | 30 mm (1.181 in.) |
- HINT:
-
Hold the arm hinge by hand when tightening the nut.
Operate the front wipers while spraying washer fluid on the glass. Make sure that the front wipers function properly and the wipers do not come into contact with the vehicle body.
Raise the wiper arm 2 times and check that the tip of the front wiper blade is at the position shown in the illustration.
85292B
6.INSTALL FRONT WIPER ARM HEAD CAP
Attach the 3 claws to install the front wiper arm head cap.
55106D
7.INSTALL PEDAL BRACKET SUB-ASSEMBLY
for LHD with Brake pedal Load Sensing Switch:
Click hereBrake>BRAKE SYSTEM (OTHER)>BRAKE BOOSTER (for LHD with Brake pedal Load Sensing Switch)>INSTALLATION
for RHD with Brake pedal Load Sensing Switch:
Click hereBrake>BRAKE SYSTEM (OTHER)>BRAKE BOOSTER (for RHD with Brake pedal Load Sensing Switch)>INSTALLATION
8.INSTALL FRONT HEATER UNIT