BRAKE SYSTEM (OTHER) BRAKE MASTER CYLINDER(w/ Brake pedal Load Sensing Switch) REMOVAL
CAUTION / NOTICE / HINT
- HINT:
- ·
Use the same procedure for RHD and LHD vehicles.
·The procedure listed below is for LHD vehicles.
PROCEDURE

 55412D
1.REMOVE CENTER INSTRUMENT CLUSTER FINISH PANEL
55480D
2.REMOVE LOWER INSTRUMENT PANEL FINISH PANEL ASSEMBLY
83100
3.REMOVE COMBINATION METER ASSEMBLY
4.REMOVE STEERING COLUMN ASSEMBLY
5.DRAIN BRAKE FLUID
47201
6.REMOVE BRAKE MASTER CYLINDER SUB-ASSEMBLY
- NOTICE:
- ·
Release the vacuum from booster by depressing the brake pedal several times. Then remove the brake master cylinder from brake booster.
·The master cylinder requires careful handling. Do not allow the master cylinder to receive any impact, such as from being dropped. Do not reuse a master cylinder that has been dropped.
·Do not strike or pinch the master cylinder piston, and do not cause any damage to the master cylinder piston by any other means.
·When installing the brake master cylinder sub-assembly onto the brake booster, or when removing the brake master cylinder sub-assembly from the brake booster, make sure that the brake master cylinder sub-assembly is kept horizontal or its tip faces downward (the piston faces upward) to prevent the master cylinder piston from falling off.
·Do not allow any foreign objects to contaminate the master cylinder piston. If a foreign object gets on the piston, remove it by using a piece of cloth and then apply an even layer of lithium soap based glycol grease around the circumference (sliding part) of the piston.
·Do not use any other type of grease or fluid.
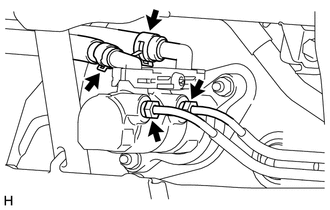
Using a union nut wrench 12mm, disconnect the 2 brake tubes from the brake master cylinder sub-assembly.
Slide the 2 clips and disconnect the 2 master cylinder reservoir tubes.
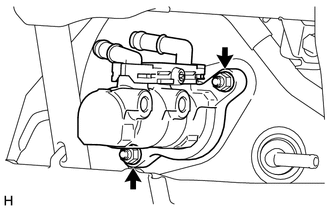
Remove the 2 nuts and the brake master cylinder sub-assembly from the brake booster assembly.
Remove the O-ring from the brake master cylinder sub-assembly.