2TR-FE ENGINE MECHANICAL CAMSHAFT REMOVAL
PROCEDURE

 1.DISCONNECT CABLE FROM NEGATIVE BATTERY TERMINAL
58410
2.REMOVE ENGINE SERVICE HOLE COVER
58734B
3.REMOVE REAR ENGINE SERVICE COVER WEATHERSTRIP
58521D
4.REMOVE ENGINE SERVICE HOLE COVER MAT
58420
5.REMOVE NO. 2 ENGINE SERVICE HOLE COVER ASSEMBLY
58123A
6.REMOVE SHIFT AND SELECT LEVER SUPPORT WITH BOOTS
33506F
7.REMOVE FLOOR SHIFT CONTROL SHIFT LEVER RETAINER SUB-ASSEMBLY
58701A
8.REMOVE FRONT ENGINE SERVICE COVER PANEL SUB-ASSEMBLY
51405A
9.REMOVE NO. 1 ENGINE UNDER COVER
88310A
10.REMOVE NO. 1 V (COOLER COMPRESSOR TO CRANKSHAFT PULLEY) BELT
16361A
11.REMOVE FAN AND GENERATOR V BELT
17861
12.REMOVE INTAKE AIR CONNECTOR
19500
13.REMOVE IGNITION COIL ASSEMBLY
Remove the 4 bolts and 4 ignition coils.
11201
14.REMOVE CYLINDER HEAD COVER SUB-ASSEMBLY
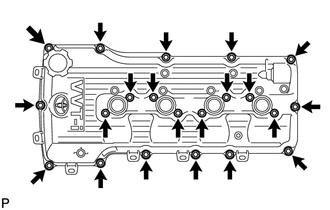
Disengage the wire harness clamps and separate the wire harness.
Remove the 19 bolts, 2 nuts, cylinder head cover and 2 gaskets.
13566B
15.REMOVE TIMING CHAIN GUIDE
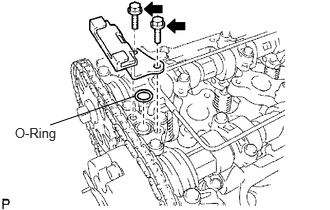
Remove the 2 bolts, chain guide and O-ring.
13523
16.REMOVE CAMSHAFT TIMING GEAR OR SPROCKET
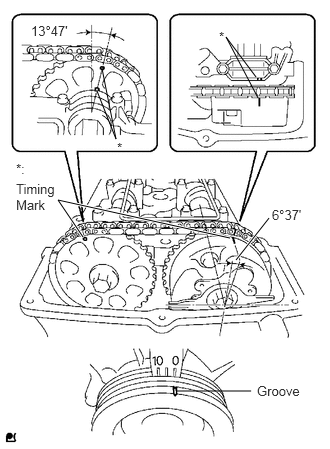
Turn the crankshaft pulley, and align the groove with timing mark 0 on the timing chain cover.
Check that the timing marks on the camshaft timing gear and sprocket are aligned with the timing marks on the No. 1 bearing cap, as shown in the illustration.
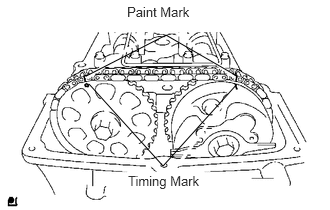
Place paint marks on the timing chain and camshaft timing gear and sprocket.
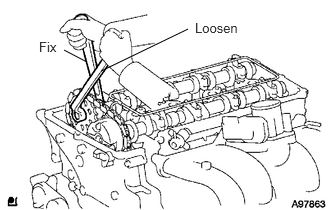
Fix the camshaft with a wrench and then loosen the sprocket bolt.
- NOTICE:
-
Be careful not to damage the oil delivery pipe.
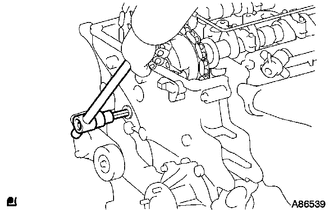
Using a 10 mm socket hexagon wrench, remove the timing chain cover plug.
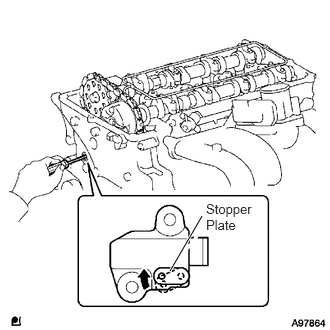
Using a screwdriver, access the tensioner stopper plate through the chain tensioner service hole. Move the stopper plate upward to release the lock. Then hold the plate in that position as shown in the illustration.
- HINT:
-
If the stopper plate's lock is difficult to release, slightly rotate the camshaft's hexagon-shaped part to the left and right.
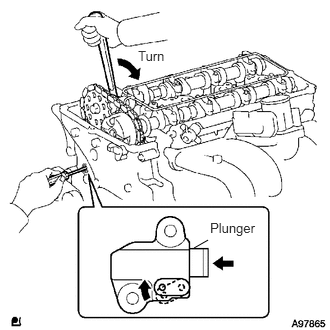
With the stopper plate's lock released, slightly rotate the camshaft to the right. Then maintain that position.
- NOTICE:
-
Be careful not to damage the oil delivery pipe.
- HINT:
-
Rotating the camshaft to the right will cause pressure to be applied to the tensioner plunger.
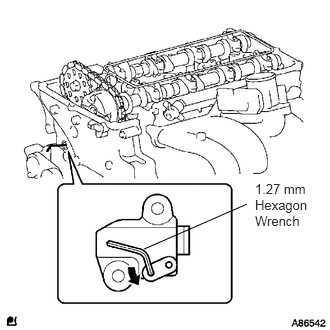
Remove the screwdriver from the chain tensioner service hole. Move the stopper plate to the position shown in the illustration. Then insert a hexagon wrench into the hole.
- HINT:
- ·
If the wrench cannot fit into the hole, slightly rotate the camshaft to the left and then to the right. Then insert the wrench.
·To prevent the wrench from falling out, use tape to fix the wrench in place.
Remove the camshaft timing sprocket from the camshaft.
13511
17.REMOVE CAMSHAFTS
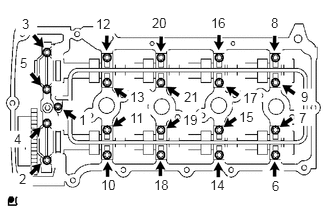
Uniformly loosen the 21 bearing cap bolts in several passes in the sequence shown in the illustration.
Remove the 9 bearing caps, oil delivery pipe, O-ring and camshaft.
- NOTICE:
- ·
Place the camshaft on a flat surface, maintain this position and loosen the bolts uniformly.
·If prying the camshaft out with a tool, do not apply excessive force.
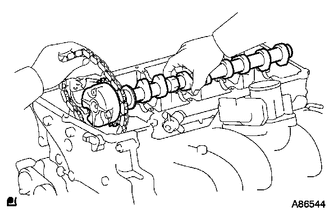
Remove the camshaft while holding the timing chain.
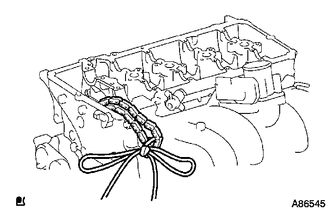
Tie the timing chain with a string as shown in the illustration.
- NOTICE:
-
Be careful not to drop anything inside the timing chain cover.
13801
18.REMOVE VALVE ROCKER ARM SUB-ASSEMBLY
- HINT:
-
Each rocker arm must be reinstalled to its original location.
13750
19.REMOVE VALVE LASH ADJUSTER ASSEMBLY
- HINT:
-
Each valve lash adjuster must be reinstalled to its original location.
13050
20.REMOVE CAMSHAFT TIMING GEAR ASSEMBLY
Check that the camshaft timing gear is locked.
Release the lock pin.
- NOTICE:
-
Before removing the camshaft timing gear assembly, make sure that the lock pin has been released.
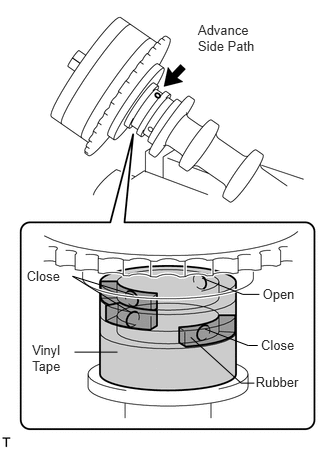
Cover the 4 oil paths of the cam journal with vinyl tape as shown in the illustration.
- HINT:
-
There are 4 oil paths in the groove of the camshaft. Plug three of the paths with pieces of rubber.
Prick a hole in the tape placed on the advance side. Prick a hole in the tape placed on the retard side path, on the opposite side to that of the advance side path, as shown in the illustration.
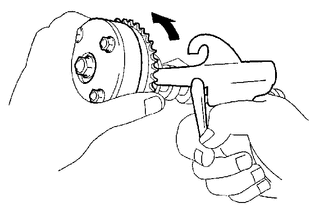
While applying approximately 150 kPa (2.0 kgf/cm2, 22 psi) of air pressure to the oil paths, forcibly turn the camshaft timing gear assembly in the advance direction (counterclockwise).
- CAUTION:
-
Cover the paths with a piece of cloth when applying pressure to keep oil from splashing.
- NOTICE:
-
Do not lock the camshaft timing gear assembly. If it is locked, release the lock pin again.
- HINT:
- ·
The camshaft timing gear assembly may be turned in the advance direction without applying any force.
·If enough air pressure cannot be applied because of air leakage from the port, releasing the lock pin may be difficult.
Remove the vinyl tape and rubber pieces from the camshaft.
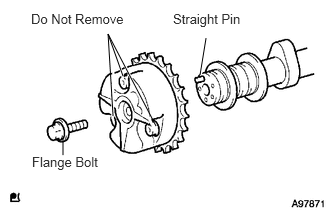
Remove the flange bolt from the camshaft timing gear.
- NOTICE:
- ·
Before removing the camshaft timing gear, make sure that the lock pin has been released.
·Be sure not to remove the other 3 bolts.
·Keep the camshaft timing gear assembly horizontal while removing it from the camshaft.
13716
21.REMOVE VALVE STEM CAP
- HINT:
-
Each valve stem cap must be reinstalled to its original location.