2TR-FE ENGINE MECHANICAL CAMSHAFT INSPECTION
PROCEDURE

 13750
1.INSPECT VALVE LASH ADJUSTER ASSEMBLY
- NOTICE:
- ·
Keep the lash adjuster free from foreign matter.
·Only use clean engine oil.
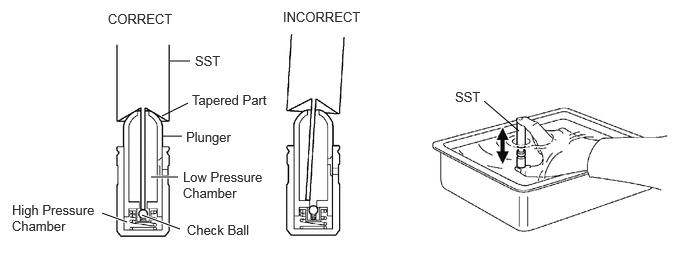
Place the lash adjuster into a container full of engine oil.
Insert SST's tip into the lash adjuster's plunger and use the tip to press down on the check ball inside the plunger.
- SST
- 09276-75010
Squeeze the SST and lash adjuster together to move the plunger up and down 5 to 6 times.
Check the movement of the plunger and bleed air.
- OK:
Plunger moves up and down.
- NOTICE:
-
When bleeding high-pressure air from the compression chamber, make sure that the tip of the SST is actually pressing the check ball as shown in the illustration. If the check ball is not pressed, air will not bleed.
After bleeding air, remove SST. Then, try to quickly and firmly press the plunger with a finger.
- OK:
Plunger is difficult to move.
If the result is not as specified, replace the lash adjuster.
13050
2.INSPECT CAMSHAFT TIMING GEAR ASSEMBLY
Install the camshaft timing gear assembly (Click here Engine / Hybrid System>2TR-FE (ENGINE MECHANICAL)>CAMSHAFT>INSTALLATION ).
Check the camshaft timing gear.
Clamp the camshaft in a vise, and confirm that the camshaft timing gear is locked.
- NOTICE:
-
Be careful not to damage the camshaft.
Release the lock pin.
- NOTICE:
-
Before removing the camshaft timing gear assembly, make sure that the lock pin has been released.
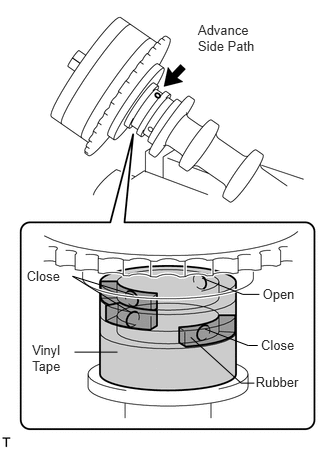
Cover the 4 oil paths of the cam journal with vinyl tape as shown in the illustration.
- HINT:
-
There are 4 oil paths in the groove of the camshaft. Plug three of the paths with pieces of rubber.
Prick a hole in the tape placed on the advance side. Prick a hole in the tape placed on the retard side path, on the opposite side to that of the advance side path, as shown in the illustration.
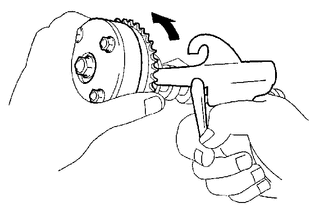
While applying approximately 150 kPa (2.0 kgf/cm2, 22 psi) of air pressure to the oil paths, forcibly turn the camshaft timing gear assembly in the advance direction (counterclockwise).
- CAUTION:
-
Cover the paths with a piece of cloth when applying pressure to keep oil from splashing.
- NOTICE:
-
Do not lock the camshaft timing gear assembly. If it is locked, release the lock pin again.
- HINT:
- ·
The camshaft timing gear assembly may be turned in the advance direction without applying any force.
·If enough air pressure cannot be applied because of air leakage from the port, releasing the lock pin may be difficult.
Check for smooth rotation.
Turn the camshaft timing gear within its movable range (26.5 to 28.5°) 2 or 3 times, but do not turn it to the most retarded position. Make sure that the gear turns smoothly.
- NOTICE:
-
Do not lock the camshaft timing gear assembly. If it is locked, release the lock pin again.
Remove the camshaft timing gear assembly (Click here Engine / Hybrid System>2TR-FE (ENGINE MECHANICAL)>CAMSHAFT>REMOVAL).
13511
3.INSPECT CAMSHAFT
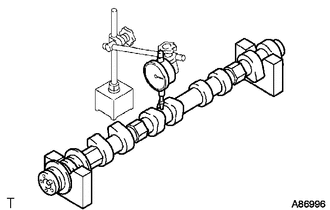
Check the camshaft for runout.
Place the camshaft on V-blocks.
Using a dial indicator, measure the circle runout at the center journal.
- Maximum circle runout:
0.03 mm (0.0012 in.)
If the circle runout is greater than the maximum, replace the camshaft.
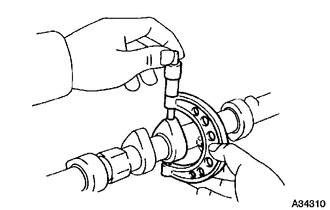
Using a micrometer, measure the cam lobe height.
- Standard cam lobe height:
42.855 to 42.955 mm (1.6872 to 1.6911 in.)
- Minimum cam lobe height:
42.855 mm (1.6872 in.)
If the cam lobe height is less than the minimum, replace the camshaft.
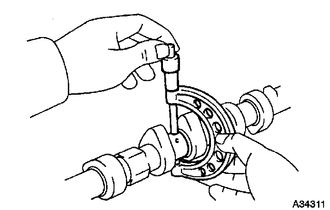
Using a micrometer, measure the journal diameter.
- Standard journal diameter:
Item Specified Condition No. 1 journal 35.949 to 35.965 mm (1.4153 to 1.4159 in.) Other journal 26.959 to 26.975 mm (1.0614 to 1.0620 in.)
If the journal diameter is not as specified, check the oil clearance.
13512
4.INSPECT NO. 2 CAMSHAFT
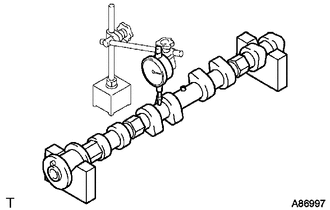
Check the camshaft for runout.
Place the camshaft on V-blocks.
Using a dial indicator, measure the circle runout at the center journal.
- Maximum circle runout:
0.03 mm (0.0012 in.)
If the circle runout is greater than the maximum, replace the camshaft.
Using a micrometer, measure the cam lobe height.
- Standard cam lobe height:
42.854 to 42.954 mm (1.687 to 1.6911 in.)
- Minimum cam lobe height:
42.854 mm (1.6872 in.)
If the cam lobe height is less than the minimum, replace the camshaft.
Using a micrometer, measure the journal diameter.
- Standard journal diameter:
Item Specified Condition No. 1 journal 35.949 to 35.965 mm (1.4153 to 1.4159 in.) Other journal 26.959 to 26.975 mm (1.0614 to 1.0620 in.)
If the journal diameter is not as specified, check the oil clearance.