N04C-WA ENGINE CONTROL ECD SYSTEM P0401 EGR "A" Flow Insufficient Detected
DESCRIPTION
| DTC No. | Detection Item | DTC Detection Condition | Trouble Area | MIL | Memory |
|---|---|---|---|---|---|
| P0401 | EGR "A" Flow Insufficient Detected | Diagnosis Condition:
·
Either the fuel injection rate is 10 to 100 mm3/st with an engine speed of 1400 to 2100 rpm, or the rate is 10 to 30 mm3/st with an engine speed of 2200 to 2300 rpm. ·
Engine speed fluctuation 117.2 r/min/sec or more. ·
Fuel injection rate fluctuation 54.7 mm3/st/sec or more ·
Predicted EGR flow rate 10 g/sec or less. ·
Atmospheric pressure 75 kPa or less. ·
Exhaust brake is not actuated. Malfunction Status: The value of parameters calculated from the measured EGR rate, predicted EGR rate, and EGR valve feedback quantity is at least 0.1 conditions continue for at least 30 seconds. Malfunction Duration: 30 seconds or more |
·
EGR cooler gas passageway ·
EGR valve ·
Intake system ·
Mass air flow meter ·
Manifold absolute pressure sensor ·
Intake air temperature sensor (for intake manifold side) ·
Suction control valve ·
Injector |
Class B1 | DTC stored |
MONITOR DESCRIPTION
The measured EGR rate, which is calculated from the mass air flow meter, manifold absolute pressure sensor, and intake air temperature sensor (for intake manifold side), is compared with the predicted EGR rate, and malfunction is detected.
CONFIRMATION DRIVING PATTERN
DTC No. DTC Detection Drive Pattern P0401 30 seconds or more with the engine speed from 1400 to 2300 rpm
WIRING DIAGRAM
Refer to DTC P0097:
Click hereEngine / Hybrid System>N04C-WA (ENGINE CONTROL)>ECD SYSTEM>P0097
CAUTION / NOTICE / HINT
- HINT:
-
Read freeze frame data using the GTS. Freeze frame data records the engine condition when malfunctions are detected. When troubleshooting, freeze frame data can help determine if the vehicle was moving or stationary, if the engine was warmed up or not, and other data from the time the malfunction occurred.
PROCEDURE
Inspect the air cleaner element sub-assembly is dirty, clogged or damaged.
Make sure the element is a genuine part.
- Result:
Proceed to OK NG
OK
NG
Check the installation of the mass air flow meter.
Make sure there is no dirt, damage or clogging in the sensing unit of the mass air flow meter.
- Result:
Proceed to OK NG
OK
NG
Check the installation of the manifold absolute pressure sensor.
Make sure there is no dirt, damage or clogging in the sensing unit of the manifold absolute pressure sensor.
- Result:
Proceed to OK NG
OK
NG
Start the engine.
Turn the GTS on.
Enter the following menus: Powertrain / Engine / Data list / Actual Boost Pressure and engine speed
Race the engine from idle to NMR and verify that the manifold absolute pressure sensor output signal varies.
- OK:
There is no abnormal change in the sensor output signal.
(The pressure sensor signal response changes according to the engine speed)
- Result:
Proceed to OK NG
OK
NG
Check the installation of the intake air temperature sensor (for intake manifold side).
Make sure there is no dirt, damage or clogging in the sensing unit of the intake air temperature sensor (for intake manifold side).
- Result:
Proceed to OK NG
OK
NG
Inspect the intake air temperature sensor (for intake manifold side).
Click hereEngine / Hybrid System>N04C-WA (ENGINE CONTROL)>INTAKE AIR TEMPERATURE SENSOR>INSPECTION
- Result:
Proceed to OK NG
OK
NG
Connect the GTS to the DLC3.
Turn the ignition switch to ON and turn the GTS on.
Enter the following menus: Powertrain / Engine / Active Test / Control the EGR Valve Position / Data List / Actual EGR Valve Position and Target EGR Valve Position
Check each step from 90 to 0% of the time lag of the target EGR valve opening and actual EGR valve opening.
- NOTICE:
-
Perform the inspection while the engine is stopped to avoid engine damages.
- OK:
The response delay should be less than 5 seconds.
- Result:
Proceed to OK NG
OK
NG
Check if soot is obstructing the inlet/outlet of the EGR cooler gas passageway.
Check if there are foreign substances stuck to the EGR cooler coolant passageway.
Check the EGR cooler coolant passageway for obstruction due to deformation or other damage.
Check if coolant is leaking from the EGR cooler sub-assembly.
- Result:
Proceed to OK NG
OK
NG
Check the EGR valve for damage due to intrusion of foreign substances.
Check if the inlet/outlet of the exhaust gas passageway is obstructed by soot.
- Result:
Proceed to OK NG
OK
NG
Save GTS data for use during the fuel system inspection. (Engine speed pattern).
Connect the GTS to the DLC3.
After engine has reached operating temperature (more than 82°C (180°F)).
Check that the loads from the air conditioning, headlights, PTO, etc. are turned off.
Enter the following menus: Powertrain / Engine / Active Test / Control the Target Engine Speed / Data List / Engine Speed / Common Rail Pressure and Target Common Rail Pressure.
Check that the loads from the air conditioning, headlights, PTO, etc. are turned off.
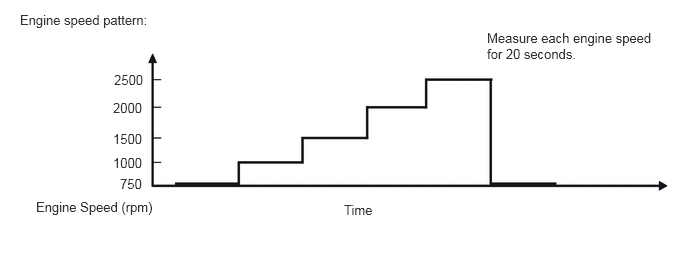
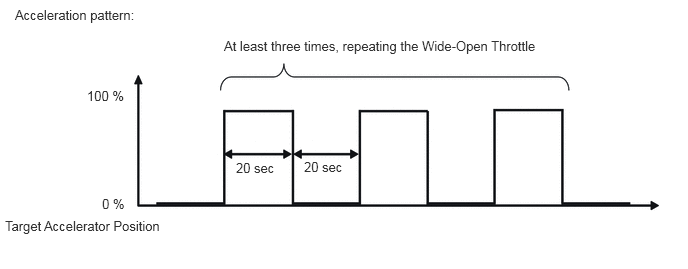
Save GTS data for use during the fuel system inspection. (Acceleration pattern)
Connect the GTS to the DLC3.
After engine has reached operating temperature (more than 82°C (180°F)).
Check that the loads from the air conditioning, headlights, PTO, etc. are turned off.
Enter the following menus: Powertrain / Engine / Data List / Engine Speed, Common Rail Pressure, Target Common Rail Pressure and Target Accelerator Position.
Idle and then run with no load at the highest speed for 20 seconds at a time. Repeat this at least 3 times and save the data.
- Result:
Proceed to NEXT
NEXT
Check the saved data.
Engine speed pattern:
Pressure is reduced by 5 MPa or more continually for 5 seconds or more.
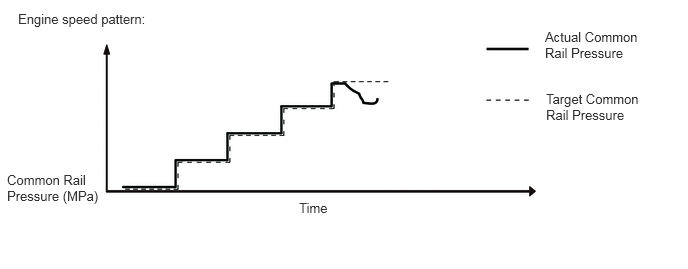
- Replace:
Supply pump assembly
Engine speed pattern:
Pressure is increased by 5 MPa or more continually for 5 seconds or more.
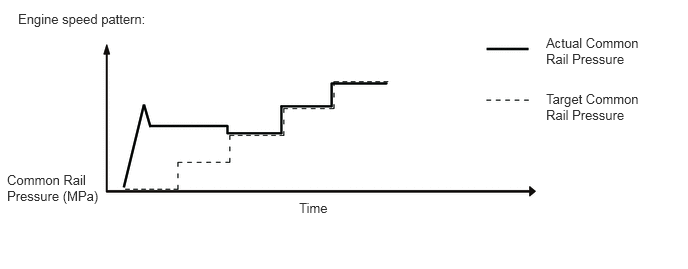
- Replace:
SCV
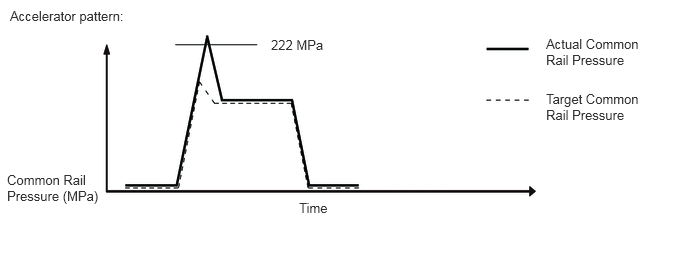
Accelerator pattern:
The maximum common rail pressure exceeds 222 MPa for even a moment during pressure increase.
- Replace:
SCV
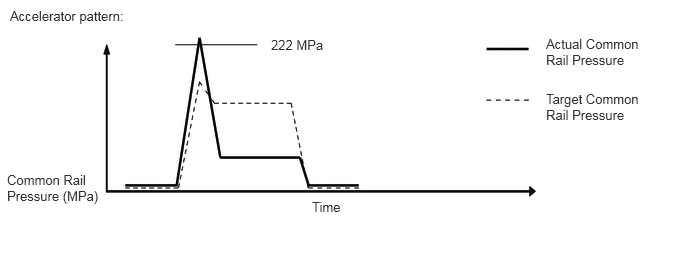
Accelerator pattern:
After the maximum common rail pressure exceeds 222 MPa during pressure increase, the actual rail pressure falls below the target rail pressure.
- Replace:
SCV
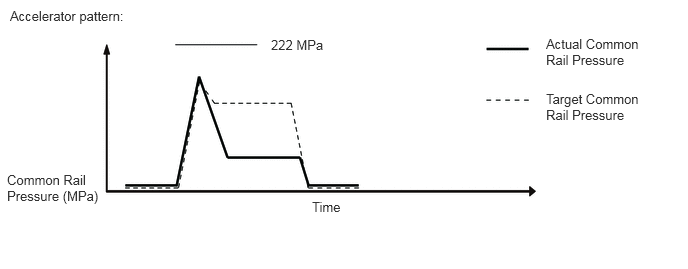
Accelerator pattern:
Before the maximum common rail pressure exceeds 222 MPa during pressure increase, the actual rail pressure falls below the target rail pressure rapidly.
- Replace:
Common rail assembly
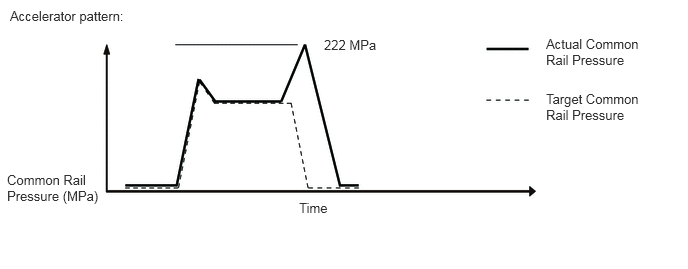
Accelerator pattern:
The maximum common rail pressure exceeds 222 MPa during pressure drop.
- Check:
Return pipe
Engine speed pattern:
The pressure is disturbed at a given speed and the pressure decreases at higher speed.
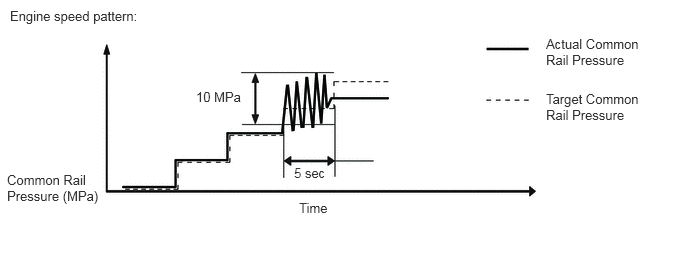
- Replace:
Supply pump assembly
Engine speed pattern:
Hunting remains within 10 MPa or more for more than 5 seconds.
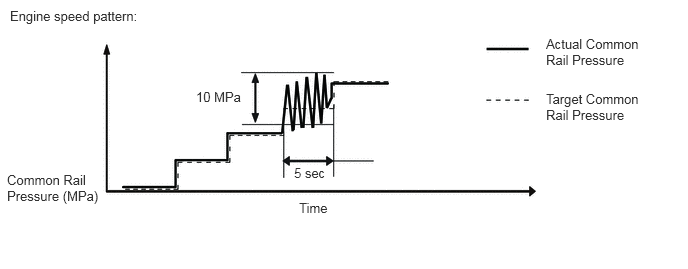
- Replace:
SCV
Accelerator pattern:
The engine stops during pressure relief.
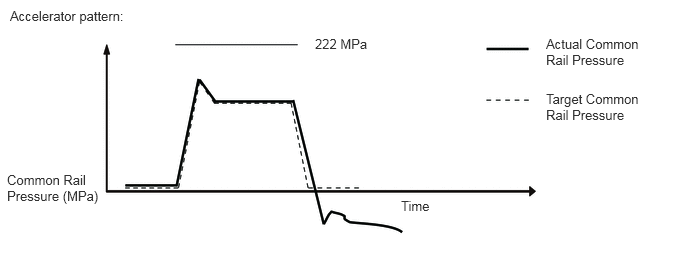
- Replace:
SCV
Target common rail pressure during idling deviates from the standard value.
- Replace:
SCV
Check SCV actuation current value
Connect the GTS to the DLC3.
After engine has reached operating temperature. (more than 82°C (180°F))
Check that the loads from the air conditioning, headlights, PTO, etc. are turned off.
Enter the following menus: Powertrain / Engine / Active Test / Control the Target Engine Speed / Data List / Engine Speed and Target Pump SCV Current
Set the engine speed to 750 rpm, and then check the Target Pump SCV Current value.
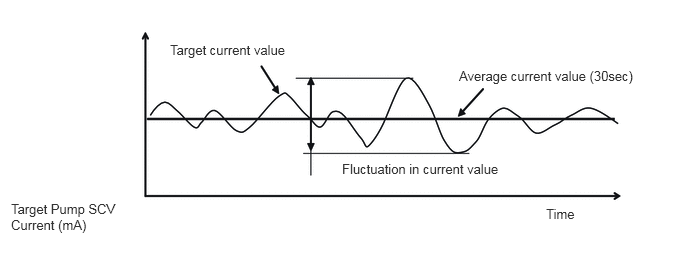
- Standard:
Item Condition Reference Value Target Pump SCV Current Average current value 1660 to 1820 mA Fluctuation in current value Below 80 mA
- Result:
Proceed to OK NG
OK
NG
Disconnect the ECM connector.
Turn the ignition switch to ON.
Turn the GTS on.
Enter the following menus: Powertrain / Engine / Data List / Engine Speed and Injection Volume
Read the value displayed on the GTS.
- Standard:
Item Condition Reference Value Engine Speed ·Engine speed: 1500 rpm
·Engine coolant temperature: 80°C or higher
·Shift position N
·A/C OFF
·Air compressor OFF
Speed fluctuation amount is 15 rpm or less Injection Volume 5 mm3/st or more
- Result:
Proceed to OK NG
OK
NG
Connect the GTS to the DLC3.
Turn the ignition switch to ON and turn the GTS on.
Clear the DTCs.
- HINT:
-
Clear the DTCs with the engine stopped, as DTCs cannot be cleared while the engine is running.
Turn the ignition switch off for 30 seconds or more.
Start the engine and warm it up until the engine coolant temperature reaches 80°C (176°F) or higher.
Perform the confirmation driving pattern.
Turn the GTS on.
Enter the following menus: Powertrain / Engine / Trouble Codes.
Read Current DTCs.
- Result:
Result Proceed to DTC P0401 is output A DTCs are not output B
A
B
Replace the ECM.
- Result:
Proceed to NEXT
NEXT
Connect the GTS to the DLC3.
Turn the ignition switch to ON and turn the GTS on.
Clear the DTCs.
- HINT:
-
Clear the DTCs with the engine stopped, as DTCs cannot be cleared while the engine is running.
Turn the ignition switch off for 30 seconds or more.
Start the engine and warm it up until the engine coolant temperature reaches 80°C (176°F) or higher.
Perform the confirmation driving pattern.
Turn the GTS on.
Enter the following menus: Powertrain / Engine / Trouble Codes.
Confirm that the DTC is not output again.
- Result:
Proceed to NEXT
NEXT
Replace the injector assembly.
Click hereEngine / Hybrid System>N04C-WA (FUEL)>FUEL INJECTOR>REMOVAL
- Result:
Proceed to NEXT
NEXT
Remove the soot in the inlet/outlet of the gas passageway, or repair or replace the faulty part.
- Result:
Proceed to NEXT
NEXT
Remove foreign substances and clean the passageway.
- HINT:
-
Replace the EGR valve if it is damaged.
- Result:
Proceed to NEXT
NEXT
Remove the soot in the inlet/outlet of the gas passageway, or repair or replace the faulty part.
- Result:
Proceed to NEXT
NEXT
Replace the EGR valve assembly.
Click hereEngine / Hybrid System>N04C-WA (EMISSION CONTROL)>EGR VALVE>REMOVAL
- Result:
Proceed to NEXT
NEXT
Replace the intake air temperature sensor (for intake manifold side).
Click hereEngine / Hybrid System>N04C-WA (ENGINE CONTROL)>INTAKE AIR TEMPERATURE SENSOR>REMOVAL
- Result:
Proceed to NEXT
NEXT
Replace or replace the intake air temperature sensor (for intake manifold side).
- HINT:
-
Clean the sensing unit and install it properly.
-
If damaged, replace the intake air temperature sensor (for intake manifold side).
- Result:
Proceed to NEXT
NEXT
Replace the manifold absolute pressure sensor.
- Result:
Proceed to NEXT
NEXT
Repair or replace the manifold absolute pressure sensor.
- HINT:
-
Clean the sensing unit and install it properly.
-
If damaged, replace the manifold absolute pressure sensor.
- Result:
Proceed to NEXT
NEXT
Repair or replace the mass air flow meter.
- HINT:
-
Clean the sensing unit and install it properly.
-
If damaged, replace the mass air flow meter.
- Result:
Proceed to NEXT
NEXT
Clean or replace the air cleaner filter element sub-assembly.
- Result:
Proceed to NEXT
NEXT