A861E AUTOMATIC TRANSMISSION / TRANSAXLE VALVE BODY ASSEMBLY REMOVAL
CAUTION / NOTICE / HINT
- NOTICE:
- ·
Install the automatic transmission assembly on the SST.
·When replacing the transmission valve body assembly or the front oil pump assembly, replacing only one of them may cause a decrease in performance. Therefore, replace both parts together.
PROCEDURE

 35000
1.REMOVE AUTOMATIC TRANSMISSION ASSEMBLY
32000
2.REMOVE TORQUE CONVERTER ASSEMBLY
33161B
3.REMOVE TRANSMISSION POWER TAKE-OFF COVER
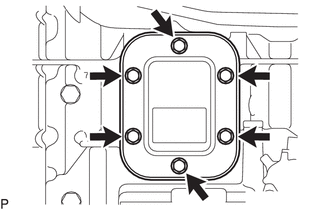
Remove the 6 bolts, transmission power take-off cover and gasket from the automatic transmission assembly.
35106
4.REMOVE AUTOMATIC TRANSMISSION OIL PAN SUB-ASSEMBLY
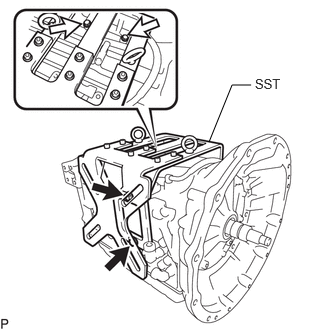

|
Bolt A |

|
Bolt B |
Install the automatic transmission assembly to SST with the 4 bots.
- SST
- 09390-36030
- Torque:
- for bolt A : 48 N*m (489 kgf*cm, 35 ft.*lbf)
- for bolt B : 18 N*m (184 kgf*cm, 13 ft.*lbf)
- HINT:
-
Use the following bots.
Bolt Type Screw Diameter Pitch Under Head Length A 10 mm (0.394 in.) 1.25 mm (0.0492 in.) About 25 mm (0.984 in.) B 8.0 mm (0.315 in.) 1.25 mm (0.0492 in.) About 25 mm (0.984 in.)
Install SST to an engine stand.
Rotate the SST to face the automatic transmission oil pan sub-assembly up.
Remove the automatic transmission oil pan sub-assembly.
Click hereDrivetrain>A861E (AUTOMATIC TRANSMISSION / TRANSAXLE)>OIL PAN GASKET>REPLACEMENT
35168
5.REMOVE AUTOMATIC TRANSMISSION OIL PAN GASKET
35330
6.REMOVE VALVE BODY OIL STRAINER ASSEMBLY
7.REMOVE TRANSMISSION WIRE
35240E
8.REMOVE SHIFT SOLENOID VALVE S1
35240F
9.REMOVE SHIFT SOLENOID VALVE S2
10.REMOVE SHIFT SOLENOID VALVE S3
11.REMOVE SHIFT SOLENOID VALVE S4
83380A
12.REMOVE NO. 1 OIL PRESSURE SWITCH
83380A
13.REMOVE NO. 2 OIL PRESSURE SWITCH
83380A
14.REMOVE NO. 3 OIL PRESSURE SWITCH
83380A
15.REMOVE NO. 6 OIL PRESSURE SWITCH
83380A
16.REMOVE NO. 7 OIL PRESSURE SWITCH
83380A
17.REMOVE NO. 8 OIL PRESSURE SWITCH
18.REMOVE TRANSMISSION VALVE BODY ASSEMBLY
Remove the 19 bolts, transmission valve body assembly and valve body wire harness clamp from the automatic transmission assembly.
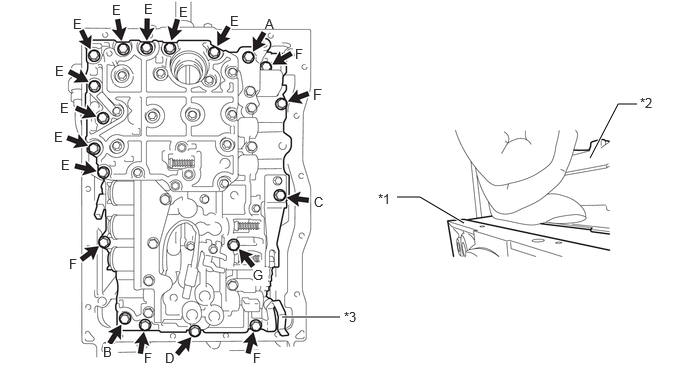
| *1 | Automatic Transmission Assembly | *2 | Transmission Valve Body Assembly |
| *3 | Valve Body Wire Harness Clamp | - | - |
- CAUTION:
-
Perform working with holding the side surfaces with a finger not to trap the finger by the automatic transmission assembly and the transmission valve body assembly.
- HINT:
-
Leave the bolt over at the transmission valve body assembly before replaced to reuse the bolt.
Bolt Type Bolt Shape Under Head Length A Flange Bolt 58 mm (2.28 in.) B Flange Bolt 31.2mm (1.23 in.) C Flange Bolt 43 mm (1.69 in.) D Bolt with Washer 42.5 mm (1.67 in.) E Bolt with Washer 57.2 mm (2.25 in.) F Bolt with Washer 32.2 mm (1.27 in.) G Bolt with Washer 51 mm (2.01 in.)
Remove the 4 valve body gaskets from the automatic transmission assembly.
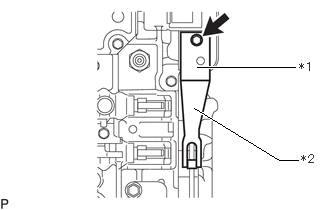
| *1 | Manual Detent Spring Cover |
| *2 | Manual Detent Spring Sub-assembly |
Remove the bolt, washer, manual detent spring cover and manual detent spring sub-assembly from the transmission valve body assembly.
19.REMOVE ACCUMULATOR PISTON AND ACCUMULATOR SPRING SUB-ASSEMBLY
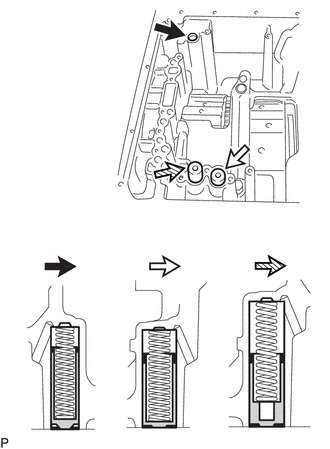
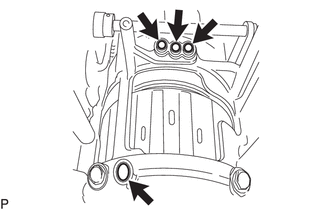
|
|
No. 1 Accumulator Piston and Accumulator Spring Sub-assembly |
|
|
No. 2 Accumulator Piston and Accumulator Spring Sub-assembly |

|
No. 3 Accumulator Piston and Accumulator Spring Sub-assembly |
Remove the No. 1 accumulator piston, No. 2 accumulator piston, No. 3 accumulator piston and 3 accumulator spring sub-assemblies.
- NOTICE:
- ·
The accumulator piston and accumulator spring sub-assembly may fall if the transmission assembly is tilted down.
·There are different types of accumulator pistons and accumulator spring sub-assemblies. Be careful not to mistake the type.
Accumulator Types Spring Color Spring Free Length Accumulator Piston Diameter Accumulator Piston Length No. 1 accumulator piston and accumulator spring sub-assembly Purple 43.27 mm (1.70 in.) 16 mm (0.630 in.) 40.18 mm (1.58 in.) No. 2 accumulator piston and accumulator spring sub-assembly Yellow 50.12 mm (1.97 in.) 20 mm (0.787 in.) 39.18 mm (1.54 in.) No. 3 accumulator piston and accumulator spring sub-assembly Green 68.18 mm (2.68 in.) 20 mm (0.787 in.) 38.18 mm (1.50 in.)
Rotate the SST to face the front oil pump assembly up.
35712A
20.REMOVE INPUT SHAFT OIL SEAL RING
21.REMOVE AUTOMATIC TRANSMISSION HOUSING
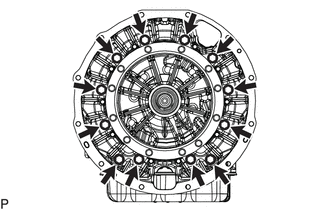
Remove the 12 bolts and automatic transmission housing from the automatic transmission assembly.
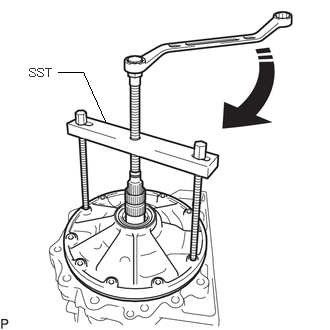
22.REMOVE FRONT OIL PUMP ASSEMBLY
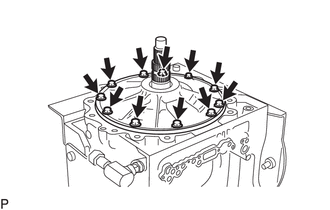
Remove the 11 bolts.

|
Turn |
Using SST, remove the front oil pump assembly from the automatic transmission assembly.
- SST
- 09390-36010
- NOTICE:
- ·
Slowly raise the front oil pump assembly using the SST.
·Install the SST in threaded holes.
·Adjust the bolt with the elongate hole of the SST so that the bolt is vertical because the span length between 2 threaded holes center is different.
- HINT:
-
Remove the sealant from the SST installation screw holes.
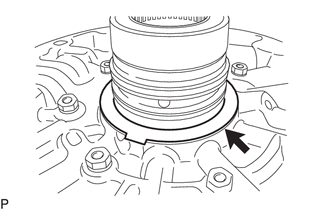
Remove the clutch drum thrust washer from the front oil pump assembly.
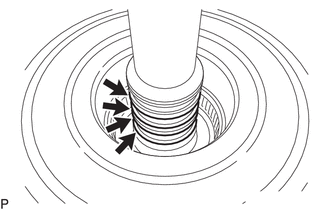
Remove the 4 input shaft oil seal rings from the input shaft.
|
|
Remove |
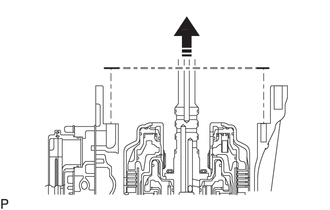
Remove the front oil pump cover gasket from the transmission case.
- NOTICE:
- ·
Thoroughly remove the foreign matter such as front oil pump cover gasket residue on the transmission case.
·Not damage the processed surface of the transmission case.