A861E AUTOMATIC TRANSMISSION / TRANSAXLE AUTOMATIC TRANSMISSION ASSEMBLY REMOVAL
CAUTION / NOTICE / HINT
- CAUTION:
- ·
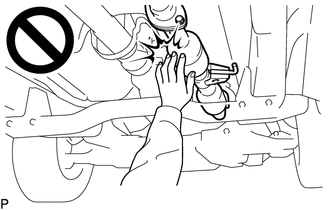
To prevent burns, do not touch the engine, exhaust pipe or other high temperature components while the engine is hot.
·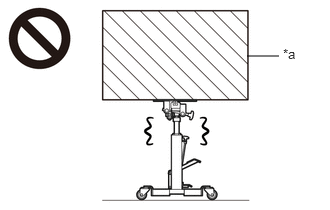 2.573,0.583 2.906,0.583 false 2.948,0.479 3.26,0.677 0.313,0.198 10 false *a
*a Object Exceeding Weight Limit of Transmission Jack
The automatic transmission assembly is very heavy. Be sure to follow the procedure described in the repair manual, or the transmission jack may suddenly drop or a part may fall.
PROCEDURE

 1.DISCONNECT CABLE FROM NEGATIVE BATTERY TERMINAL
58521D
2.REMOVE ENGINE SERVICE HOLE COVER MAT
58420
3.REMOVE NO. 2 ENGINE SERVICE HOLE COVER ASSEMBLY
58410
4.REMOVE ENGINE SERVICE HOLE COVER
58734B
5.REMOVE REAR ENGINE SERVICE COVER WEATHERSTRIP
6.DRAIN AUTOMATIC TRANSMISSION FLUID
51441D
7.REMOVE NO. 1 ENGINE UNDER COVER
37140
8.REMOVE PROPELLER SHAFT ASSEMBLY
9.REMOVE FRONT EXHAUST PIPE ASSEMBLY
46501
10.REMOVE PARKING BRAKE DRUM SUB-ASSEMBLY
46243
11.REMOVE PARKING BRAKE LEVER COVER
46241
12.REMOVE PARKING BRAKE LEVER BOOT
46503C
13.DISCONNECT PARKING BRAKE PLATE SUB-ASSEMBLY
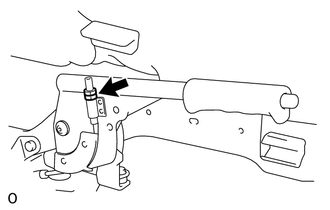
Loosen the adjusting nut from the parking brake cable.
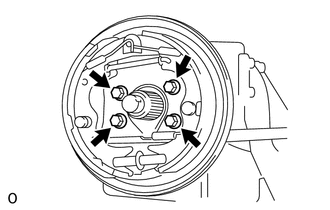
Remove the 4 bolts and disconnect the parking brake assembly from the extension housing.
- HINT:
-
Hang the parking brake assembly on the vehicle with a piece of rope.
32922
14.REMOVE NO. 1 OIL COOLER OUTLET TUBE
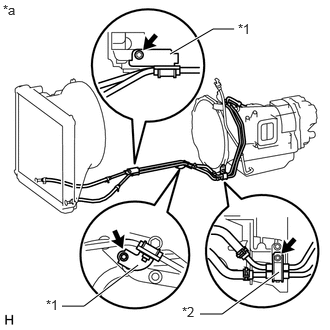
| *1 | Oil Cooler Tube Clamp |
| *2 | No. 3 Oil Cooler Tube Clamp |
| *a | Left Side of Vehicle |
Remove the 3 bolts, 2 oil cooler tube clamps and No. 3 oil cooler tube clamp from the automatic transmission assembly.
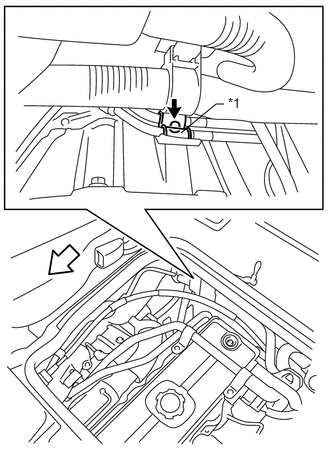
| *1 | No. 2 Oil Cooler Tube Clamp |

|
Front of the Vehicle |
Remove the bolt and No. 2 oil cooler tube clamp from the automatic transmission assembly.
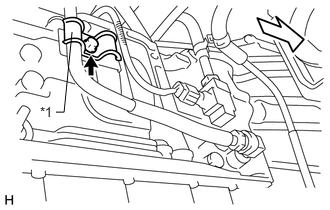
| *1 | No. 2 Oil Cooler Tube Clamp |
|
|
Front of the Vehicle |
Remove the bolt and No. 2 oil cooler tube clamp from the oil cooler tube clamp.
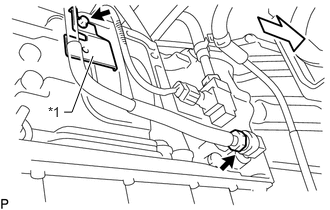
| *1 | Oil Cooler Tube Clamp |
|
|
Front of the Vehicle |
Disconnect the No. 1 oil cooler outlet tube from the automatic transmission assembly.
- HINT:
-
Use a container to catch any ATF which flows out of the oil cooler tube and automatic transmission assembly.
Remove the bolt and oil cooler tube clamp from the automatic transmission assembly.
32921
15.REMOVE NO. 1 OIL COOLER INLET TUBE
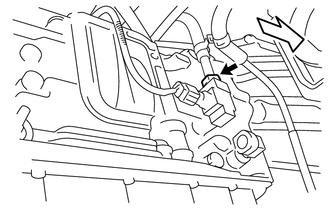
|
|
Front of the Vehicle |
Disconnect the No. 1 oil cooler inlet tube from the automatic transmission assembly.
- HINT:
-
Use a container to catch any ATF which flows out of the oil cooler tube and automatic transmission assembly.
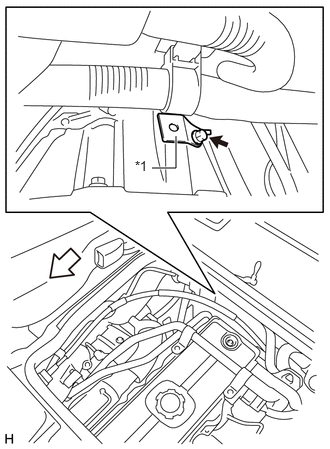
| *1 | Oil Cooler Tube Clamp |
|
|
Front of the Vehicle |
Remove the bolt and oil cooler tube clamp from the automatic transmission assembly.
16.REMOVE OIL COOLER HOSE
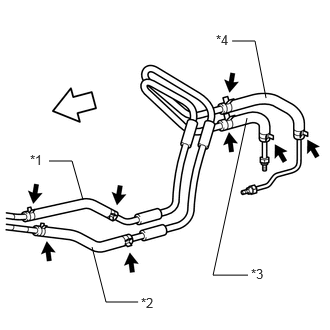
| *1 | No. 1 Oil Cooler Inlet Hose |
| *2 | No. 1 Oil Cooler Outlet Hose |
| *3 | No. 2 Oil Cooler Inlet Hose |
| *4 | No. 2 Oil Cooler Outlet Hose |
|
|
Front of the Vehicle |
Slide the 8 clips and remove the oil cooler hoses.
33820B
17.DISCONNECT TRANSMISSION CONTROL CABLE ASSEMBLY
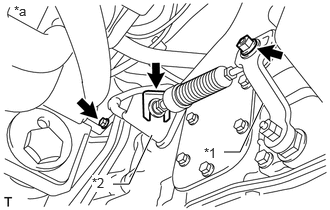
| *1 | Transmission Control Shaft Lever LH |
| *2 | Transmission Control Cable Bracket |
| *a | Left Side of Vehicle |
Remove the nut and washer, and then disconnect the transmission control cable assembly from the transmission control shaft lever LH.
Remove the clip and disconnect the transmission control cable assembly from the transmission control cable bracket.
Remove the bolt and disconnect the transmission control cable assembly.
35013
18.REMOVE TRANSMISSION OIL FILLER TUBE SUB-ASSEMBLY
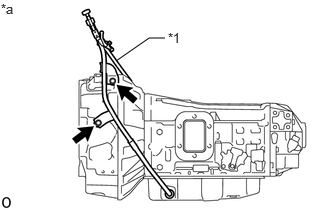
| *1 | Breather Hose |
| *a | Left Side of Vehicle |
Remove the transmission oil level dipstick sub-assembly from the transmission oil filler tube sub-assembly.
Disconnect the breather hose from the transmission oil filler tube sub-assembly.
Remove the 2 bolts and transmission oil filler tube sub-assembly from the automatic transmission assembly.
Remove the O-ring from the transmission oil filler tube sub-assembly.
19.DISCONNECT CONNECTORS
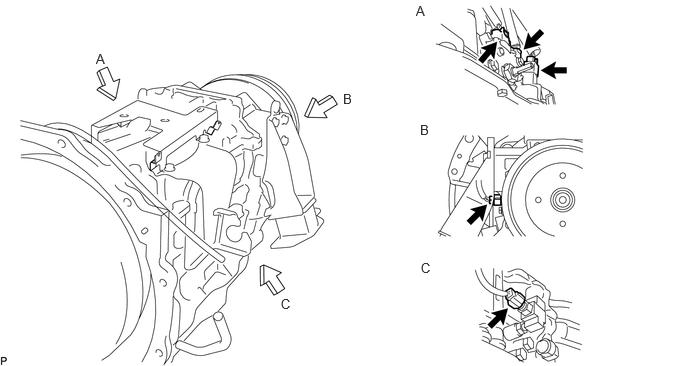
Disconnect the park/neutral position switch assembly connector and 2 transmission wire connectors from the automatic transmission assembly. (A)
Disconnect the transmission revolution sensor connector from the automatic transmission assembly. (B)
Disconnect the temperature sensor connector from the automatic transmission assembly. (C)
20.REMOVE WIRE HARNESS CLAMP BRACKET
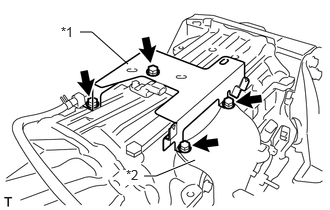
| *1 | Wire Harness Clamp Bracket |
| *2 | No. 1 Transmission Control Cable Bracket |
Remove the 4 bolts, wire harness clamp bracket and No. 1 transmission control cable bracket from the automatic transmission assembly.
35019
21.REMOVE TRANSMISSION CASE DUST COVER SUB-ASSEMBLY
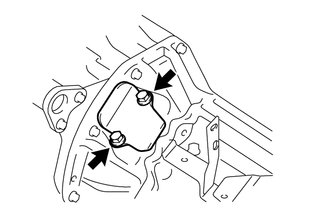
Remove the 2 bolts and transmission case dust cover sub-assembly from the automatic transmission assembly.
32101A
22.REMOVE DRIVE PLATE AND TORQUE CONVERTER SETTING BOLT
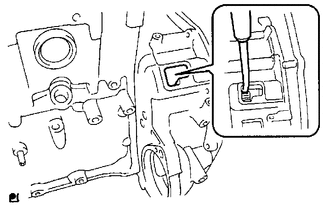
Insert a screwdriver into the ring gear of the flywheel sub-assembly from the flywheel housing check hole and hold the crankshaft.
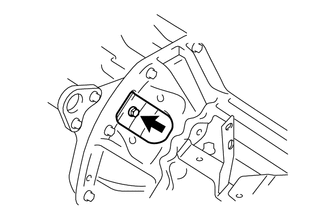
Remove the 6 drive plate and torque converter setting bolts and separate the torque converter assembly from the drive plate.
- HINT:
- ·
Remove the drive plate and torque converter setting bolt from the transmission case dust cover hole.
·Rotate the drive plate from the flywheel housing check hole.
23.SUPPORT ENGINE ASSEMBLY
Place wooden blocks, support the engine assembly with an engine jack.
- NOTICE:
-
To prevent the oil pan sub-assembly from deforming, do not place any attachments under the oil pan sub-assembly of the engine assembly.
24.SUPPORT AUTOMATIC TRANSMISSION ASSEMBLY
Support the automatic transmission assembly with a transmission jack.
- NOTICE:
- ·
In order to protect the automatic transmission oil pan sub-assembly, place attachments on the transmission jack.
·Make sure that the attachments and the automatic transmission oil pan sub-assembly are centered on the transmission jack.
·To prevent the automatic transmission oil pan sub-assembly from deforming, do not place any attachments under the automatic transmission oil pan sub-assembly of the automatic transmission assembly.
·Secure the automatic transmission assembly to the transmission jack using a belt, etc. to prevent it from falling.
51204
25.REMOVE NO. 3 FRAME CROSSMEMBER SUB-ASSEMBLY
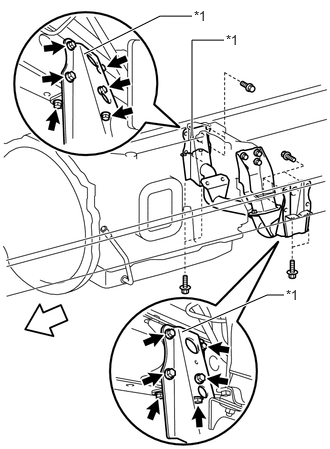
| *1 | No. 3 Frame Crossmember Sub-assembly |
|
|
Front of the Vehicle |
Remove the 12 bolts and disconnect the No. 3 frame crossmember sub-assembly from the frame.
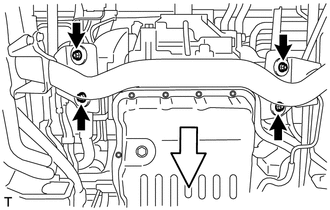
|
|
Front of the Vehicle |
Remove the 4 nuts, 4 washers and No. 3 frame crossmember sub-assembly from the 2 rear engine mounting insulators.
35000
26.REMOVE AUTOMATIC TRANSMISSION ASSEMBLY
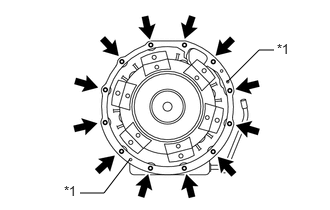
| *1 | Knock Pin |
Remove the 12 bolts and automatic transmission assembly.
- NOTICE:
- ·
Do not drop the torque converter assembly.
·Do not damage the flywheel housing.
·To prevent damage to the 2 knock pins, do not pry between the automatic transmission assembly and engine assembly.
12325C
27.REMOVE REAR ENGINE MOUNTING BRACKET LH
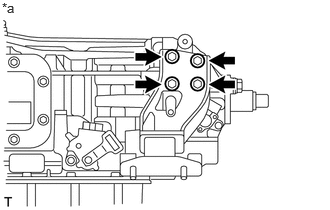
| *a | Left Side of Vehicle |
Remove the 4 bolts and rear engine mounting bracket LH from the automatic transmission assembly.
12321F
28.REMOVE REAR ENGINE MOUNTING BRACKET RH
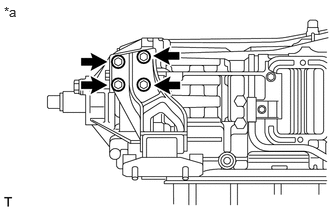
| *a | Right Side of Vehicle |
Remove the 4 bolts and rear engine mounting bracket RH from the automatic transmission assembly.
12371A
29.REMOVE REAR ENGINE MOUNTING INSULATOR
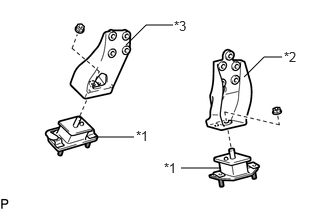
| *1 | Rear Engine Mounting Insulator |
| *2 | Rear Engine Mounting Bracket LH |
| *3 | Rear Engine Mounting Bracket RH |
Remove the 2 nuts and 2 rear engine mounting insulators from the rear engine mounting bracket LH and rear engine mounting bracket RH.
32000
30.REMOVE TORQUE CONVERTER ASSEMBLY
Remove the torque converter assembly from the automatic transmission assembly.
32000
31.INSPECT TORQUE CONVERTER ASSEMBLY AND DRIVE PLATE
35712A
32.REMOVE INPUT SHAFT OIL SEAL RING
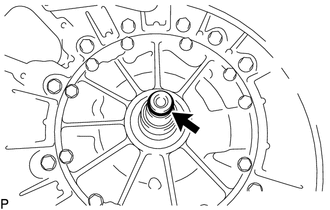
Remove the input shaft oil seal ring from the input shaft sub-assembly.
35301A
33.REMOVE FRONT OIL PUMP OIL SEAL
Using a knife, cut off the lip of the front oil pump oil seal.
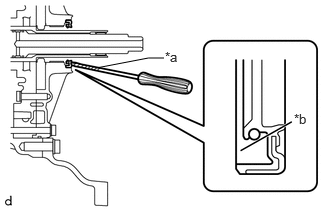
| *a | Protective Tape |
| *b | Cut Position |
Using a screwdriver with its tip wrapped with protective tape, remove the front oil pump oil seal from the front oil pump assembly.
- NOTICE:
-
Do not damage the front oil pump assembly.