SUPPLEMENTAL RESTRAINT SYSTEMS FRONT AIRBAG SENSOR INSTALLATION
PROCEDURE

 89173
1.INSTALL FRONT AIRBAG SENSOR
Check that the ignition switch is off.
Check that the cable is disconnected from the negative (-) battery terminal.
- NOTICE:
-
Wait at least 90 seconds after disconnecting the cable from the negative (-) battery terminal to disable the SRS system.
Attach the guide and temporarily install the front airbag sensor with the bolt.
Tighten the bolt.
- Torque:
9.0N*m{ 92kgf*cm , 80in.*lbf }
- NOTICE:
- ·
If the front airbag sensor has been dropped, or there are any cracks, dents or other defects in the case or connector, replace it with a new one.
·When installing the front airbag sensor, be careful that the SRS wiring does not interfere with or is not pinched between other parts.
·Make sure that the guide is securely inserted into the body hole.
·Tighten the bolt while holding the front airbag sensor because the front airbag sensor guide is easily damaged.
Connect the airbag connector.
- NOTICE:
-
When connecting any airbag connector, take care not to damage the airbag wire harness.
Before connecting the connector, check that the position of the housing lock is correct as shown in the illustration.
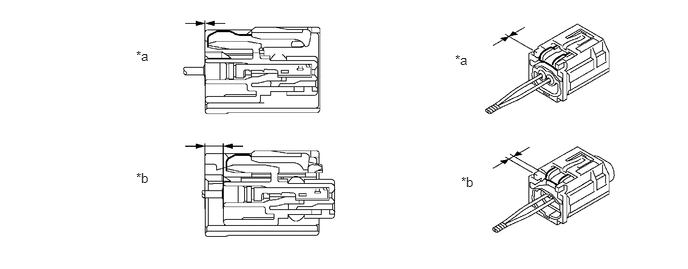
| *a | Incorrect | *b | Correct |
While holding the CPA be sure to engage the connectors until they are locked and check that the CPA is in its original position (when locking, make sure that a click sound can be heard).
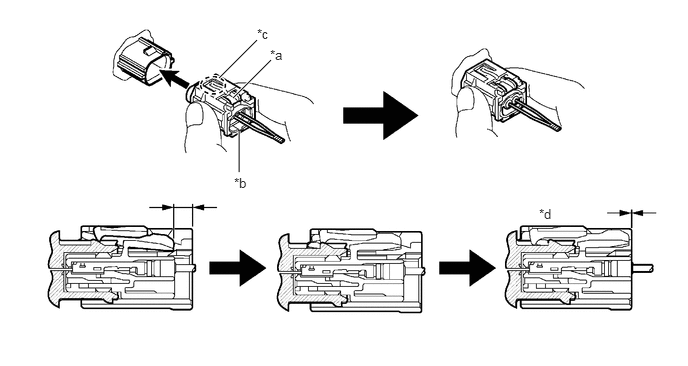
| *a | Housing Lock | *b | CPA |
| *c | CPA Upper Part | *d | Connection is Completed |
- NOTICE:
-
Do not push down the upper part of the CPA shown in the illustration when connecting the airbag connector.
Check that there is no looseness in the installation parts of the front airbag sensor.
55601C
2.INSTALL INSTRUMENT PANEL UNDER TRAY SUB-ASSEMBLY
55470
3.INSTALL INSTRUMENT CLUSTER FINISH PANEL GARNISH ASSEMBLY
55412D
4.INSTALL CENTER INSTRUMENT CLUSTER FINISH PANEL
55433B
5.INSTALL LOWER NO. 2 INSTRUMENT PANEL FINISH PANEL
58123A
6.INSTALL SHIFT LEVER HOLE COVER (for Manual Transmission)
33555D
7.INSTALL SHIFT LEVER BOOT (for Manual Transmission)
58534A
8.INSTALL TRANSMISSION COVER MAT (for Manual Transmission)
33504F
9.INSTALL SHIFT LEVER KNOB SUB-ASSEMBLY (for Manual Transmission)
58841A
10.INSTALL SHIFTING HOLE COVER (for Automatic Transmission)
11.CONNECT CABLE TO NEGATIVE BATTERY TERMINAL
- NOTICE:
-
When disconnecting the cable, some systems need to be initialized after the cable is reconnected.
-
Click hereGeneral>INTRODUCTION>REPAIR INSTRUCTION>INITIALIZATION
12. PERFORM DIAGNOSTIC SYSTEM CHECK
for 2 Connectors Type:
for 3 Connectors Type:
13. CHECK SRS WARNING LIGHT
for 2 Connectors Type:
for 3 Connectors Type: