AUDIO / VIDEO FRONT SIDE SPEAKER INSTALLATION
CAUTION / NOTICE / HINT
- HINT:
- ·
Use the same procedures for the RH side and LH side.
·The procedures listed below are for the LH side.
PROCEDURE

 86160
1.INSTALL FRONT NO. 1 SPEAKER ASSEMBLY
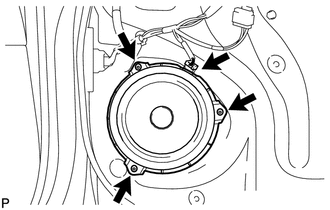
Using an air riveter or hand riveter, install the speaker with 3 new rivets.
- NOTICE:
- ·
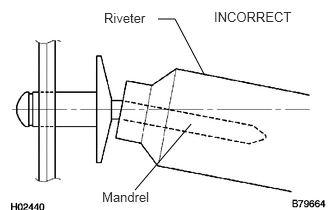 1.406,1.979 1.99,1.292 false 2.125,0.771 1.823,0.198 1.823,0.198 1.646,0.198 false 2.229,0.094 3.094,0.271 0.865,0.177 10 false INCORRECT 1.083,0.104 1.604,0.281 0.521,0.177 10 false Riveter 1.063,1.969 1.635,2.125 0.573,0.156 10 false Mandrel
Do not pry the rivet with the riveter, as this will cause damage to the riveter and mandrel.
·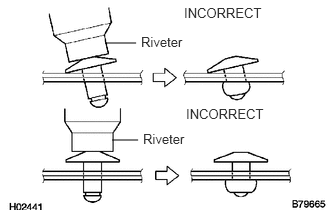 1.094,0.448 1.417,0.448 false 1.167,1.458 1.438,1.458 false 1.917,0.052 2.802,0.229 0.885,0.177 10 false INCORRECT 1.469,0.354 1.948,0.521 0.479,0.167 10 false Riveter 1.938,1.104 2.823,1.281 0.885,0.177 10 false INCORRECT 1.49,1.365 1.969,1.531 0.479,0.167 10 false Riveter
Confirm that the rivets are seated properly against the speaker. Do not tilt the riveter when installing the rivet to the speaker. Do not leave any space between the rivet head and speaker.
·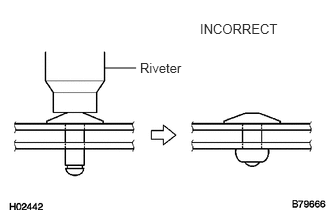 1.083,0.708 1.417,0.708 false 1.458,0.625 1.917,0.792 0.458,0.167 10 false Riveter 2.083,0.219 2.979,0.365 0.896,0.146 10 false INCORRECT
Do not leave any space between the speaker and door. Firmly hold together the 2 items while installing the rivet.
Connect the connector.
67602
2.INSTALL FRONT DOOR TRIM BOARD SUB-ASSEMBLY LH
74232
3.INSTALL FRONT ARMREST BASE PANEL UPPER LH
69278B
4.INSTALL FRONT DOOR INSIDE HANDLE BEZEL LH
67492A
5.INSTALL FRONT DOOR LOWER FRAME BRACKET GARNISH LH
6.CONNECT CABLE TO NEGATIVE BATTERY TERMINAL
7.PERFORM INITIALIZATION
Perform initialization (see page General>INTRODUCTION>REPAIR INSTRUCTION>INITIALIZATION).
- NOTICE:
-
Certain systems need to be initialized after disconnecting and reconnecting the cable from the negative (-) battery terminal.