SEAT REAR NO. 1 SEAT ASSEMBLY(for Captain Seat Type) REASSEMBLY
PROCEDURE

 1.INSTALL REAR SEAT TRACK CONTROL CABLE
Connect the cable ends as shown in the illustration and temporarily install the 3 seat track control cable assemblies, reclining adjusting cable assembly RH and legrest lock control cable assembly.
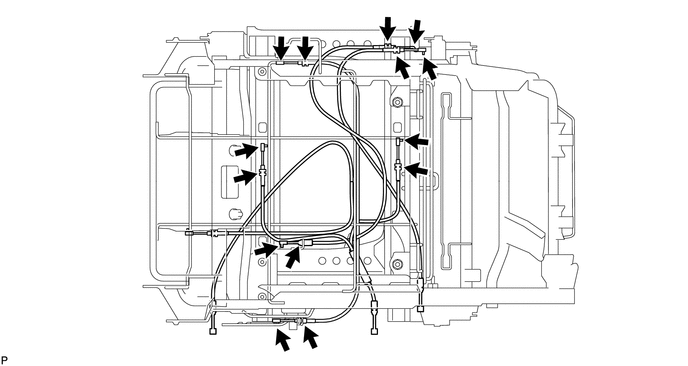
Install the 3 seat track control cable assemblies, reclining adjusting cable assembly RH and legrest lock control cable assembly with the 4 clamps.
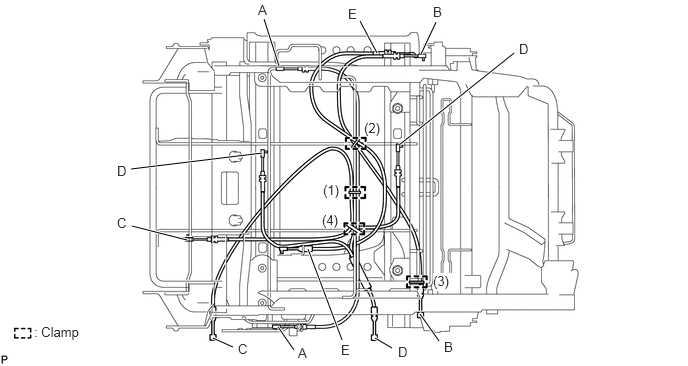
- HINT:
-
The installation position of each clamp in relation to the cables is as shown in the table below.
Cable Component Function Clamping Position Tape Color Detail A SEAT TRACK CONTROL CABLE ASSEMBLY for longitudinal slide function (1) Pink Clamp used to install cable A and cable C to the seat (2) Clamp used to install cable A, cable B and cable E to the seat spring (4) Clamp used to install cable A, cable C and cable D to the seat spring B RECLINING ADJUSTING CABLE ASSEMBLY LH for recline function (2) Blue Clamp used to install cable A, cable B and cable E to the seat spring (3) Identification tape not applied Clamp used to install cable B to the rear side seat pipe C LEGREST LOCK CONTROL CABLE ASSEMBLY for ottoman function (1) Pink Clamp used to install cable A and cable C to the seat D SEAT TRACK CONTROL CABLE ASSEMBLY for lateral slide function (4) Blue Clamp used to install cable A, cable C and cable D to the seat spring E SEAT TRACK CONTROL CABLE ASSEMBLY for walk-in function (2) Blue Clamp used to install cable A, cable B and cable E to the seat spring
71499B
2.INSTALL SEAT CUSHION SPRING DAMPER
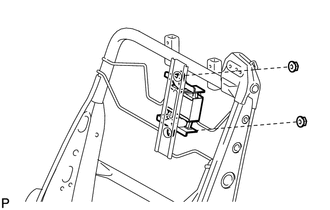
Install the seat cushion spring damper with the 2 nuts.
- Torque:
- 19 N*m (194 kgf*cm, 14 ft.*lbf)
71512S
3.INSTALL NO. 1 SEAT CUSHION PAD LH
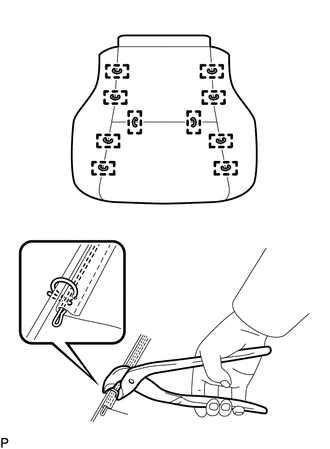
for Type A:
Using hog ring pliers, install the No. 1 seat cushion cover assembly LH to the No. 1 seat cushion pad LH with 10 new hog rings.
- NOTICE:
- ·
Be careful not to damage the No. 1 seat cushion cover assembly LH.
·Be sure to securely install the hog rings as shown in the illustration while preventing wrinkles from forming on the No. 1 seat cushion cover assembly LH.
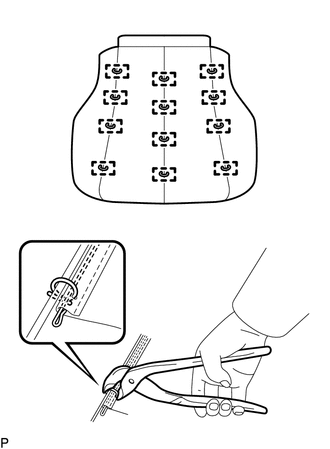
for Type B:
Using hog ring pliers, install the No. 1 seat cushion cover assembly LH to the No. 1 seat cushion pad LH with 12 new hog rings.
- NOTICE:
- ·
Be careful not to damage the No. 1 seat cushion cover assembly LH.
·Be sure to securely install the hog rings as shown in the illustration while preventing wrinkles from forming on the No. 1 seat cushion cover assembly LH.
79012
4.INSTALL NO. 1 SEAT CUSHION COVER ASSEMBLY LH
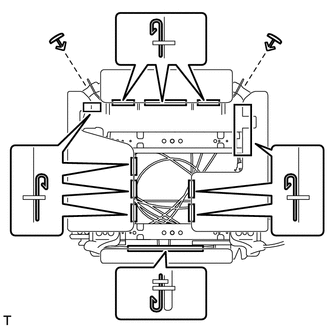
Install the seat cushion cover assembly to the seat cushion frame assembly with the hooks and 2 clips.
- NOTICE:
-
Be careful not to damage the cover.
76974E
5.INSTALL REAR UNDER COVER
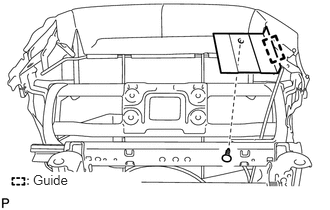
Engage the guide.
Install the rear under cover with the clip.
79959B
6.INSTALL REAR SEAT LEG COVER LH
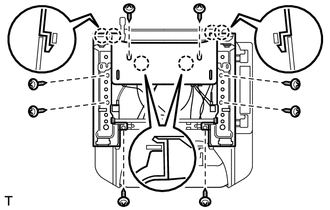
Attach the 2 claws to install the rear seat leg cover.
Install the 2 screws.
Attach the 2 claws to install the rear No. 5 seat leg side cover.
Install the 3 screws.
Attach the 3 claws to install the rear No. 6 seat leg side cover.
Install the 3 screws.
73380C
7.INSTALL REAR NO. 1 SEAT INNER BELT ASSEMBLY
71875A
8.INSTALL RECLINING ADJUSTER INSIDE COVER RH
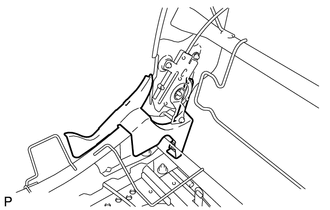
Install the reclining adjuster inside cover RH.
72553A
9.INSTALL RECLINING COVER PROTECTOR RH
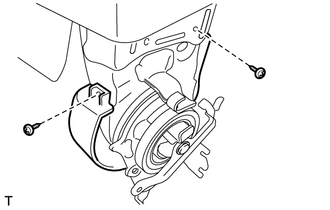
Install the reclining cover protector with the 2 screws.
72554A
10.INSTALL RECLINING COVER PROTECTOR LH
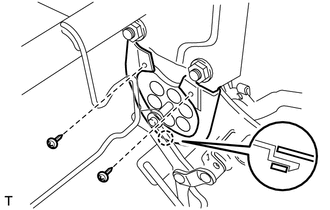
Attach the claw to install the reclining cover protector.
Install the 2 screws.
71876C
11.INSTALL RECLINING ADJUSTER INSIDE COVER LH
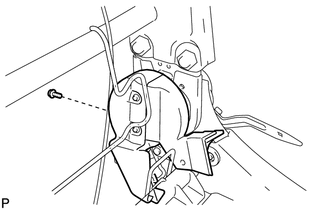
for Inner:
Install the reclining adjuster inside cover with the screw.
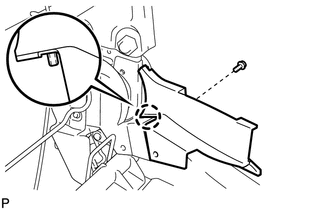
for Outer:
Attach the claw to install the reclining adjuster inside cover with the screw.
73320A
12.INSTALL NO. 1 SEAT 3 POINT TYPE BELT ASSEMBLY LH
71695A
13.INSTALL REAR SEAT PROTECTOR NO. 1
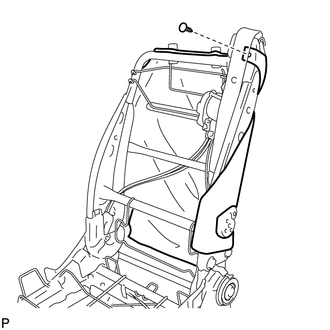
Install the seat protector with the clip.
79014
14.INSTALL NO. 1 SEATBACK COVER ASSEMBLY LH
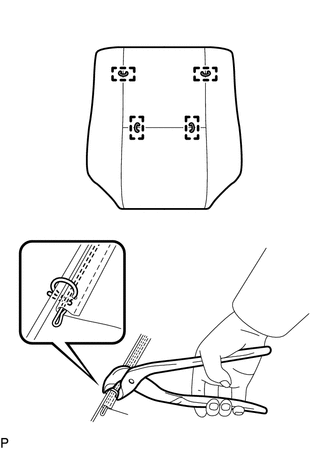
for Type A:
Using hog ring pliers, install the No. 1 seatback cover assembly LH to the No. 1 seatback pad LH with 4 new hog rings.
- NOTICE:
- ·
Be careful not to damage the No. 1 seatback cover assembly LH.
·Be sure to securely install the hog rings as shown in the illustration while preventing wrinkles from forming on the No. 1 seatback cover assembly LH.
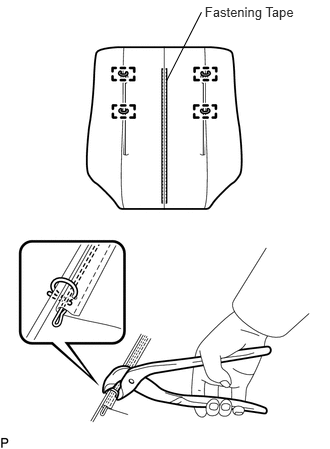
for Type B:
Engage the fastening tape.
Using hog ring pliers, install the No. 1 seatback cover assembly LH to the No. 1 seatback pad LH with 4 new hog rings.
- NOTICE:
- ·
Be careful not to damage the No. 1 seatback cover assembly LH.
·Be sure to securely install the hog rings as shown in the illustration while preventing wrinkles from forming on the No. 1 seatback cover assembly LH.
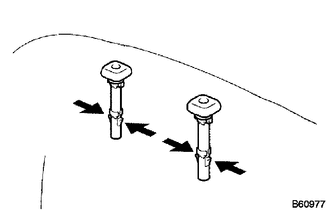
Attach the 4 claws to install the 2 headrest supports.
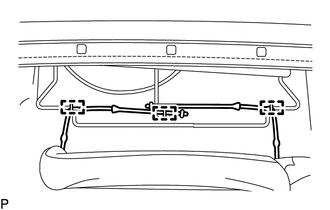
Engage the fastening rubbers with 3 new hog rings as shown in the illustration.
- NOTICE:
- ·
Be careful not to damage the No. 1 seatback cover assembly LH.
·Be sure to securely install the hog rings as shown in the illustration while preventing wrinkles from forming on the No. 1 seatback cover assembly LH.
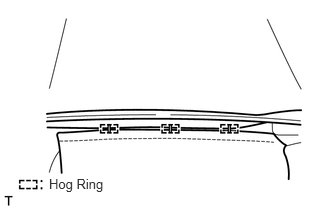
Using hog ring pliers, install 3 new hog rings on the lower part of the No. 1 seatback cover assembly LH.
- NOTICE:
- ·
Be careful not to damage the No. 1 seatback cover assembly LH.
·Be sure to securely install the hog rings as shown in the illustration while preventing wrinkles from forming on the No. 1 seatback cover assembly LH.
72667
15.INSTALL REAR SEATBACK LOCK BEZEL UPPER
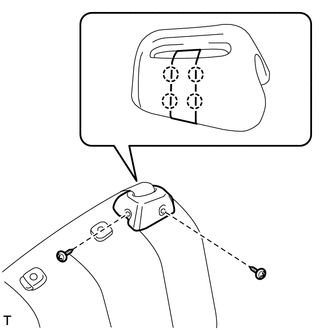
Install the rear seatback lock bezel upper.
Install the 2 screws.
Attach the 4 claws to install the seat belt hole cover.
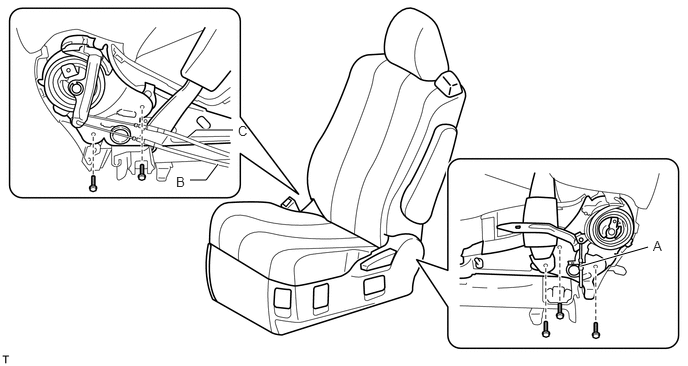
16.INSTALL REAR NO. 1 SEATBACK ASSEMBLY LH
for RH Side:
Install the seatback assembly with the 2 bolts.
- Torque:
- 55 N*m (561 kgf*cm, 41 ft.*lbf)
Connect cables B and C.
for LH Side:
Using a (T55) "TORX" socket wrench, install the 2 bolts.
- Torque:
- 55 N*m (561 kgf*cm, 41 ft.*lbf)
Install the seat belt anchor with the bolt.
- Torque:
- 42 N*m (428 kgf*cm, 31 ft.*lbf)
Connect cable A.
72830J
17.INSTALL REAR NO. 1 SEAT ARMREST ASSEMBLY RH
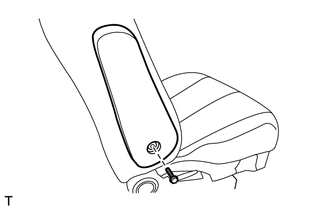
Install the rear No. 1 seat armrest assembly RH with the bolt.
- Torque:
- 19 N*m (194 kgf*cm, 14 ft.*lbf)
71877B
18.INSTALL REAR SEAT ARMREST HOLE COVER RH
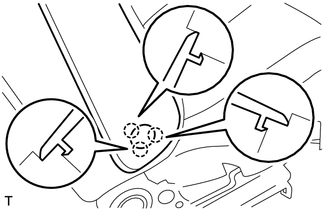
Attach the 3 claws to install the armrest hole cover.
72840
19.INSTALL REAR NO. 1 SEAT ARMREST ASSEMBLY LH
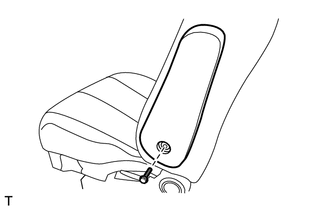
Install the rear No. 1 seat armrest assembly LH with the bolt.
- Torque:
- 19 N*m (194 kgf*cm, 14 ft.*lbf)
71877C
20.INSTALL REAR SEAT ARMREST HOLE COVER LH
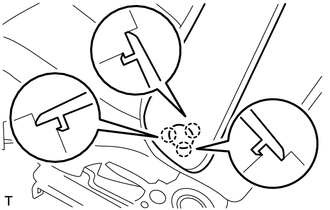
Attach the 3 claws to install the armrest hole cover.
21.INSTALL REAR SEAT LEG REST ASSEMBLY LH
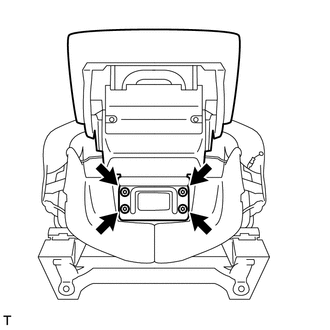
Install the leg rest with the 4 bolts.
- Torque:
- 32 N*m (327 kgf*cm, 24 ft.*lbf)
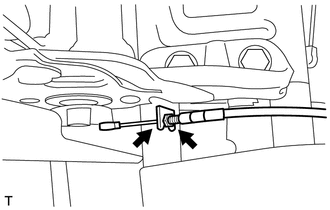
Connect the cable and tighten the 2 nuts.
71834B
22.INSTALL NO. 2 REAR SEAT RECLINING COVER LH
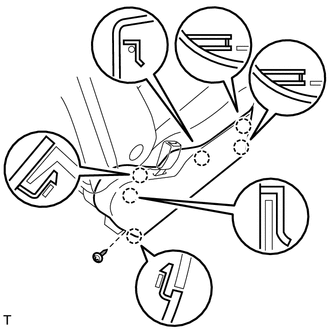
Attach the 6 claws to install the reclining cover.
Install the screw.
71834A
23.INSTALL NO. 1 REAR SEAT RECLINING COVER LH
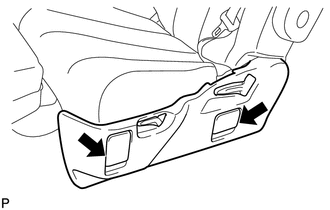
Connect the 2 cables.
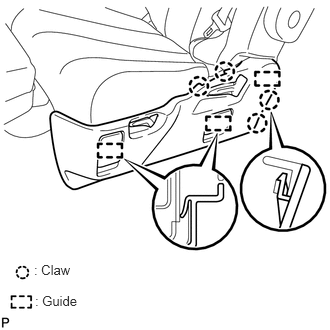
Engage the 3 guides and 4 claws.
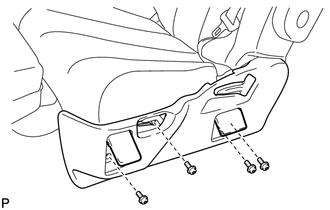
Install the No. 1 rear seat reclining cover LH with the 4 screws.
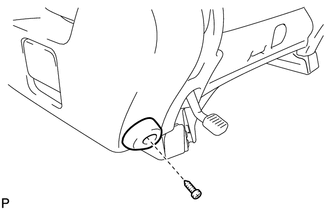
Install the rear seat cushion with the screw.
71876D
24.INSTALL RECLINING ADJUSTER OUTSIDE COVER LH
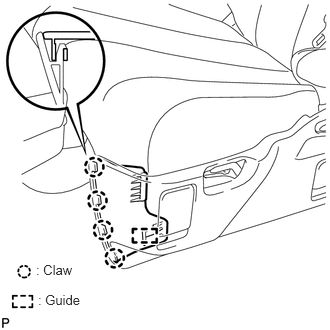
Engage the guide.
Engage the 4 claws to install the reclining adjuster outside cover LH.
72526B
25.INSTALL NO. 1 RECLINING ADJUSTER RELEASE HANDLE LH
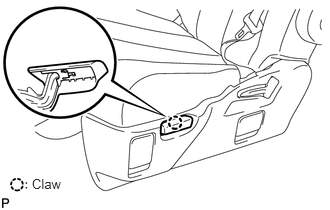
Engage the claw to install the No. 1 reclining adjuster release handle LH.
72526C
26.INSTALL NO. 2 RECLINING ADJUSTER RELEASE HANDLE LH
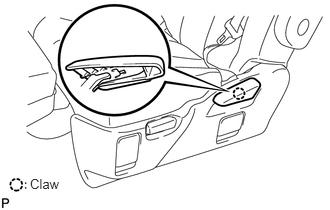
Engage the claw to install the No. 2 reclining adjuster release handle LH.